Related Tags
26 essential mods for Jazzmasters, Jaguars and other offset guitars
Here are our essential tips for squeezing every last drop of performance out of your Jazzmaster, Jaguar or other offset guitar – covering everything from new bridges and pickups to vibrato fixes and supercharged electronics…
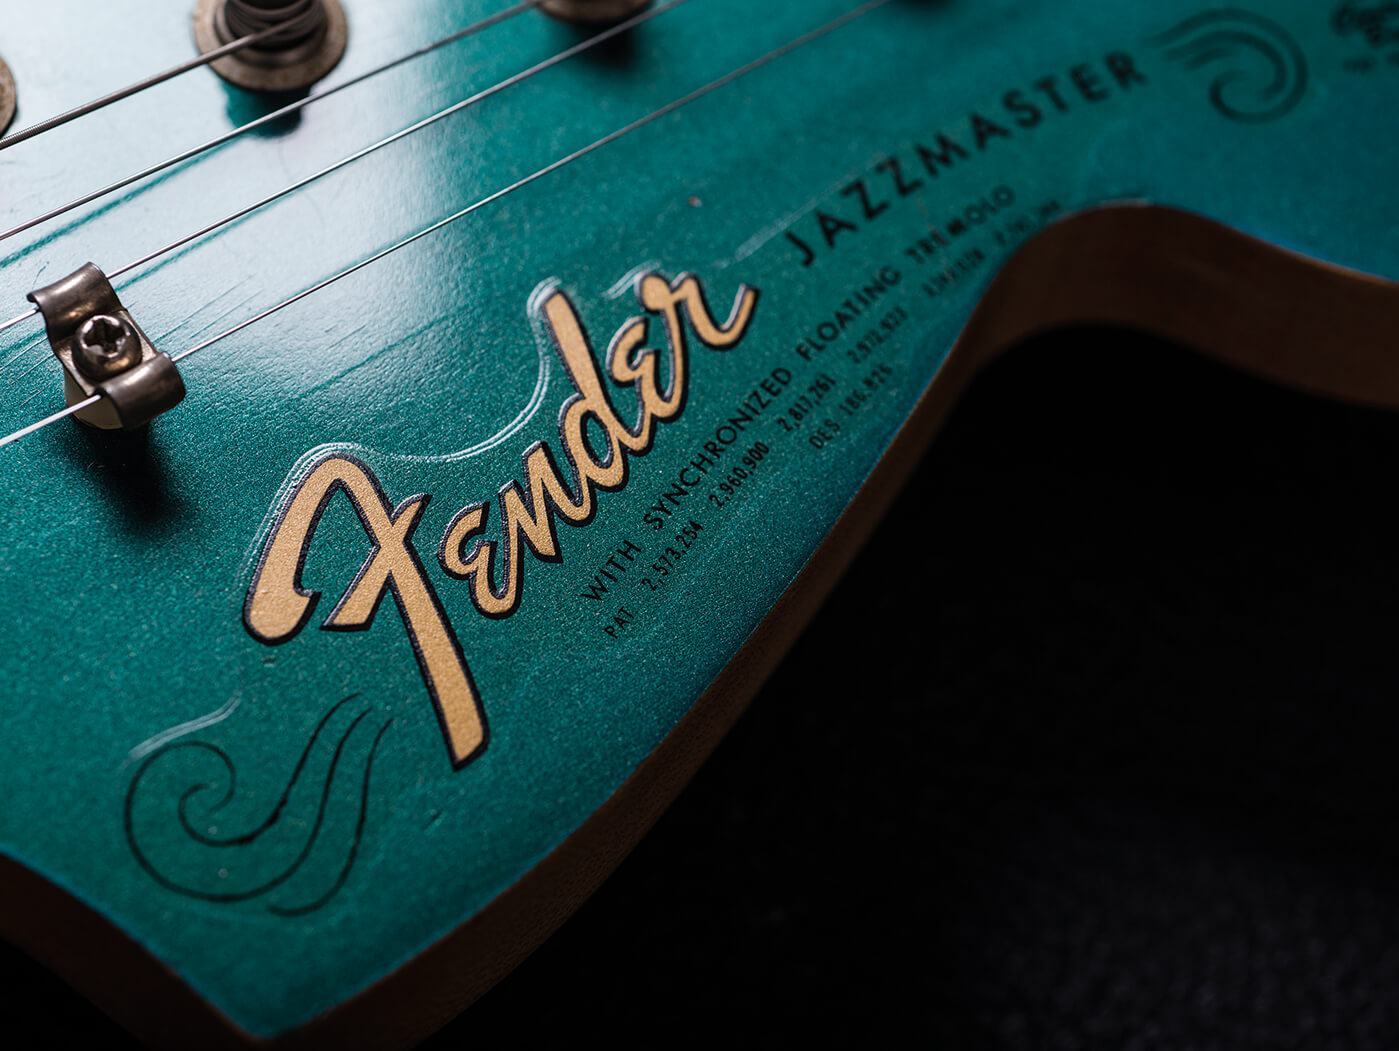
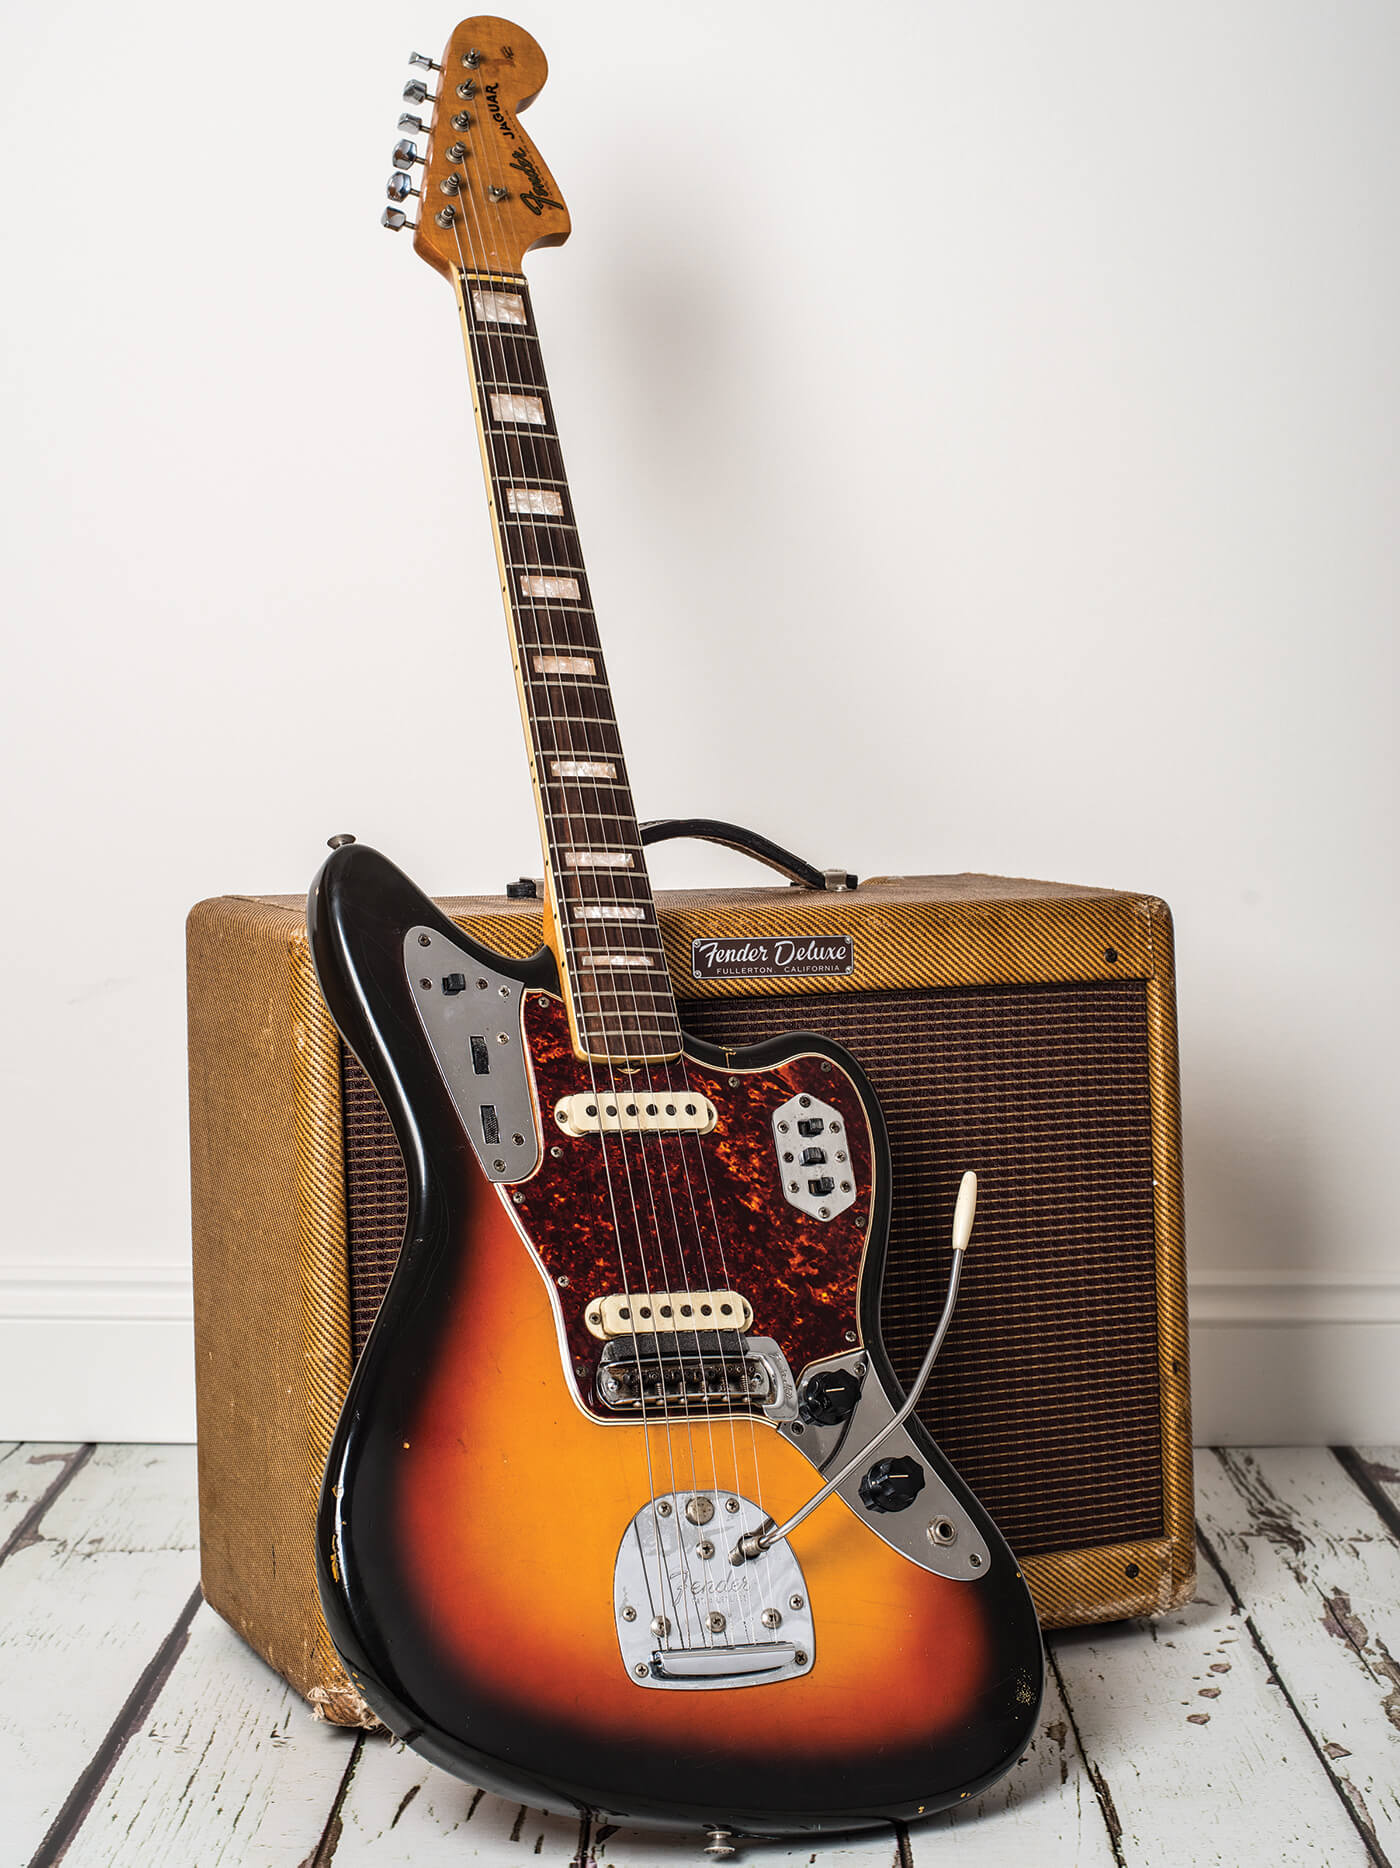
Jazzmasters and Jaguars – and the many similar guitars they inspired – are tailor-made for modding. Not only do the players who gravitate toward them tend to be experimental types, the guitars’ design begs for personalisation. Everything from hardware replacement to retrofitting non-standard pickups is par for the course in the world of offsets.
Here, we share some of our favourite alterations for these two great Fender instruments. Treat this article as a primer for your own ideas. And trust us, there are many more where these came from.
The basics
Strings
Given that Leo Fender originally meant for these guitars to be used with the heavy-gauge flatwound strings of the day, installing a set of 0.011-0.048 or above will vastly improve the feel and response of your floating-bridge instrument. Tuning will be more stable, the vibrato will feel smoother, and the tone will rise like proving dough. It’s also a good idea to solder the finish wraps of your plain strings for extra durability in the event that they come into contact with the pivot-plate screws directly beneath them.
Nut
A properly cut nut is the first line of defence against pesky tuning problems. Even on most brand-new guitars, factory-stock nuts aren’t necessarily slotted and seated properly. Have a luthier cut and shape a fresh one specifically for your instrument and string gauge, and you’ll find that your guitar sounds and stays in tune better.
We recommend unbleached bone, brought to a high polish, for its hardness and beauty, but Tusq will suffice for those with a vegan lifestyle.
Neck pitch
If you’ve ever looked at a Jazzmaster from the side, you’ll see a solidbody guitar with the string geometry of an archtop; the strings flow from tailpiece to floating bridge, and then down an angled neck that rises off the body to meet them. Increasing the angle of the neck in relation to the body is the best way to get your guitar playing and feeling solid.
Fender accomplished this by using thin shims in the neck pocket, although a thin business card laid flat at the pickguard side of the neck pocket works just as well. Otherwise, full-size shims are available from guitar-part providers such as StewMac.
When you’re happy with the amount of lift you’ve achieved, you can raise the bridge and pickups to compensate. With just a bit of maintenance, you can keep your stock bridge and stop worrying about skipping strings and poor intonation.
Floppy vibrato-arm fix
We call this the ‘Hammer Trick’. A drop-in vibrato arm that won’t stay put is a symptom of a poor fit between the arm and its collet. To remedy this, you’ll need a vice and a hammer. Place the arm in the vice with about an inch of the inserted end poking out, then give it a good whack with a hammer. This will slightly bend the end of the arm, forcing contact with the sides of the collet. If it’s still loose, perform the maneuver again; if it’s too tight, turn the arm around in the vice and smack it from the other side.
NOTE: This will only work with US-made instruments with the push-in arm.
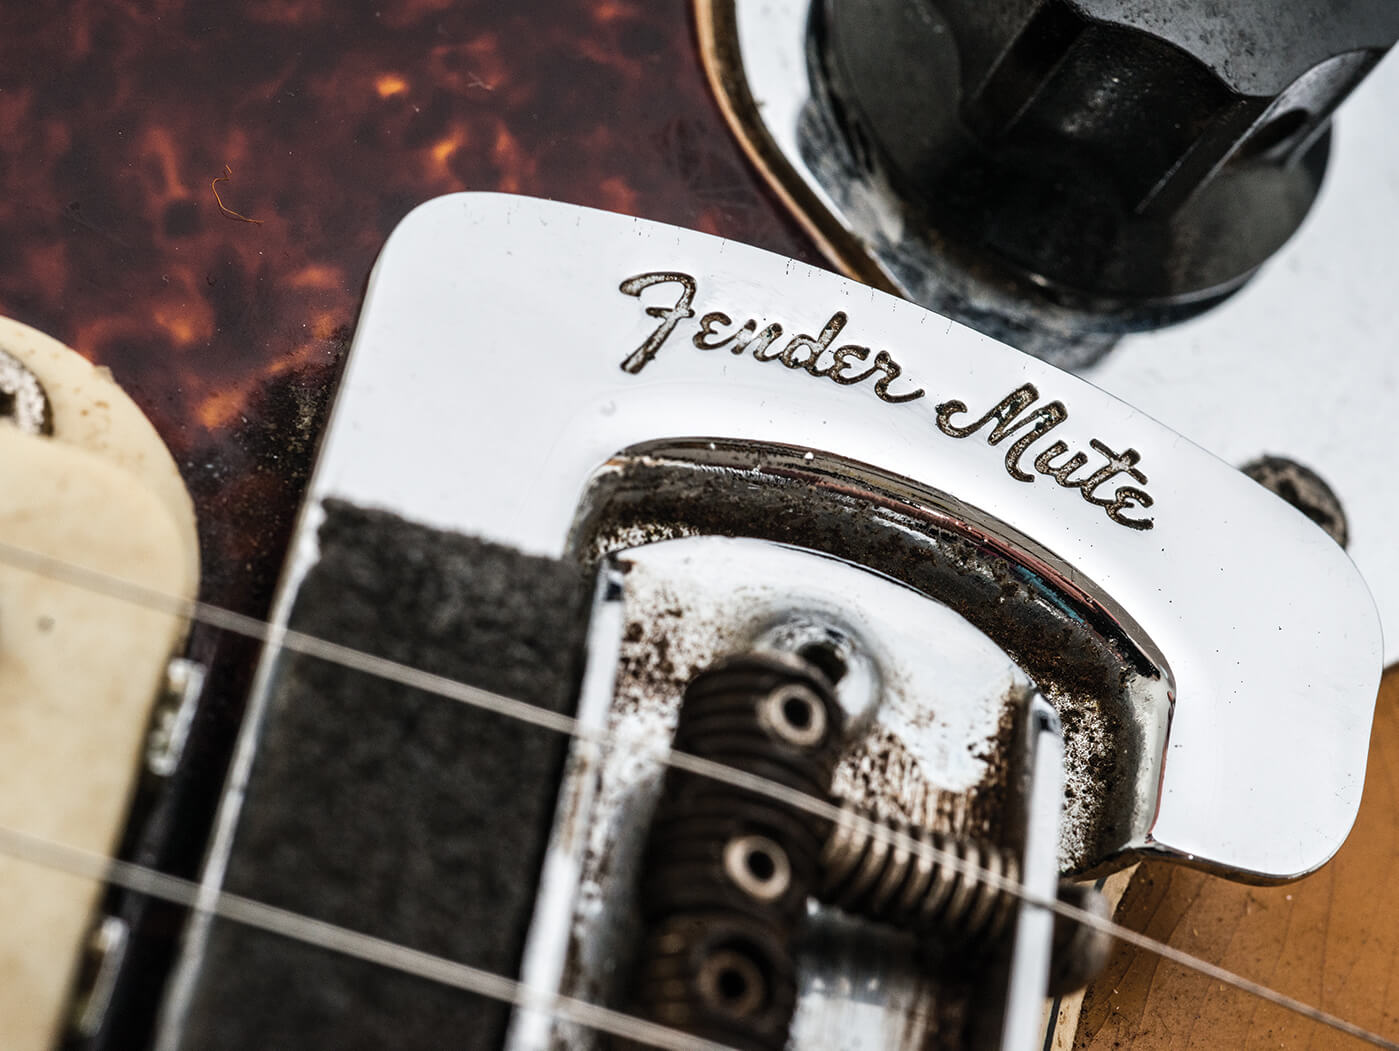
Lubrication
Friction is the enemy of tuning stability, and lubricating each point of friction in the strings’ path will encourage them to return to pitch. There are various products on the market for this issue, but the we found the humble tube of lip balm works, too – it’s perfect for bridge saddles and nut slots. You’ll only need a small amount of the stuff to keep your whammy-bar embellishments in line.

Hardware
Perhaps the most popular modification for offset Fenders is replacing the stock bridge with a more robust aftermarket part. Although a correct setup will make any Jazzmaster or Jaguar play dependably, we recognise that not everyone has the time or the ability to go to such great lengths. Many simply choose to change the bridge.
Chief among the many companies that design bridges are the US-based Mastery Bridge and UK-based Staytrem. Both have their adherents and detractors, so it’s important to weigh the pros and cons of each bridge separately.
Staytrem bridge
If you like the original bridge but want something more dependable, the Staytrem is a good and affordable option, at £65.
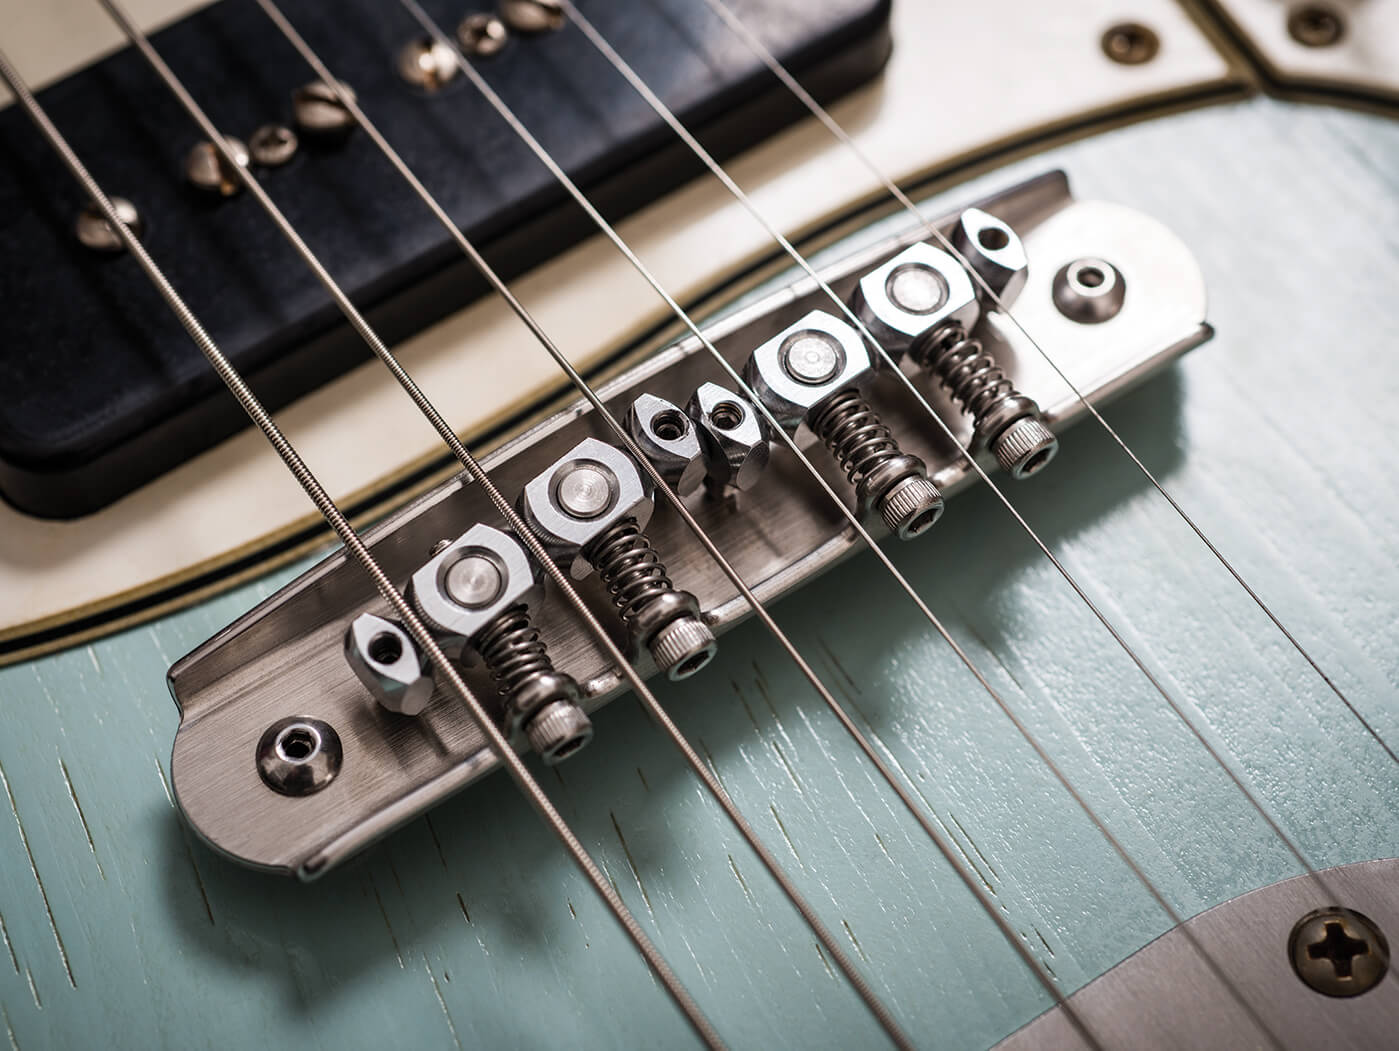
Best understood as a heavily upgraded Mustang-style bridge, this bridge features six individually adjustable barrel saddles with a deep, centred groove to keep strings in place. It boasts nylon inserts on the saddle screws; this keeps bridge height stable and reduces the stock Fender design’s tendency to rattle. The bridge is available in both 7.25- and 9.5-inch radii to match the curvature of your guitar’s fretboard, and there’s even a wider bridge meant for Bass VI models.
However, this bridge is meant to rock with trem use, which certain players may find problematic. Additionally, the fixed radius makes setups tricky for guitars with flatter fretboards. Some opt for a generic Mustang bridge, but if you’re going to go down that route, just spend the extra money on the Staytrem. Trust us, it’s worth it.
Mastery Bridge
Players who want a bridge that improves sustain and remains stationary with heavy vibrato use should consider the Mastery bridge – even though, at $175, it doesn’t come cheap.
Designed and manufactured by Minneapolis luthier John Woodland and co., this is an overbuilt masterpiece of guitar hardware. It’s machined and formed from stainless steel, and has oversized bridge posts that lock in with the guitar’s body inserts to increase resonance and fix the bridge in a stationary position.
The gently radiused, twin brass saddles have a proprietary hard chrome plating and deeply grooved, V-shaped channels to keep strings put. Intonation is adjustable via two Allen screws for each saddle. Although some feel that the Mastery’s enhanced resonance is antithetical to the classic offset sound, the needs of the player are paramount.
The Tune-o-matic bridge
Here’s a fairly common modification, but one that can cause more problems than necessary.
For one, installing them usually requires drilling out the body to accept new inserts. There’s also the radius mismatch between the 12-inch-radius bridge and most Fender-style necks. This makes it difficult to achieve a balanced and consistent action across the fretboard.
The shape of the saddles on these bridges can also prove problematic for those who use the vibrato frequently, although this can be mitigated with lubrication and additional filing of the grooves.
Vibrato
There’s little reason to swap the tailpieces of vintage and US-made reissues, but with the following upgrades, owners of Japan-made Fenders and Squiers will note a marked improvement in tuning stability and feel.
Vintage Fender vibrato units
These are coveted by in-the-know players for the taut response of the original carbon steel spring. Earlier ‘Pat Pend’ vibratos are especially favoured for their stiffer, smoother feel, and they stand up far better to bends and detuning than modern recreations. These units often fetch well over $200 on the used market, though.
Mastery Vibrato
The Mastery feels almost identical to early trems, and can be had for around $180. But it isn’t a mere reproduction of those traditional bridges. A rugged affair made from stainless steel with countersunk screws, this modern-meets-vintage vibrato features an updated string anchor plate, an arm with user-adjustable swing, and, best of all, a painstaking recreation of the carbon-steel spring.

American Vintage Reissue
This is the same part as used on the AVRI ’62, AV65 and American Original guitars – for guitars imported from outside the US, they’re excellent choices. That they sit between $70 to $90 make them an ideal upgrade for those on a budget.
Staytrem vibrato arm
If you have a good vibrato but can’t stand dealing with the arm falling out, Staytrem offers a revamped arm and collet set – for £30 – that retrofits most existing tremolo systems and eliminates the woes of an untamable arm.
Faction Guitars hard-tail plate
For a no-nonsense option that’s all rock and no roll, consider a hard-tail plate from Faction Guitars. These custom-machined stainless-steel plates install quickly using the same mounting holes as the stock vibrato, enabling you to string your guitar using six keyhole anchors. A huge range of control plates is available, retailing from $45 to $80.
Wiring
Potentiometers
For as long as offset guitars have existed, people have complained that the stock 1 Meg volume and tone controls are too bright and trebly, especially with certain amp rigs.
Stepping down to 500K or 250K can drastically affect the overall tonality of the instrument, and the lower the rating, the greater the difference. 250K pots are standard in most Fender instruments, which makes them a good choice here – you know exactly what you’re in for if you’ve ever played a Telecaster. 500K is a great middle ground between them, rolling off some of the sting but retaining much of the bite of a good Jazzmaster pickup.
Treble bleed
On the other end of the spectrum are those who rely upon consistent operation of the volume control – the Jazzmaster and Jaguar circuits may cut off far too much treble when backed off. Treble-bleed networks are an easy mod to retain clarity and bite without altering your basic guitar tone.
Placed between the input and output lugs of your volume pot, this mod consists of a cap in parallel with a resistor. They can either be bought from a number of vendors or DIY-ed. One popular combination is a 470pF (marked as 471) capacitor and a 220K ohm resistor, but some swear by a 220pF capacitor instead. Experiment away!

New control plate
The Jaguar control layout will always be confusing, but luckily, there are alternatives. Take, for instance, the Fender Johnny Marr Jaguar and its four-way blade switch, which represents a more intuitive approach to the guitar’s arsenal of sounds.
To retrofit a blade into a stock Jaguar, you’ll need a new control plate like that of the Marr, or the diagonal ‘Wronski’ plate, so-named for guitarist Dave Wronski of the surf band Slacktone. Players who prefer a toggle switch should opt for the ‘Cobain’ plate, as seen on Fender’s recent Kurt Cobain Jaguar model.
Spacers
Another common complaint about those switches is that they’re too easy to hit with even moderately energetic strumming. You could cram the end of a pencil eraser in there and break it off, but if you want to retain your tonal options while keeping the switches out of the way, spacers such as those sold by Faction Guitars are the perfect compromise.
These spacers, priced at $4 each, fit between the switch casing and the pickguard or plate to which they’re mounted, lowering the exposed tip of the switch enough so that it’s tougher to hit accidentally.
Pickups
The sheer number of pickup makers large and small means nearly every whim, within any budget, can be catered to. Seymour Duncan, Curtis Novak, Lollar, The Creamery, Lindy Fralin, McNelly, Kinman, House Of Tone and Mojo all make excellent drop-in replacements that cover a broad range of tones among them. P-90s, humbuckers, Wide Range, Gold Foils, sustainers… all are welcome here at the altar of the offset.
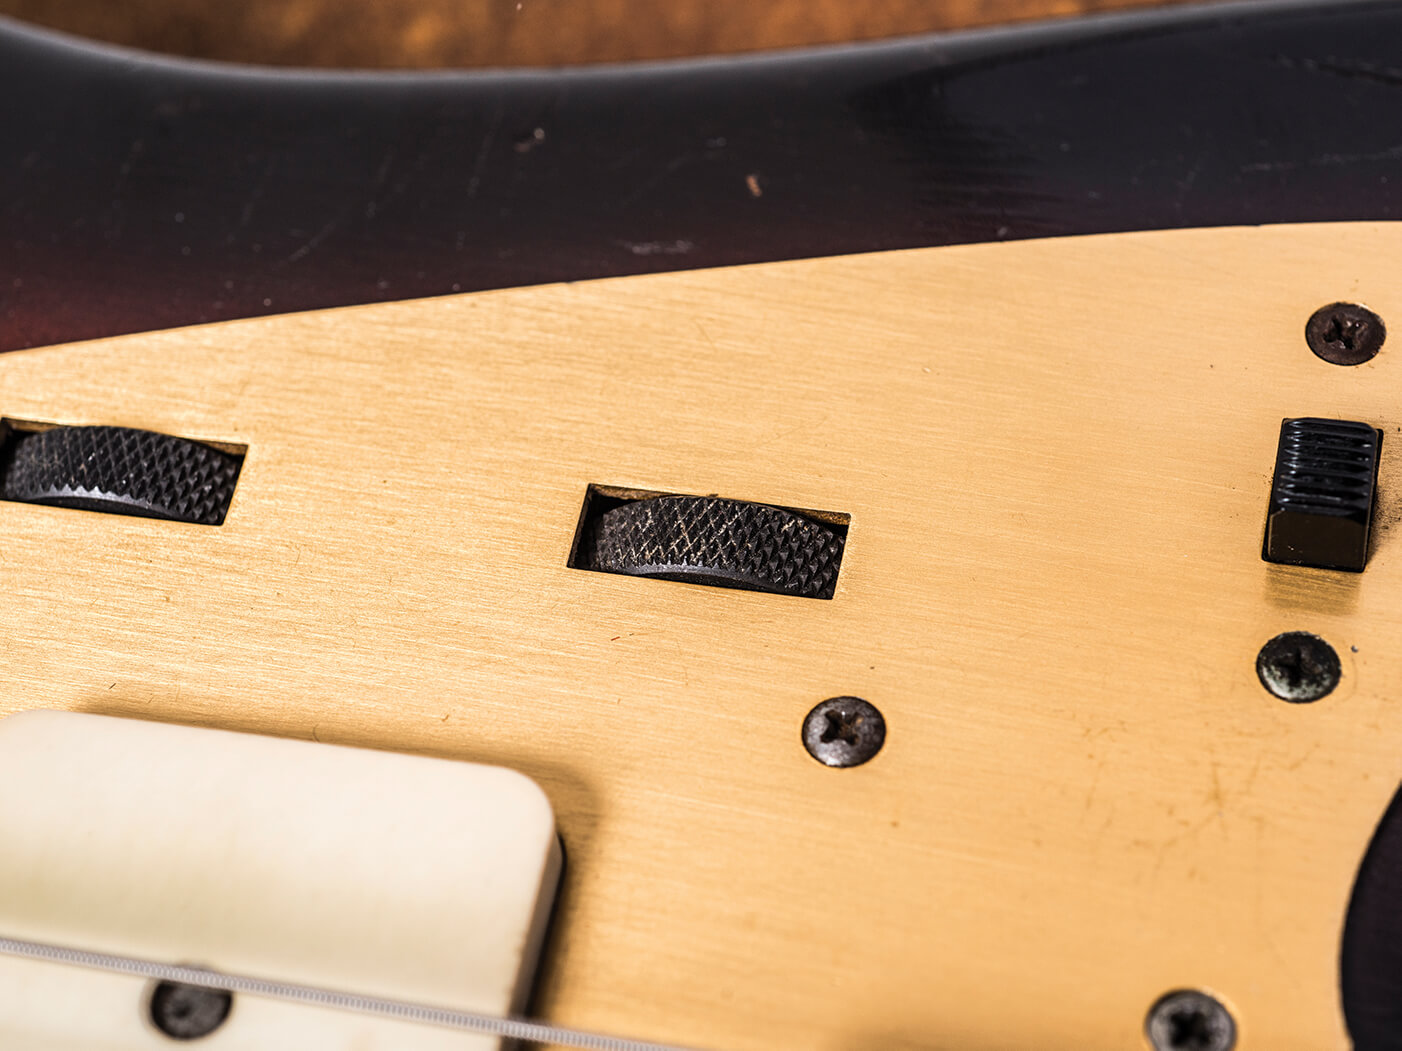
Rhythm circuit mods
In our recent piece praising Fender’s rhythm circuit, we made an impassioned plea for offset owners to employ those mysterious controls. Still, we’re fully aware that even with experimentation, they won’t work for everyone. Here are eight ways to make the most of your upper-bout electronics without dramatically changing the stock look.
Note: These diagrams assume proper grounding for pots, switches, and the jack. Additionally, pay attention to which of your pickup leads are ‘hot’ and ‘ground’.
Clip it!
Removing the rhythm from your circuit is fairly easy: simply re-route the neck pickup directly to the selector switch, the switch to the first lug of the volume pot, and then the output from your volume pot to the output jack. Remove the secondary tone circuit to save some weight, and you may even find your tone improved with the streamlined wiring.

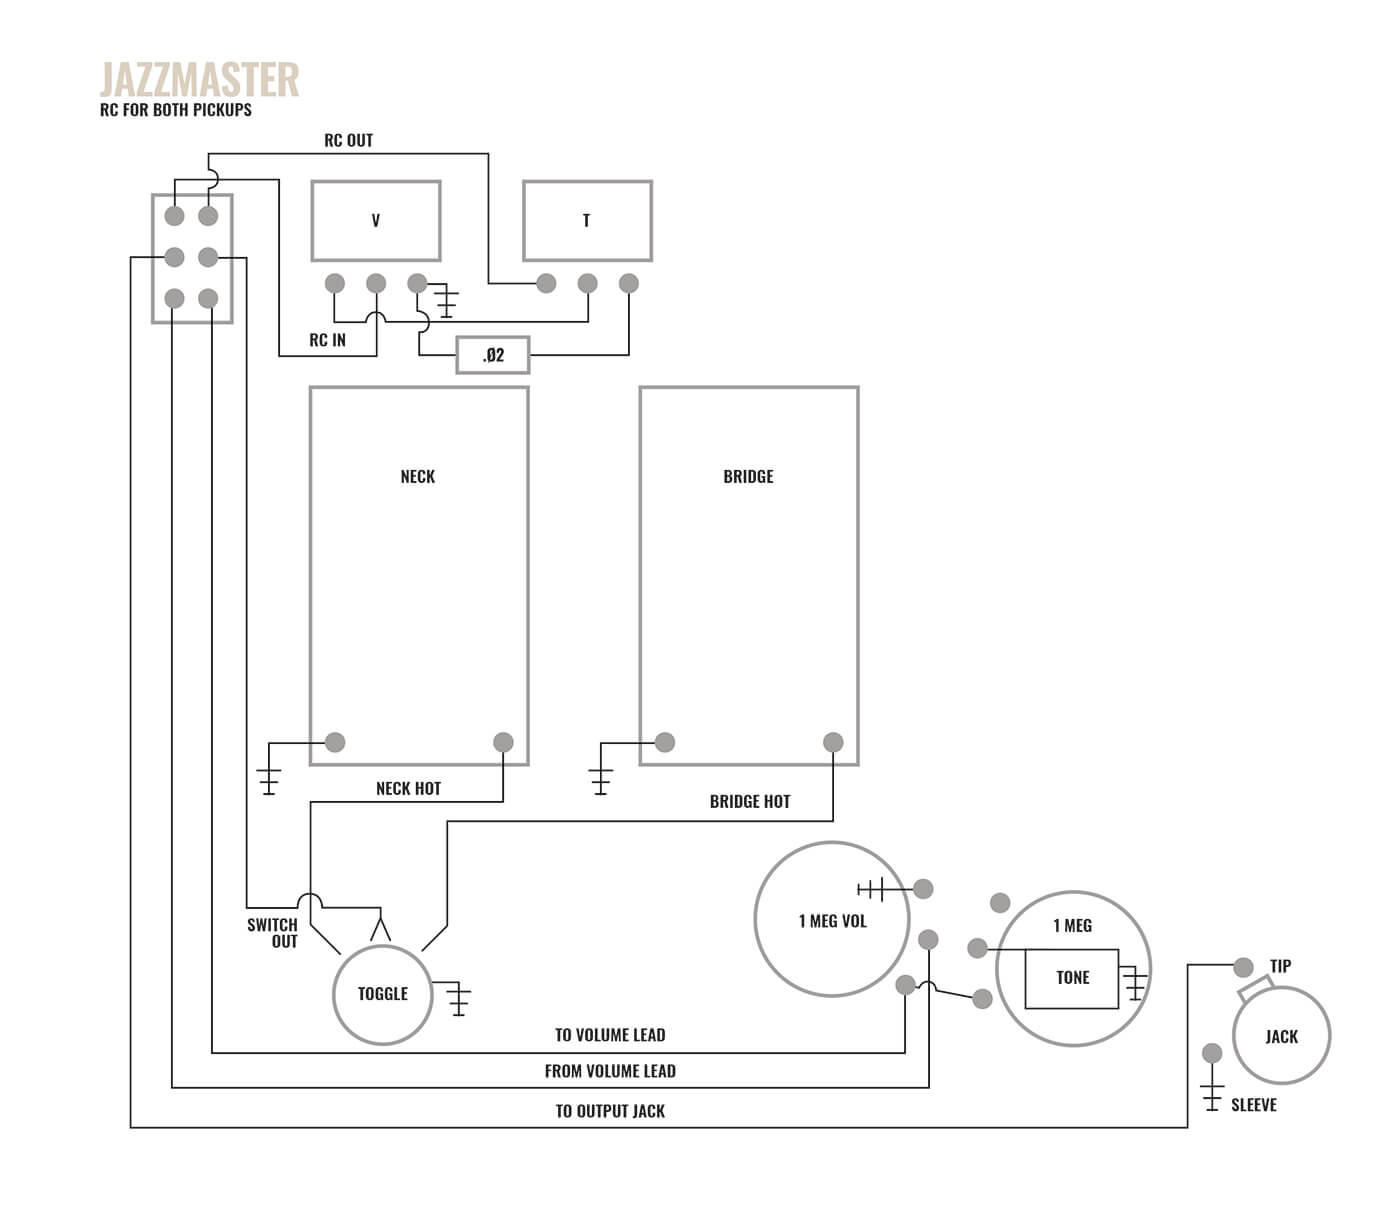
Switch it up
Instead of clipping the circuit, why not try to get more out of it instead? The rhythm circuit sounds great with the bridge pickup, so here’s how to wire the guitar so that the toggle switch is still active. All pickup selections will now be available.
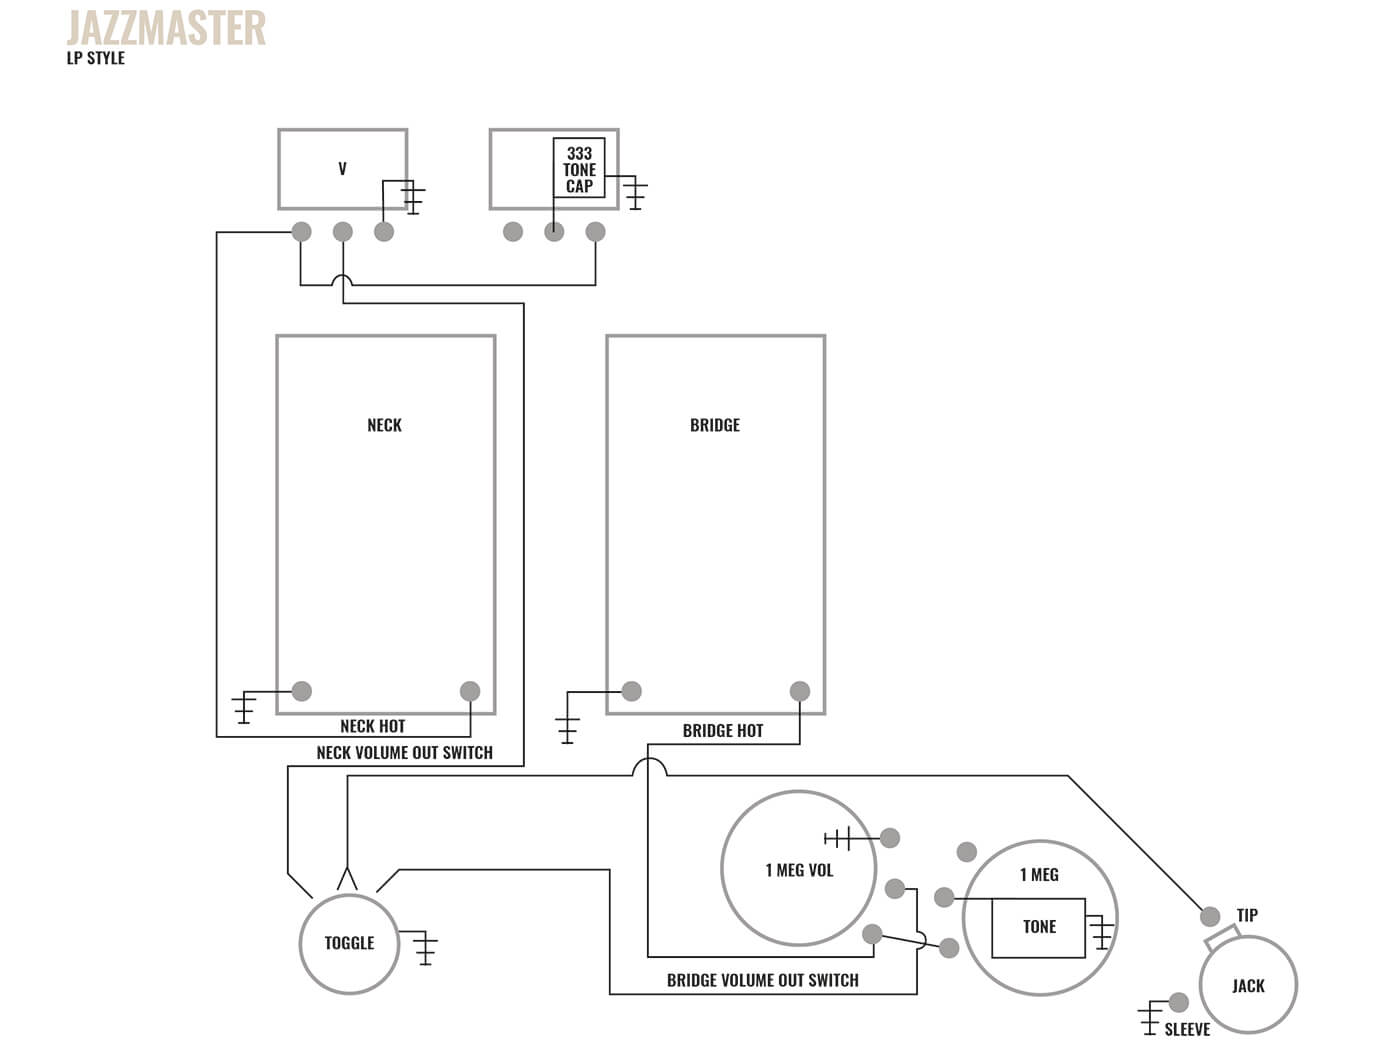
Dedicated volume and tone controls for the neck pickup
This Les Paul-like wiring scheme repurposes the rhythm circuit as a standard volume-and-tone combo for the neck pickup and substitutes the 50K Tone for a 1 Meg mini pot.
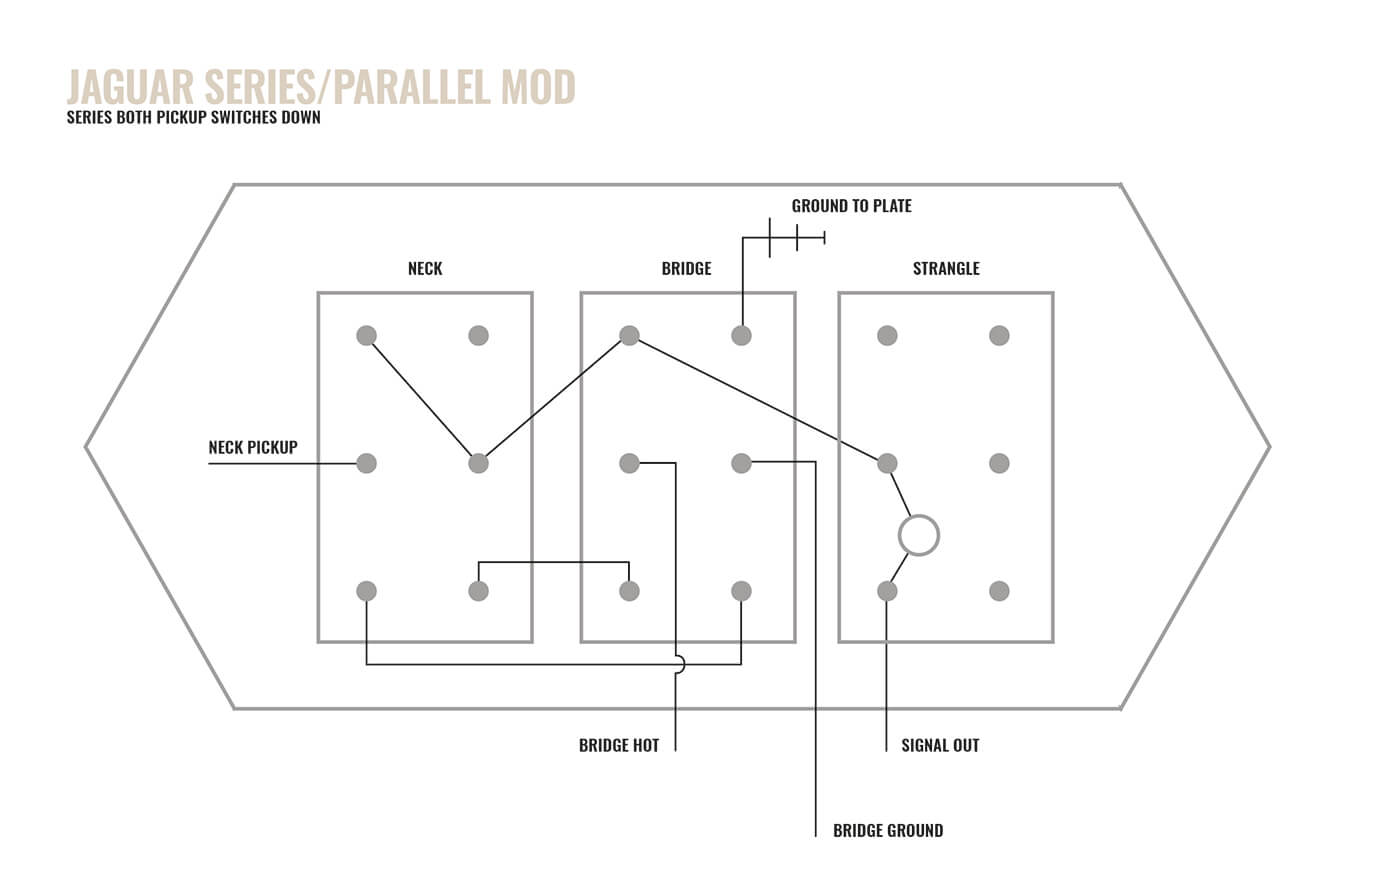
Series/parallel switching
Repurposing the rhythm circuit switch to run your pickups in either series or parallel is a painless procedure. You’ll only be using the switch, so either disconnect or toss the roller pots.
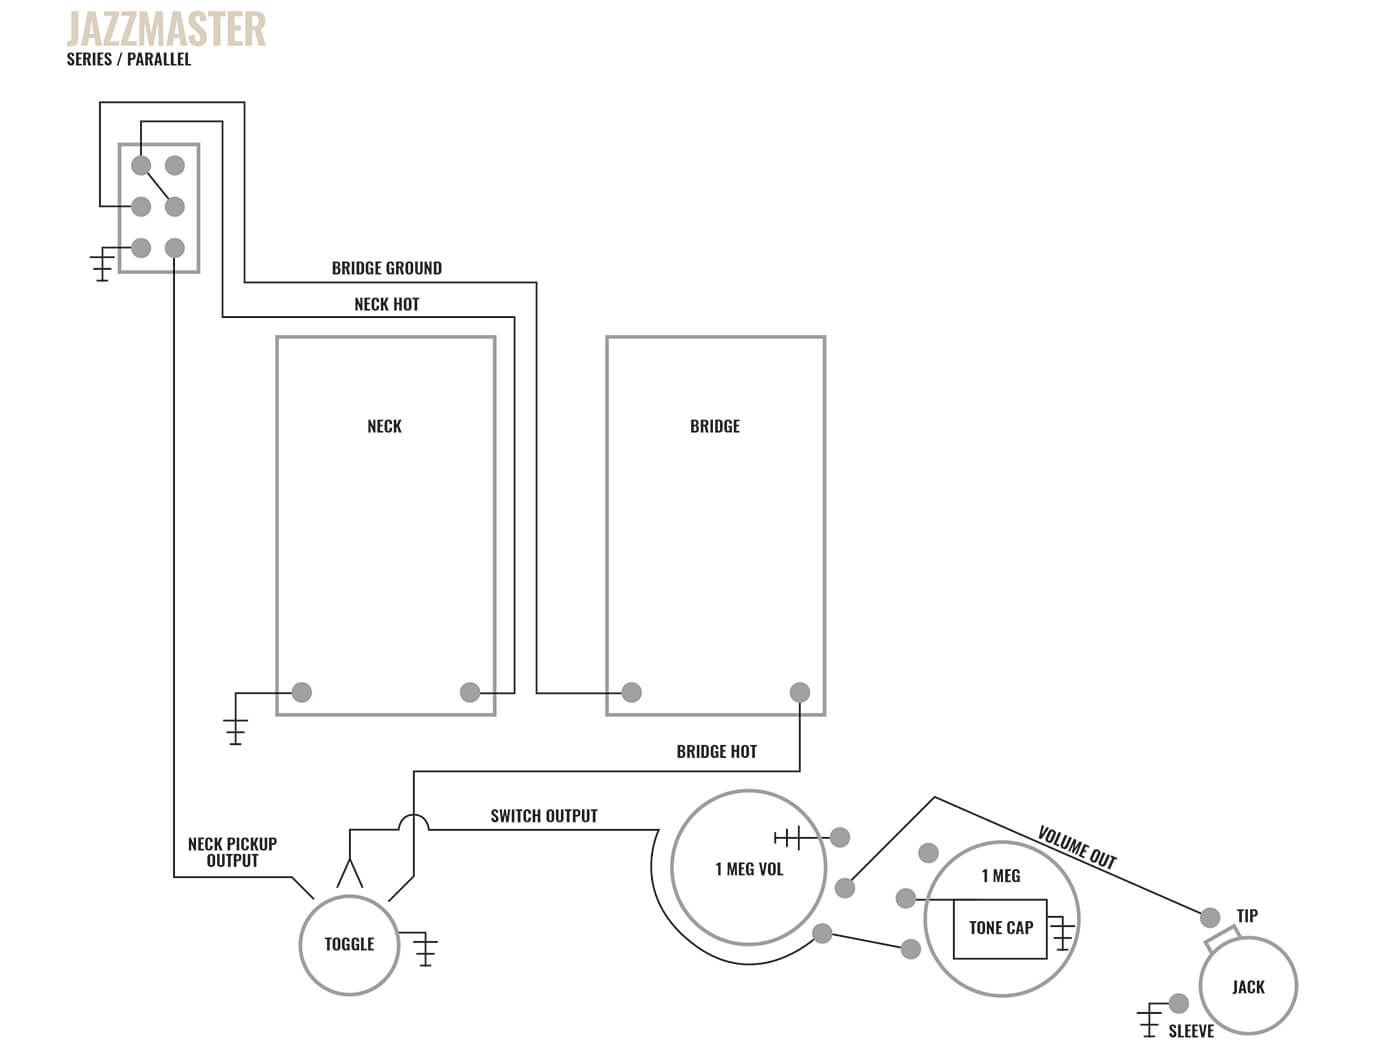
For Jaguars, here’s a series mod that keeps the stock look. Note: You’ll need to isolate the bridge pickup claw using a separate ground to the volume pot.
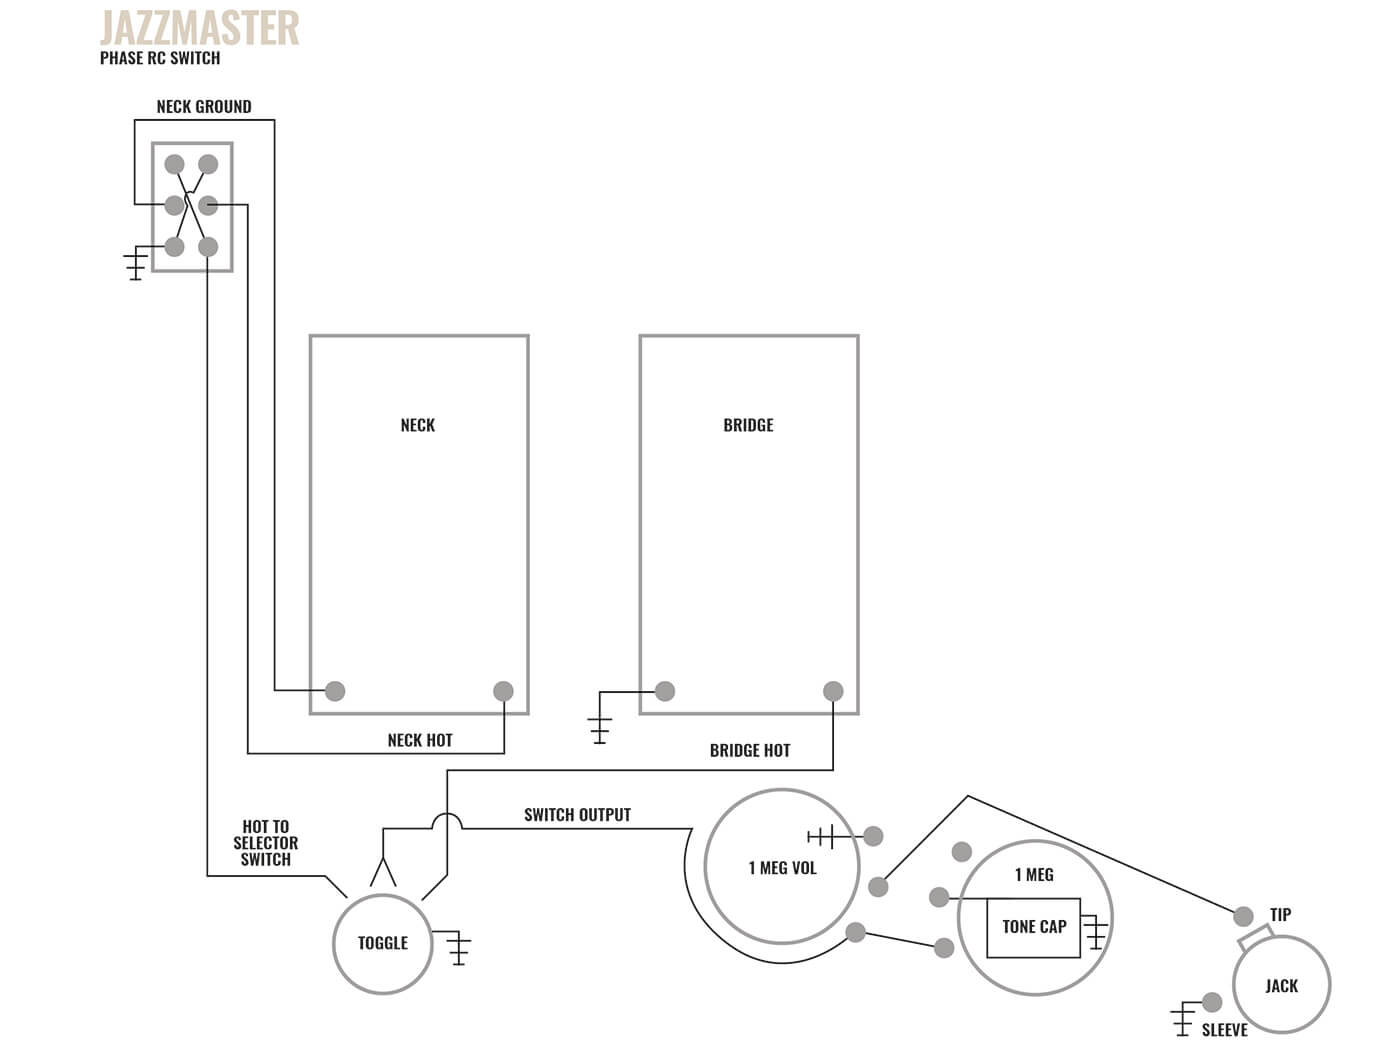
Phase switching
Players who swear by thin and funky tones will love this one. Similar difficulty as series/parallel switching, with equally usable results.
Passive treble and bass controls
One of the coolest tricks up the proverbial sleeve of Leo Fender’s other company, G&L, is the wildly usable passive treble and bass controls. Great for fattening up a thin sound or adding bite to a murky one, the PTB wiring has long been a secret of studio and stage alike.
We could draw up a diagram for this one, but honestly, it’s just easier to direct you to Rothstein Guitars, purveyors of fine and customised wiring harnesses for your favourite guitars.
Onboard effects
It’s also possible to install an onboard effect, such as a fuzz or delay, in the cavity for the rhythm circuit. There’s enough room for a small breadboard and a nine-volt, but be forewarned: you’ll need to be an electronics whiz to make this work. Start with something simple like a Fuzz Face or Tube Screamer and move up from there.
Behind the bridge pickup

Between the bridge and vibrato lurks an otherworldly palette of eerie dissonance, ghostly reverb and pitch-specific resonances. Amplifying them can lead to some interesting textures, and for that you’ll need a pickup behind the bridge.
This one’s not for the faint of heart, we’re afraid. Most pickup types require some wood to be removed, and you’ll also need to devise an appropriate wiring scheme to activate the pickup, either on an unused rhythm switch, mini-switch or a push/pull pot.
Whether or not Mr Fender could have anticipated the eventual widespread embrace of DIY enthusiasts for his then-top-of-the-line models is up for debate. No matter the historical perspective, one thing is clear: even those with limited experience should feel right at home adding personal touches to their prized instruments. Happy modding!
Check out other DIY guides here.