Related Tags
DIY Workshop: Easy and affordable humbucker and P-90 pickup mods
Unhappy with your tone? Before you throw money at the problem and install a new set of pickups, try these simple modifications first. You may find your existing pickups can be tweaked to sound better than you’d ever imagined.
All images: Huw Price
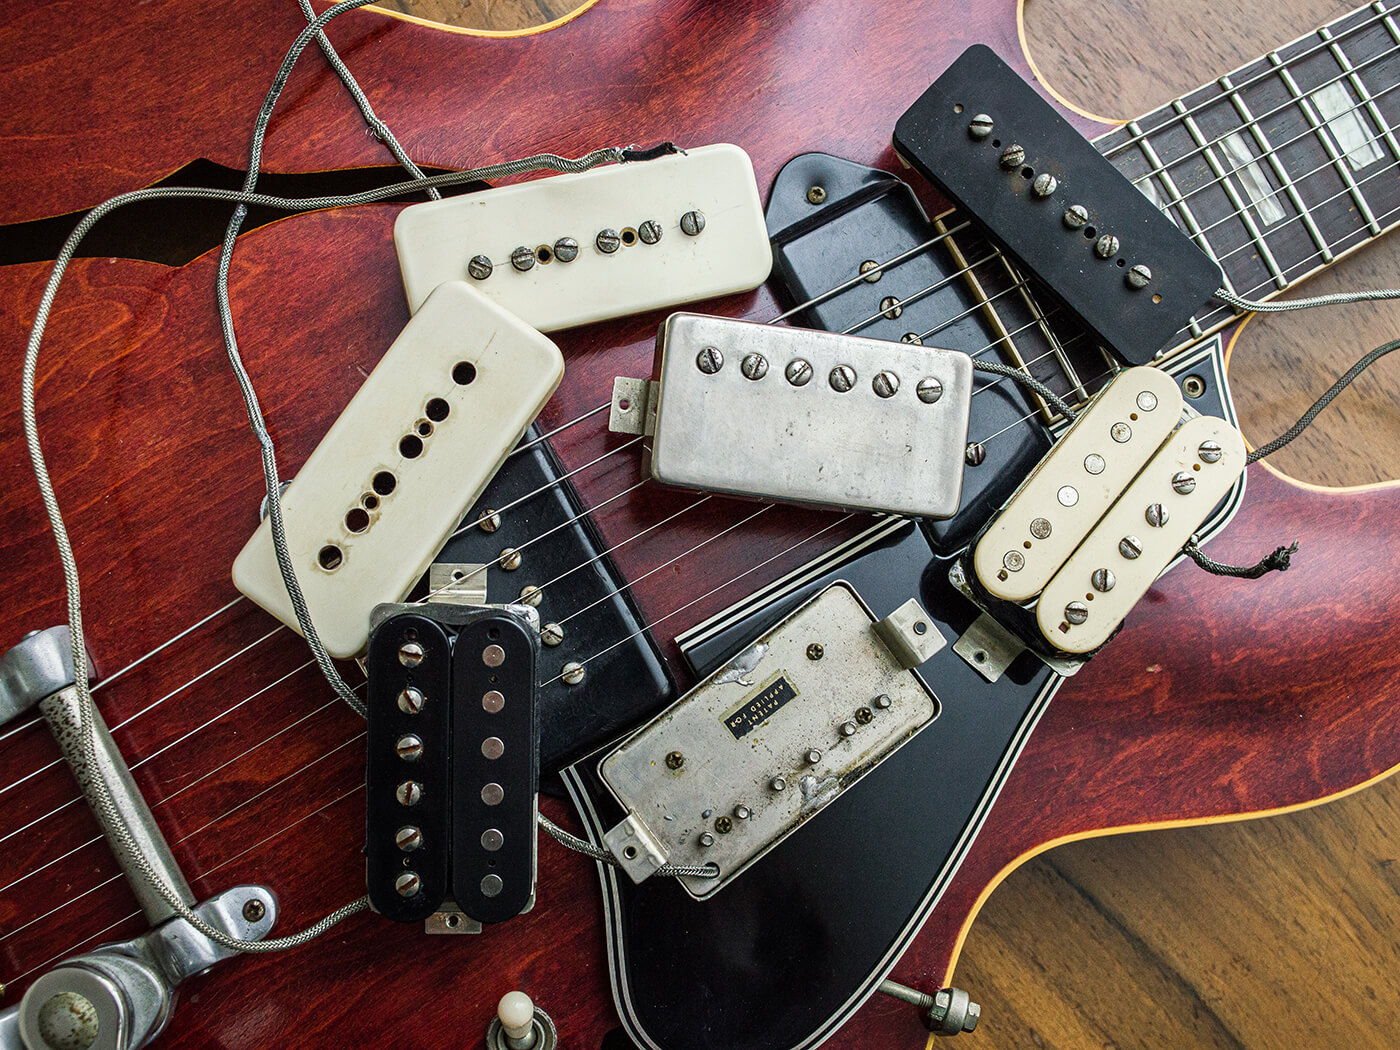
If you’ve ever investigated pickup construction, you may have noticed that most are made with exactly the same ingredients. All you need are some flats or bobbins, magnet wire, magnets, screws, slugs and wax. So how there can be such variation in output and tonal characteristics?
It’s a dark and complex art, but part of the alchemy is understanding how to combine those ingredients and make seemingly minor changes that can elevate your guitar’s performance from the mundane to the sublime.
Most of us swap pickups from time to time, but have you considered modifying the pickups you already have? Changing the component parts can dramatically change tone and output, and it will cost you far less than a new set of pickups. You can learn a lot in the process too, which may help you differentiate the snake oil from the science if you eventually decide to upgrade.
The P-90 and PAF-style humbucker mods covered here are entry level stuff, but some care will still be needed. Both of these pickups are ideal for modifying because their modular construction means there are several things you can try, and for the most part all you need are a couple of screwdrivers and a pair of pliers.
Screw swaps
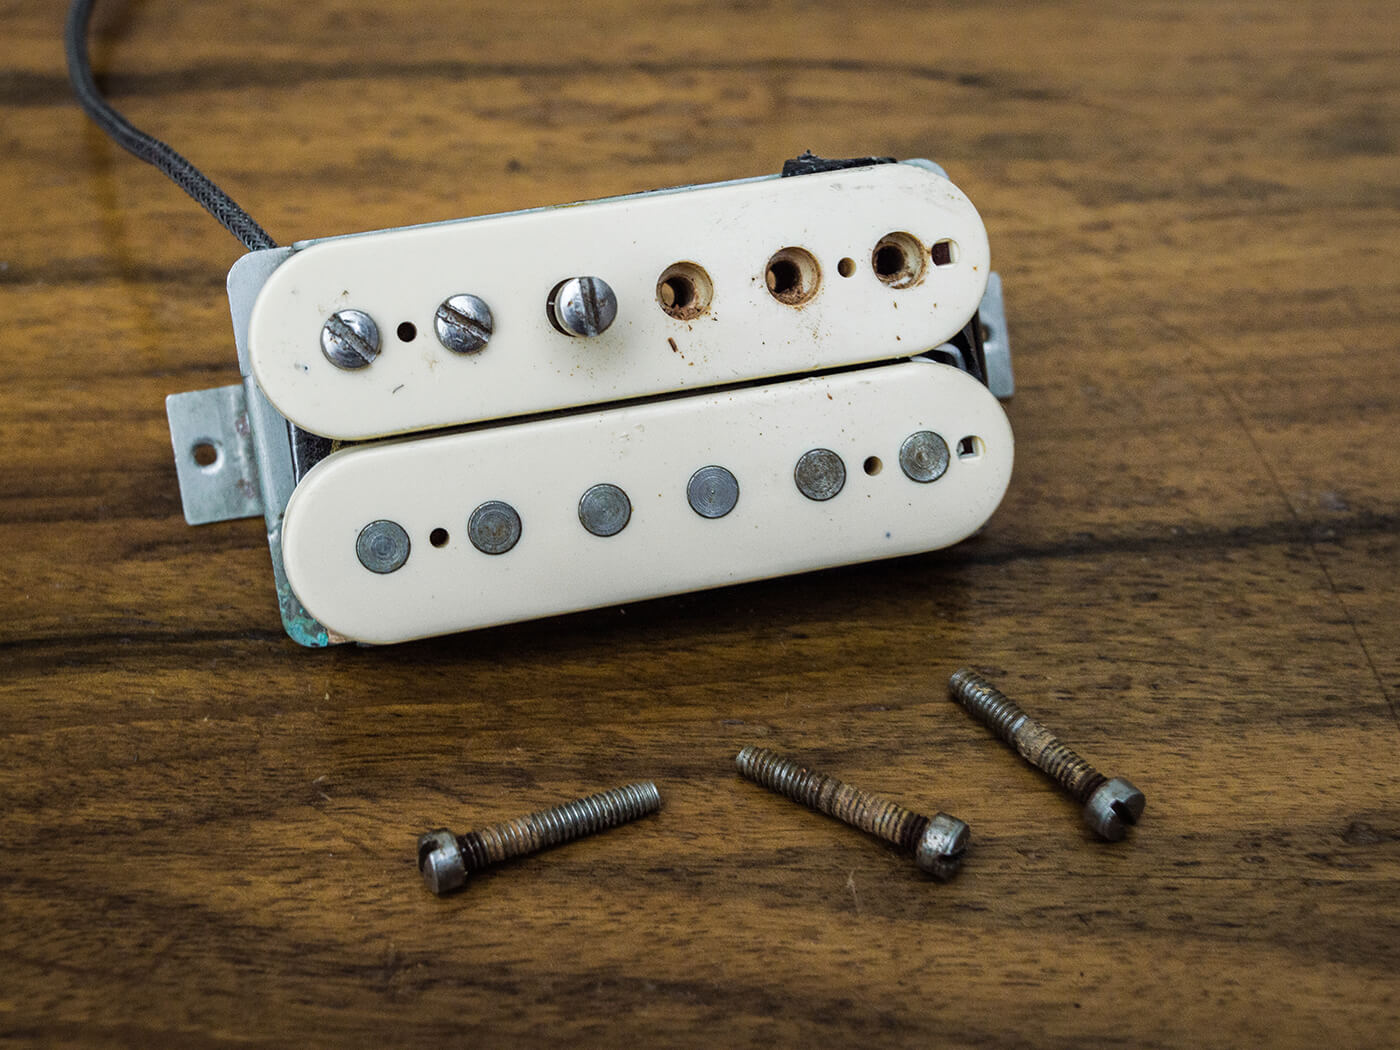
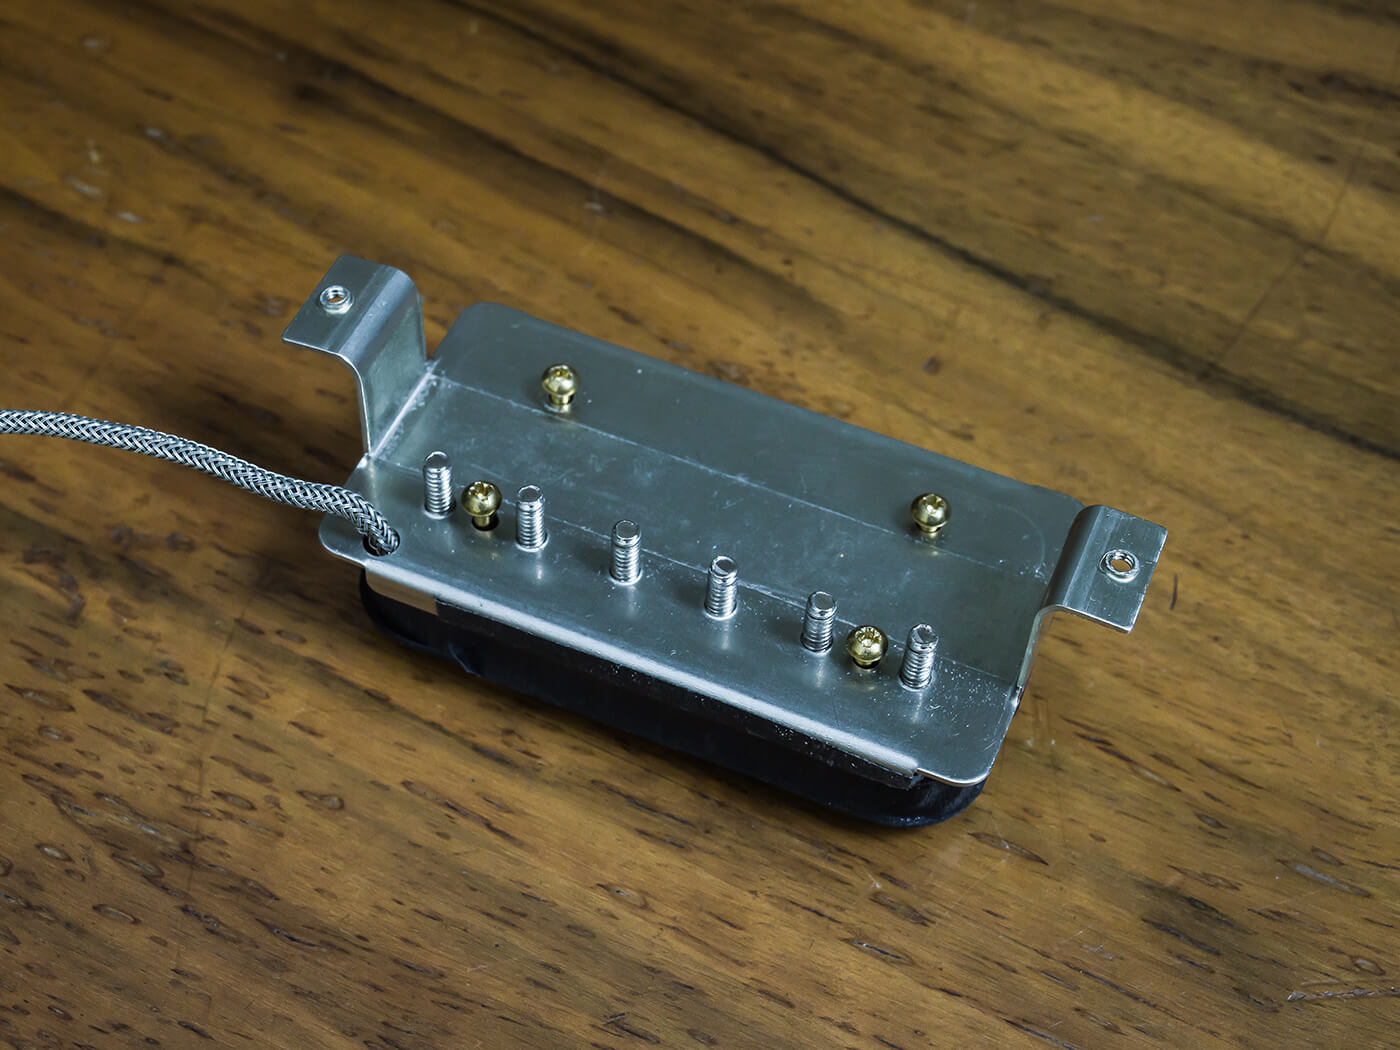
P-90s have pole screws and PAF-style humbuckers have screws and slugs – none of which are permanent magnets. Instead, magnets are located under the bobbins and because the screws and slugs are ferric, the magnetic field passes through them. The screws are a component that only pickup-makers tend to talk about.
Not all steel is created equal, and it’s graded by carbon content, but we’ll leave the academic treatise on metallurgy for another occasion. All we need to know is that the screws do have a subtle impact on tone, grades with a higher number equate to higher carbon content, and anybody with a flathead screwdriver can swap them.
Most pickup parts suppliers don’t specify the grade of their pole screws, so you can ask before buying or find a supplier that does. According to Jon Gundry of ThroBak Electronics, vintage screws varied from 1006 to 1018 grade steel. Try 1010 screws for a sweet, smooth and more ‘vintage’ tone with a rounded attack. For more upper mids, punch and percussiveness, try 1018, 1020 or even 1022. A set of six screws should cost you £5 or less.
Higher carbon screws can help with brightness and clarity. You can get more bite and aggression too, but higher carbon can be counterproductive when combined with loose coils and naturally bright vintage-style pickups. This simple mod involves unscrewing the old screws and screwing the replacements back in. Try an electric screwdriver because it takes forever with a manual one.
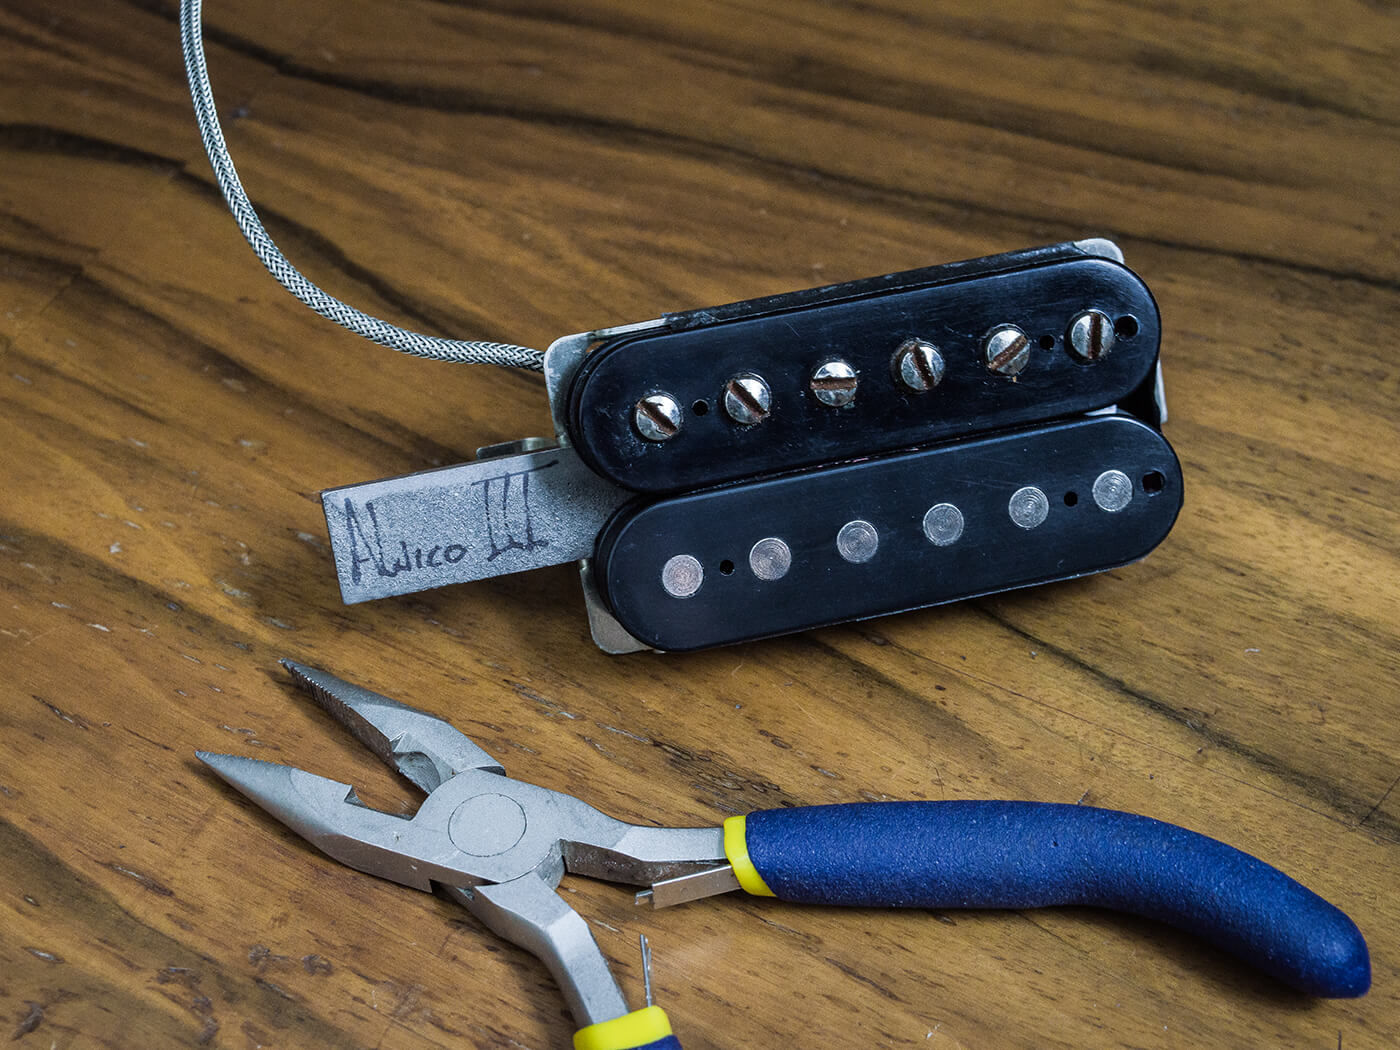
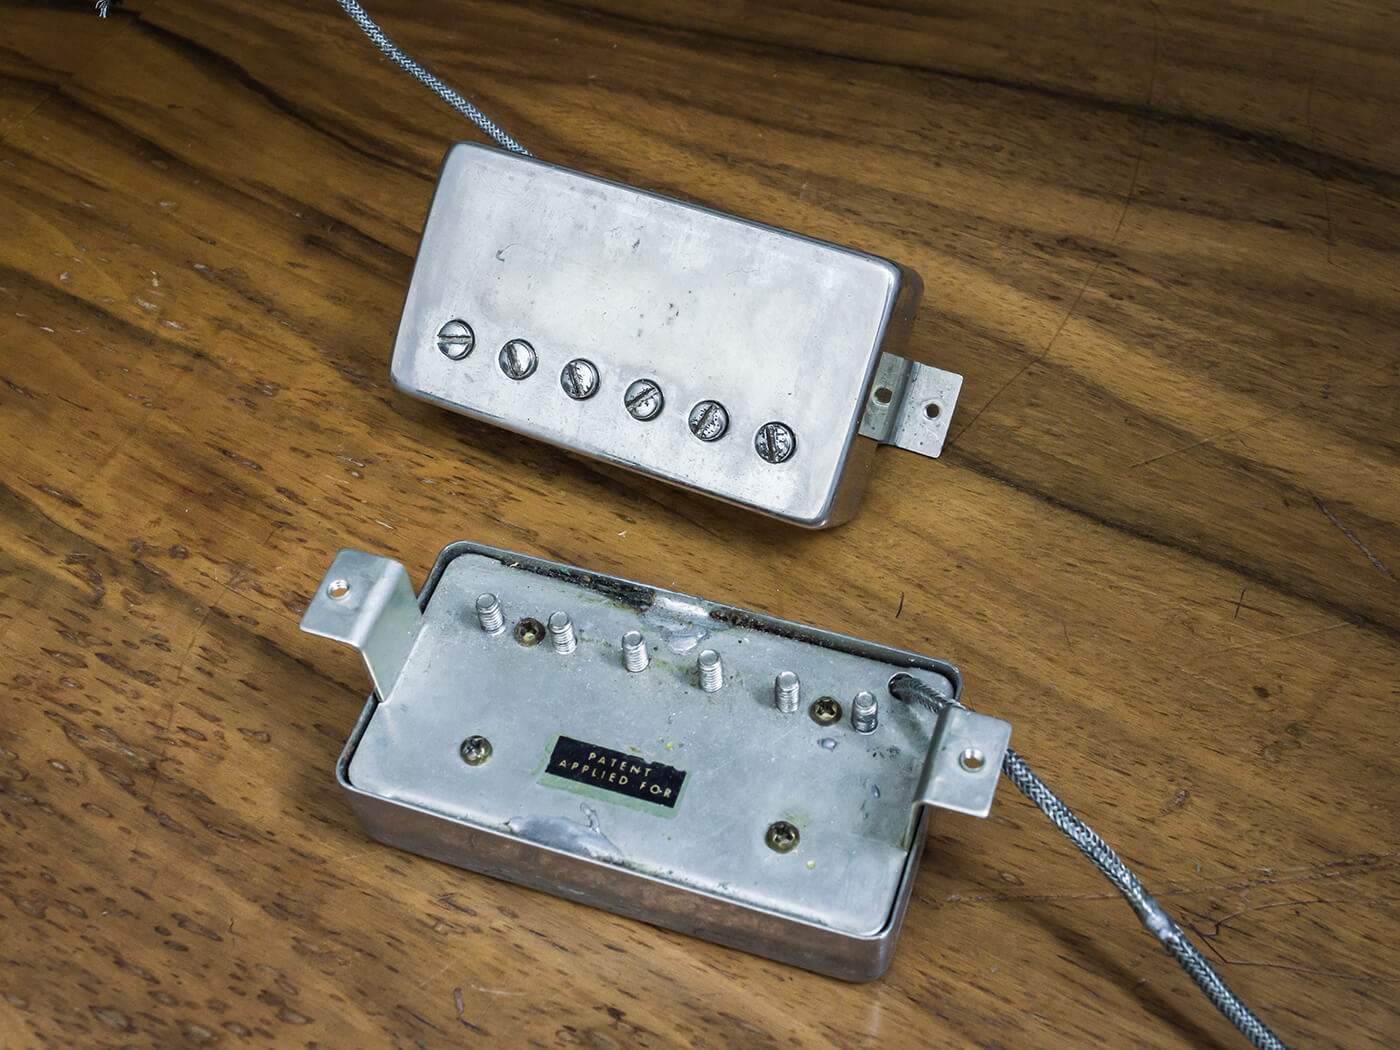
Covers off
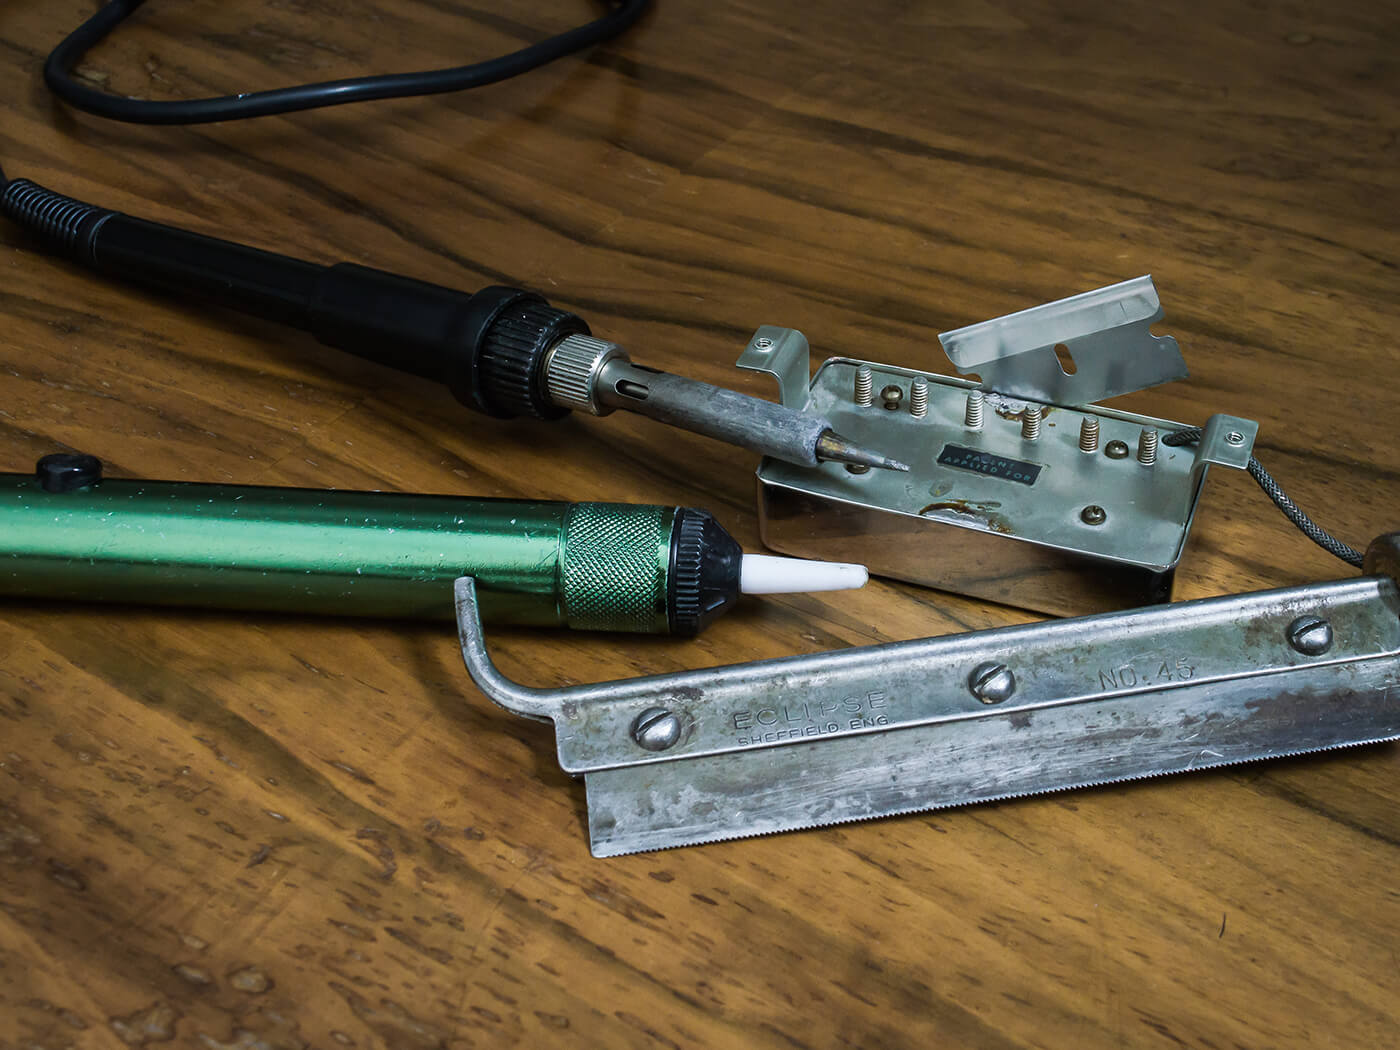
Covered humbuckers are a stumbling block, but once you know how to remove and refit them, it’s game on for all of our mods. Humbucker covers are fixed with a couple of solder blobs and you have to break those joints. My method is to use a soldering iron set to 450°C to melt the solder as quickly as possible, then I use a solder sucker to remove the majority of it.
You can cut through some of the remaining solder while it’s still hot using a single-sided razor blade, or once it has cooled, a veneer saw. With unpotted humbuckers, the cover should simply ease off. But potted pickups may need to be heated with a hairdryer before the cover will loosen.
Removing the covers was probably the very first PAF mod. Rock players began doing it in the belief that they could get more output and therefore more overdrive, and reduce squeal. But whether removing humbucker covers increases loudness or brightness is open to question.
Either way there’s a noticeable difference and I hear more air frequencies and harmonic bloom. There’s an increased sense of openness, but some of the vocal quality that you can get with covered humbuckers is lost. It’s a trade off, and if you like brighter and more aggressive tones, you’ll probably prefer the covers removed.

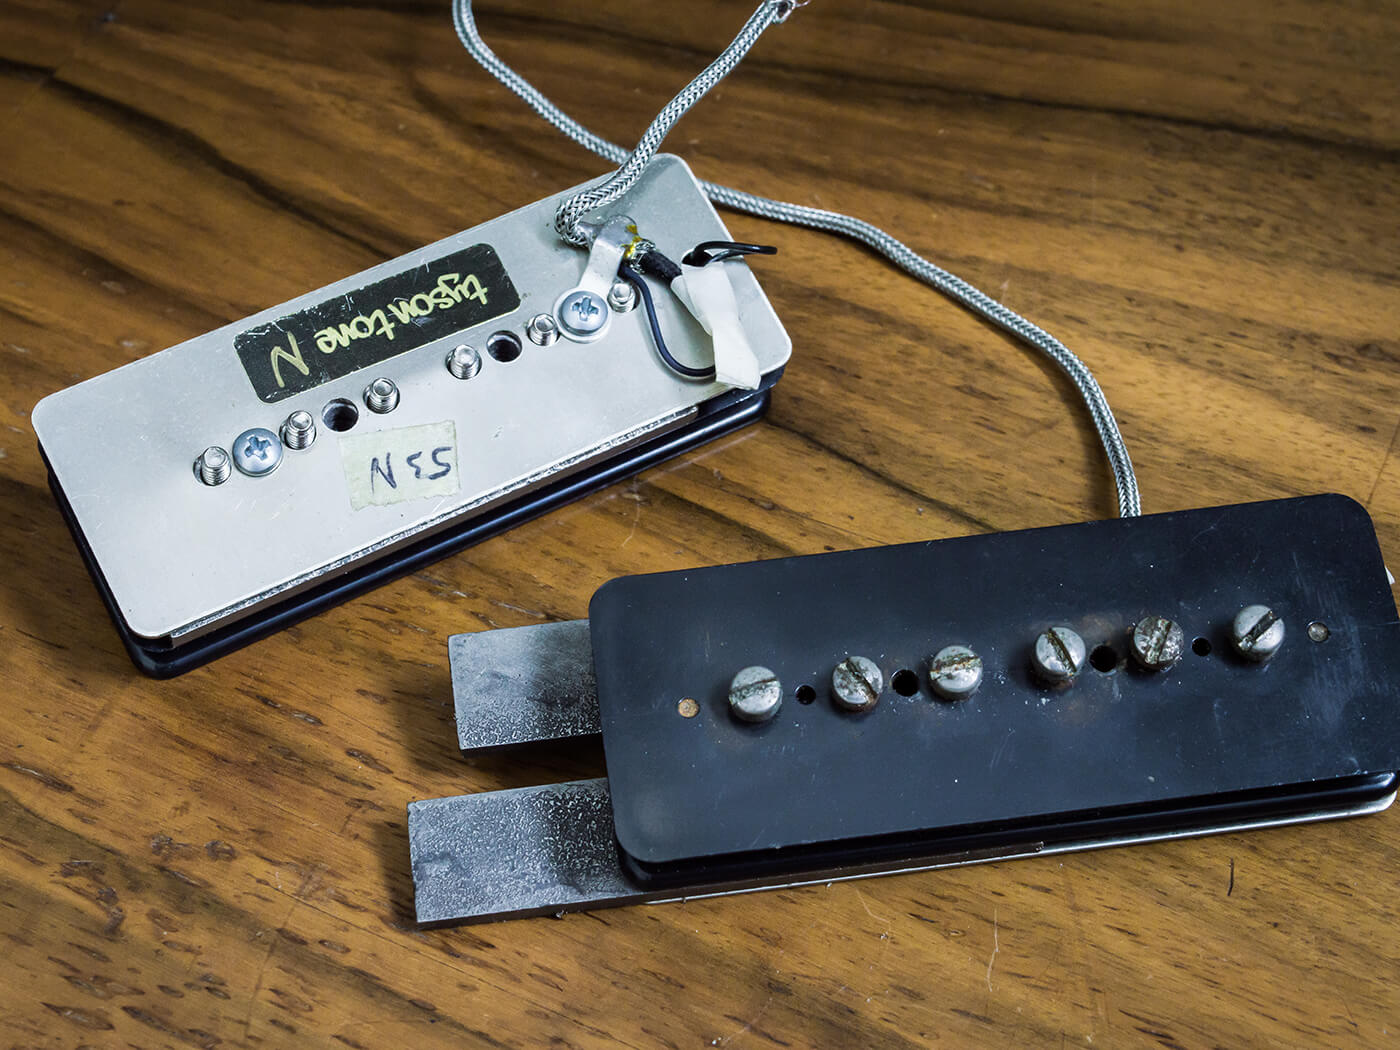
Cover versions
Much depends on the covers themselves, because if they are thick and heavy, you may struggle for clarity and chime, and string-to-string separation suffers. Vintage PAF covers weigh around 24 grams and were pressed from very thin nickel. I recently tested some highly regarded vintage repros that weighed 32 grams and at 0.7mm, were 0.25mm thicker than vintage covers.
They had all the right curves and contours, and the ageing was impressive, but they had a detrimental effect on clarity and harmonics. Swapping them for some cheap nickel covers that were nearly identical to the vintage ones in weight, thickness and tap tone was a huge improvement. Testing a vintage PAF with and without its cover, I feel the cover has a very slight sweetening and balancing effect. Seth Lover probably chose the materials and thickness to minimise the cover’s sonic impact.
If your humbuckers sound dull, consider removing or upgrading the covers. If the stock covers are brass, you’ll really notice a difference. But be aware that even in the PAF replica world, vintage looks can be prioritised over tone. Also, if your pickups are wax potted and wound hot, they might not have enough treble content to make cover swapping worthwhile.
When humbuckers are too microphonic, try attaching a large piece of masking tape to the inside of the cover or apply a few small dabs of silicone sealant between the slugs to dampen the covers down before replacing them.
Whether they’re soapbars or dogears, using P-90s without covers isn’t really an option. But, you can still change the covers. Try plastic instead of metal if you need more bite and clarity, or vice versa if you want mellower and woodier tones. If you have chrome-plated covers and like the metal look but need greater clarity, nickel-plated covers might help.
Magnetic personalities
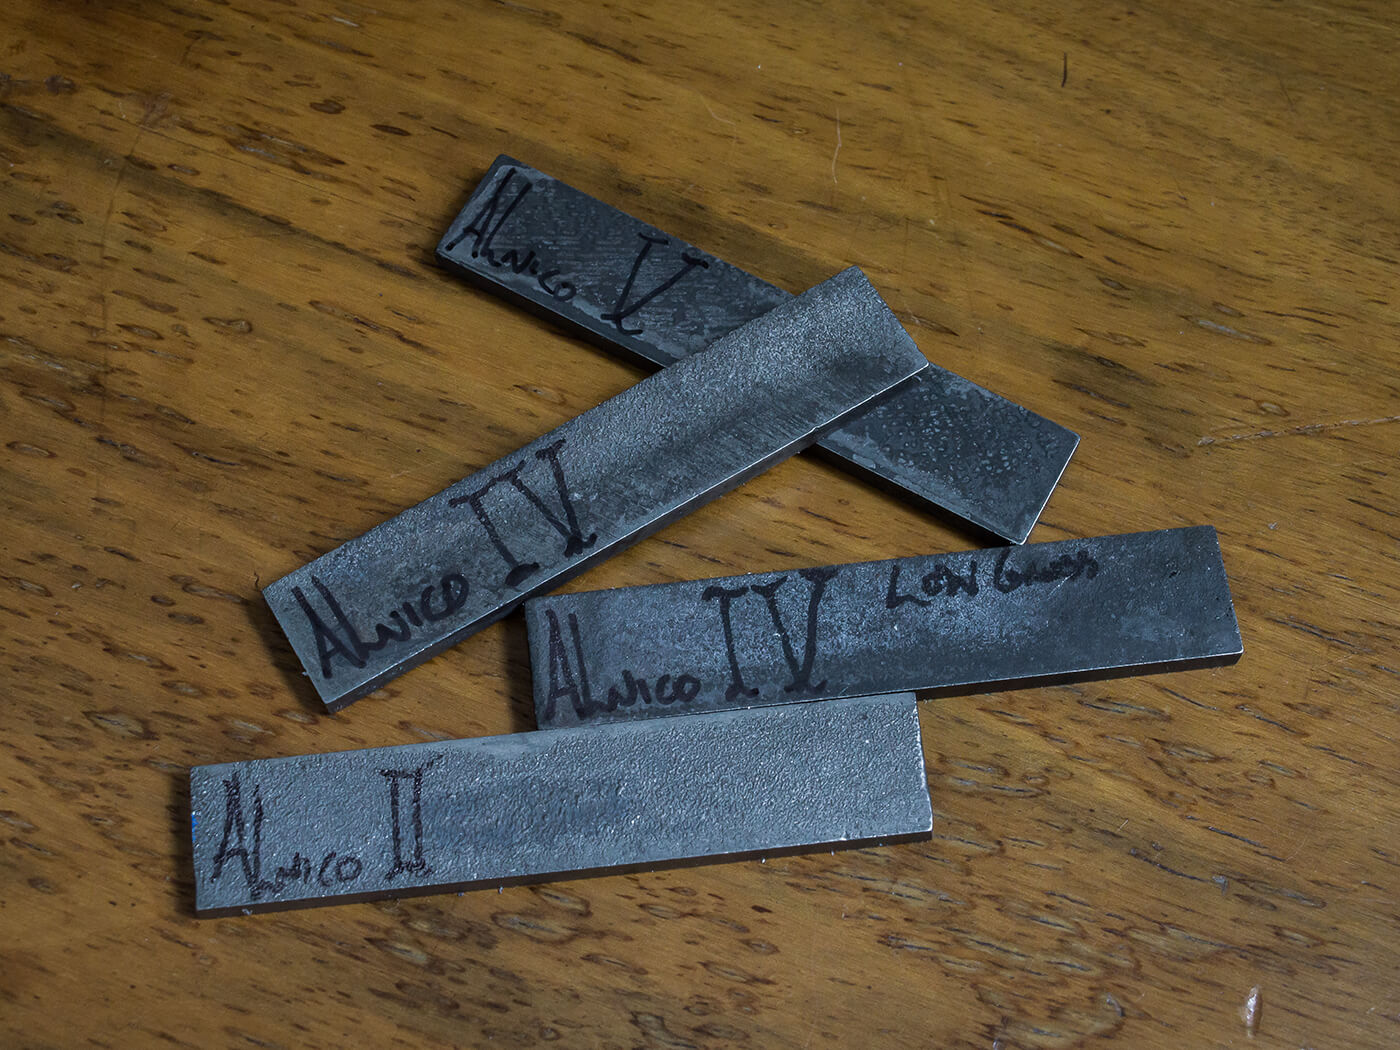
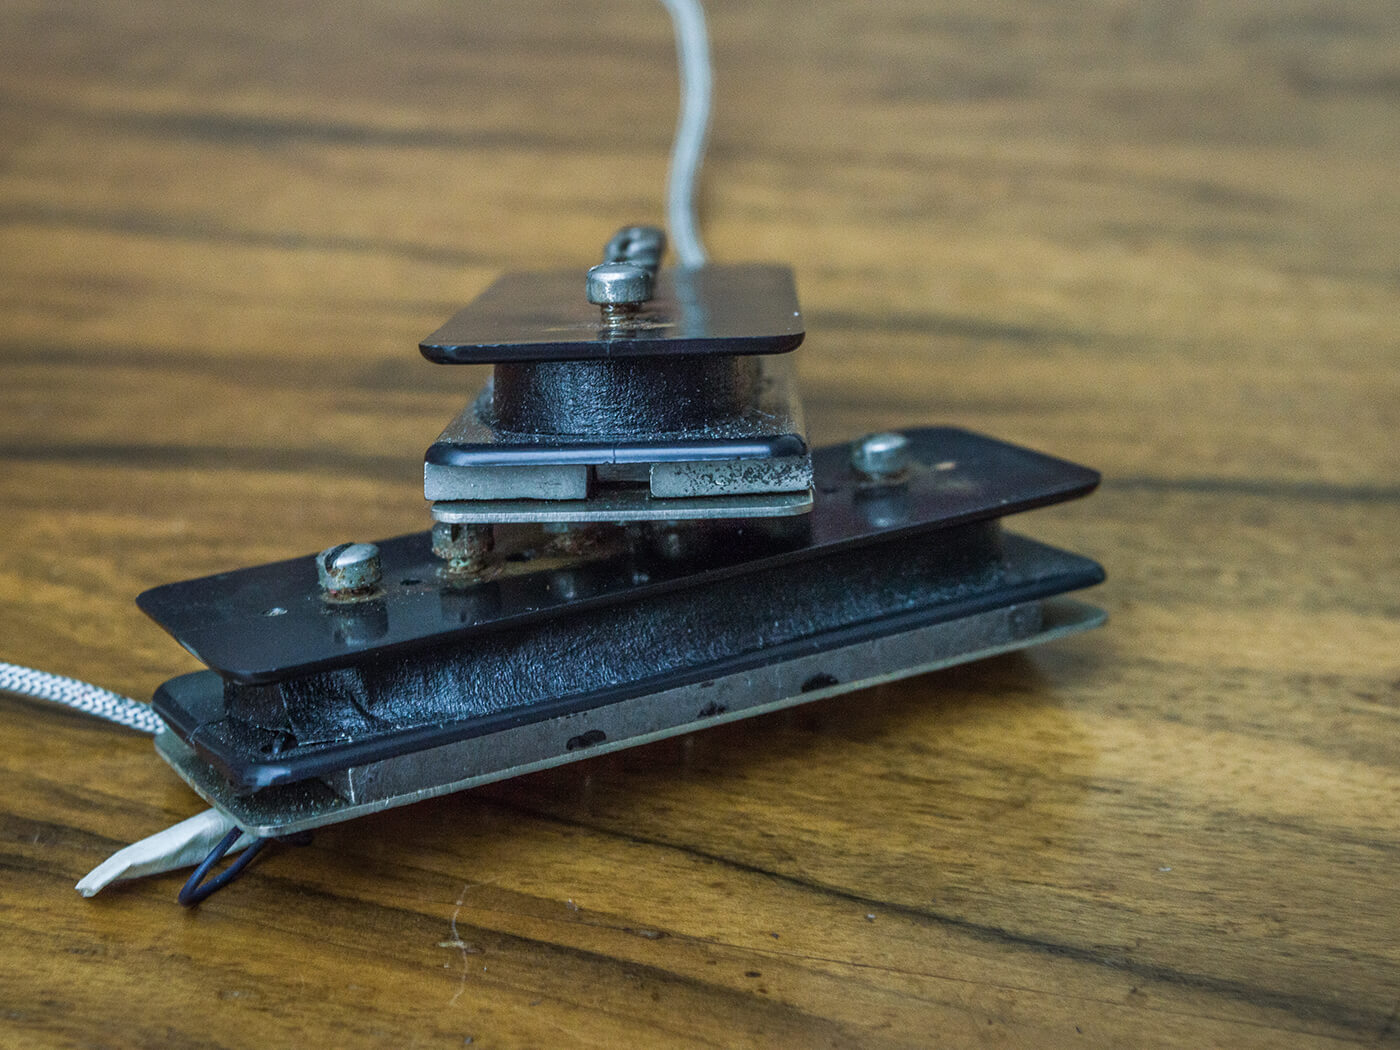
Magnets are mysterious, especially among the guardians of PAF lore. For our purposes, there are three factors to consider – smooth and rough (sand cast) magnets, magnet length and the type of alloy.
It’s easy to spot the difference between smooth and rough cast magnets because they look exactly as you’d expect. Whether they sound different is somewhat contentious, but some argue that rough magnets sound warmer in the treble and have a softer bass response.
Others claim the surface texture makes no audible difference, and point out that for humbuckers, the thin edges are ground smooth to make a proper physical contact with the slugs and keeper bar. But when it comes to vintage Gibson pickups, they all have magnets with rough appearance, so that’s what the vast majority of boutique replicas come with.
Gibson changed the length of the magnets around 1961. As always, there was some degree of crossover, with short magnets documented on 1950s PAFs and long magnets being used beyond 1961. Actual lengths varied, but for our purposes ‘long’ magnets measure around 2.5 inches and they were shortened by between 0.125 and 0.25 inches.
The debate about tonal differences is complicated because alnico V magnets became standardised around the time of the length change. But those who detect tonal differences suggest that short alnico V magnets are sweeter in the highs and have stronger mids than the longer equivalents.
Poles apart
The various grades of alnico magnets used in P-90s and PAFs all have distinct tonal characteristics. However, there is some confusion, because our natural tendency to think in terms of worst/better/best makes everything subjective.
Since we all hear things differently, listening for yourself through a familiar rig is always the best option. But for what it’s worth, here’s what I’ve found when testing full-length alnico magnets using loosely wound, unpotted coils that are offset to vintage specs and enclosed in thin nickel covers.
There are differences in brightness, bass response, output, sustain and sensitivity but for vintage PAF tone, alnico V and alnico II seem to be the most convincing. I find alnico V the closest of all, because it has a mid-scoop at precisely the right frequency band to create a cocked-wah quack, while not being too hyped and harsh in the upper mids. Sustain, output and sensitivity impress too.
Alnico II isn’t as scooped and it’s a tad more rounded and forward in the upper mids. With the right amp settings, it can produce a detailed and pretty tone. But it doesn’t have quite as much bass or heft as alnico V and can get harsh. In contrast I find alnico IV has the most even frequency response, with very balanced mids, but a slightly neutral quality that some may find lacking in character.
Alnico III sounds like a kinder and gentler alnico V, with similar midrange characteristics and very sweet but open treble. It’s lower in output but the weaker magnetism helps sustain, and it would be an ideal choice if you’re looking for mellower humbucker tones with plenty of characte, rather than an aggressive edge.
Alnico VIII and ceramic magnets are very popular for heavy rock and metal, where aggression, high output and definition across the frequency spectrum is required. They aren’t vintage spec, but old isn’t necessarily best.
Swapping magnets is easy. Simply loosen off the four screws under the baseplate by a few millimetres to free the bobbins, gently grip the exposed end of the magnet with fine nose pliers and pull it out. If the pole screws are screwed into the baseplate, you may need to slacken those off too, but you don’t need to remove them from the bobbin entirely.
The magnet’s south edge should be marked but if it isn’t, use a compass to determine which edge is south. The south edge goes on the screw side, but there are exceptions. The bridge pickups of three-pickup Les Paul Customs and Varitone-equipped semis are oriented with the north magnetic pole on the screw side. And if you want the Peter Green in-between tone, you need to flip the neck magnet so north is facing the screw side.
P-90 magnets
P-90 magnets are the same size as PAF magnets, but you’ll need two magnets for each pickup. While uncertainty remains about vintage PAF magnets, most agree that alnico III was used in P-90s from their debut in 1946 until Gibson began the transition to alnico V around 1957.
Everything said about the tonal characteristics of the various grades of alnico magnets in PAFs applies to P-90s. If yours are too edgy, try alnico III. If you need more power and bite, try alnico V or even ceramic. Like in PAFs, it’s still the convention for the magnet’s south pole to face the screw side, which means the P-90 magnets will try to repel each other when they’re installed in the assembly.
Removing and replacing P-90 and PAF magnets is an almost identical procedure, but P-90s only have two bobbin screws. Another trick you can try is offsetting P-90 magnets by a few millimetres. Lots of P90s ended up that way and you might hear a quackier vintage tone. It’s something you can try with your stock magnets too.
Extra polepieces?
This may be the nerdiest mod of all, but dogear P-90 fixing screws and PAF bobbin screws (number two diameter, 0.5-inch length) can function as extra polepieces. In P-90s the fixing screws are located between the A and D, and G and B pole screws. The vintage screws were brass, but to make this work you need steel.
The very first PAFs had steel bobbin screws, but Gibson very quickly changed to brass. Even so, steel screws did show up on occasion and they have been documented on Peter Green’s Burst and one of Paul Kossoff’s. Maybe it even explains why Duane Allman insisted on hanging onto his pickups when he swapped his ’57 Goldtop for a ’59 Burst.
In a nutshell, steel screws give P-90s and PAFs a little more bite, edge and midrange push. Everything else being equal, brass screws will give you more sweetness, clarity and smoother dynamics. As ever, it depends on your priorities.
The bottom line
The artistry in pickup making is the way the coils are wound and an understanding of how all the components sound and interact. Even if you’re stuck with your coils, almost everything else can be changed and the affordable mods covered in this article can dramatically change the tone of your pickups.
If this has piqued your interest, check in again soon for some Fender and Gretsch pickup mods. Many thanks to Stuart Robson of Sunbear Pickups (sunbearpickups.com) for his invaluable assistance with this article.
For more DIY workshops and guides, click here.