Related Tags
DIY Workshop: Greco to Les Paul Goldtop conversion (Part Five)
This month we’ll be getting our Goldtop conversion fully playable, but first a lot of routing, gluing, filing, drilling and measuring needs to be done. Huw Price struggles with his zip forstner…
Last time in our Goldtop conversion, we applied the veneer to the body and installed the frets in our Greco’s ’board, but now we have to get those frets levelled…
It may be tempting to level frets while a fingerboard is firmly fixed to a dead flat surface, but doing so will almost certainly result in you doing the job twice. Even if a neck seems straight before the board gets glued back on, with fret heights we’re dealing in engineering tolerances and visual checks are insufficient to detect tiny irregularities.
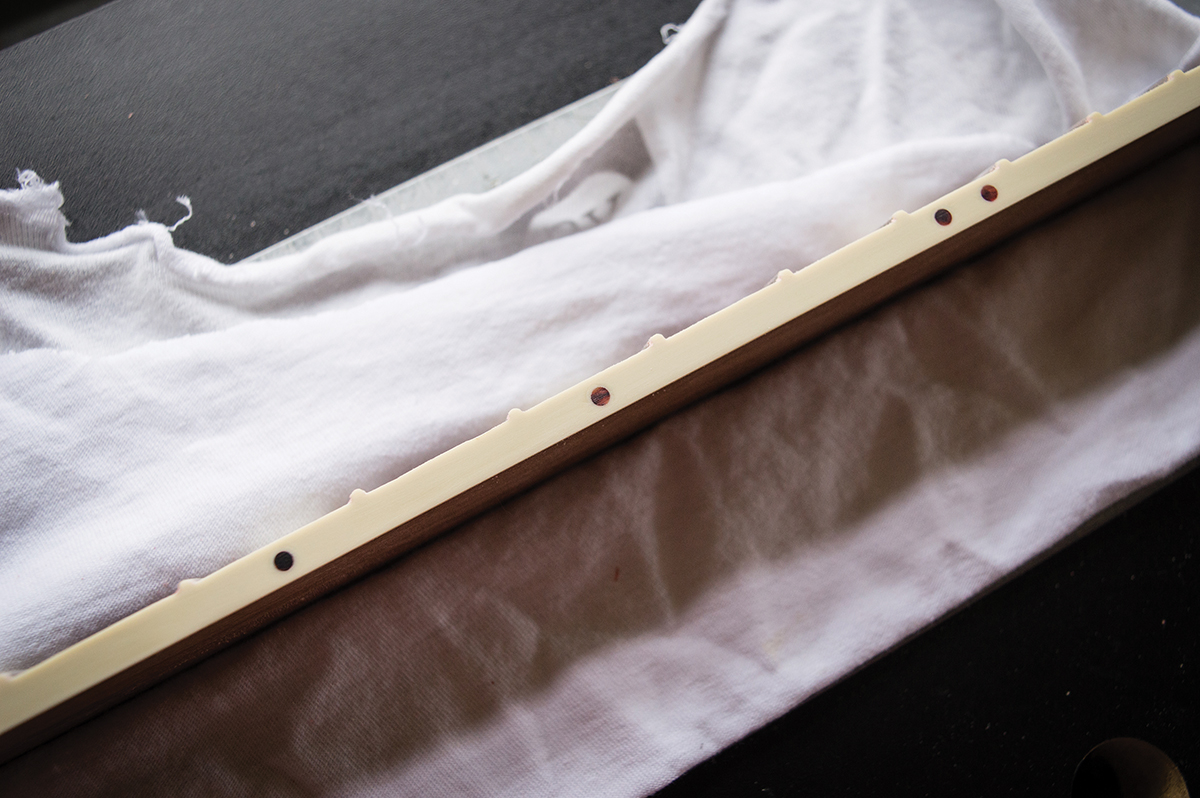
I prefer to level things up by removing metal rather than wood, so it’s time to glue the fretboard on. However, before doing so the dot markers must be installed along the fingerboard binding. If you forget, getting the dot holes drilled above the 14th fret will prove challenging.
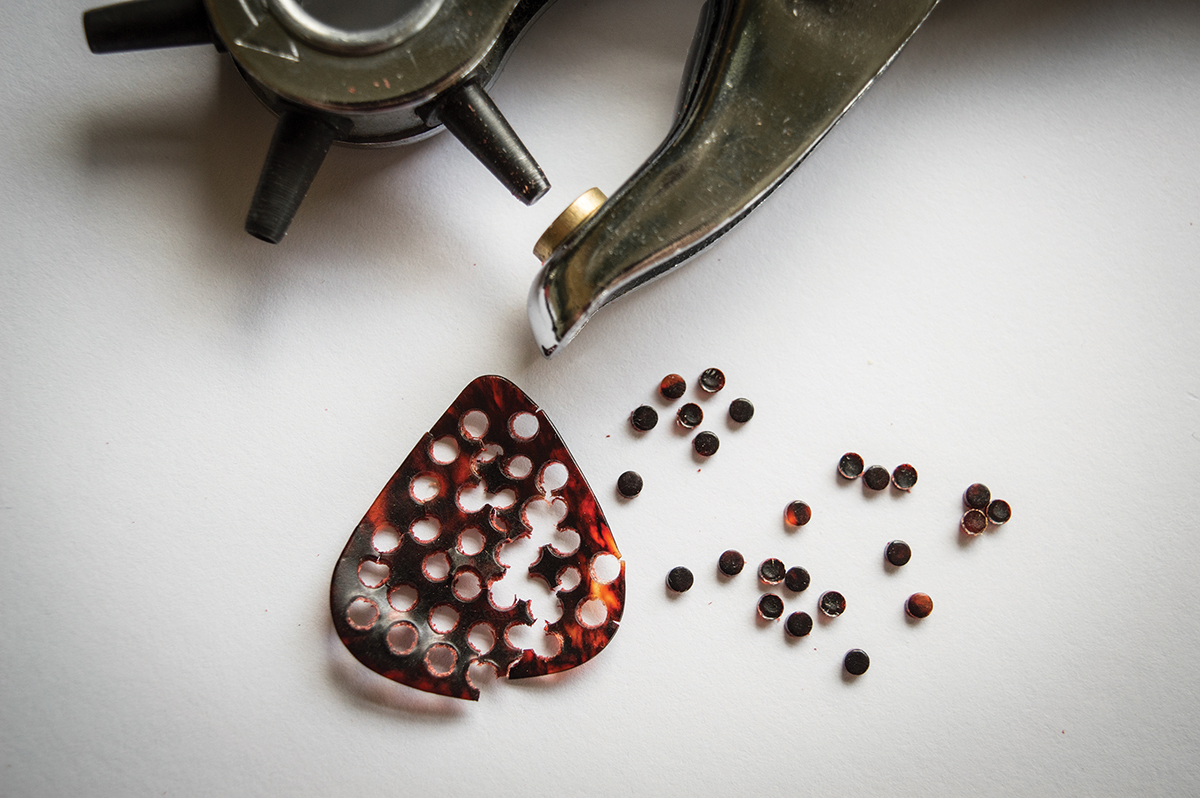
A simple hole punch and a tortoiseshell plectrum are all you need to make 50s-style marker dots
Punching holes
Most agree that vintage Les Paul marker dots were some sort of dark tortoiseshell celluloid, so I’m going to make some. All you need is a tortoiseshell-style plectrum and a hole punch tool designed for adding holes to watch straps and belts. Usually pieces of material that get punched out are discarded, but here they’re the bits we want to keep.
Examining some vintage dots, they are slightly irregular but the diameter averages out to just under 2.5mm. My hole punch has 2mm and 3mm, so I punch out some of each, drill some shallow 2mm and 3mm holes in some scrap binding and put them in with superglue. Once levelled off with 320 grit paper on a sanding block, I hold the sample dots up against the real thing.
When installed, the 3mm dots measure about 2.7mm and although they look very slightly bigger, I decide to use them. The fingerboard binding is wider than usual due to the added ’board thickness, so the 3mm dots will appear in proportion. Without actually measuring, I mark the dot positions onto the board by eye and drill 3mm holes. A dab of superglue goes into each one, followed by a dot that’s gently tapped in. Once all the dots are in, I level them off with a sanding block, taking care to remove as little binding as possible.
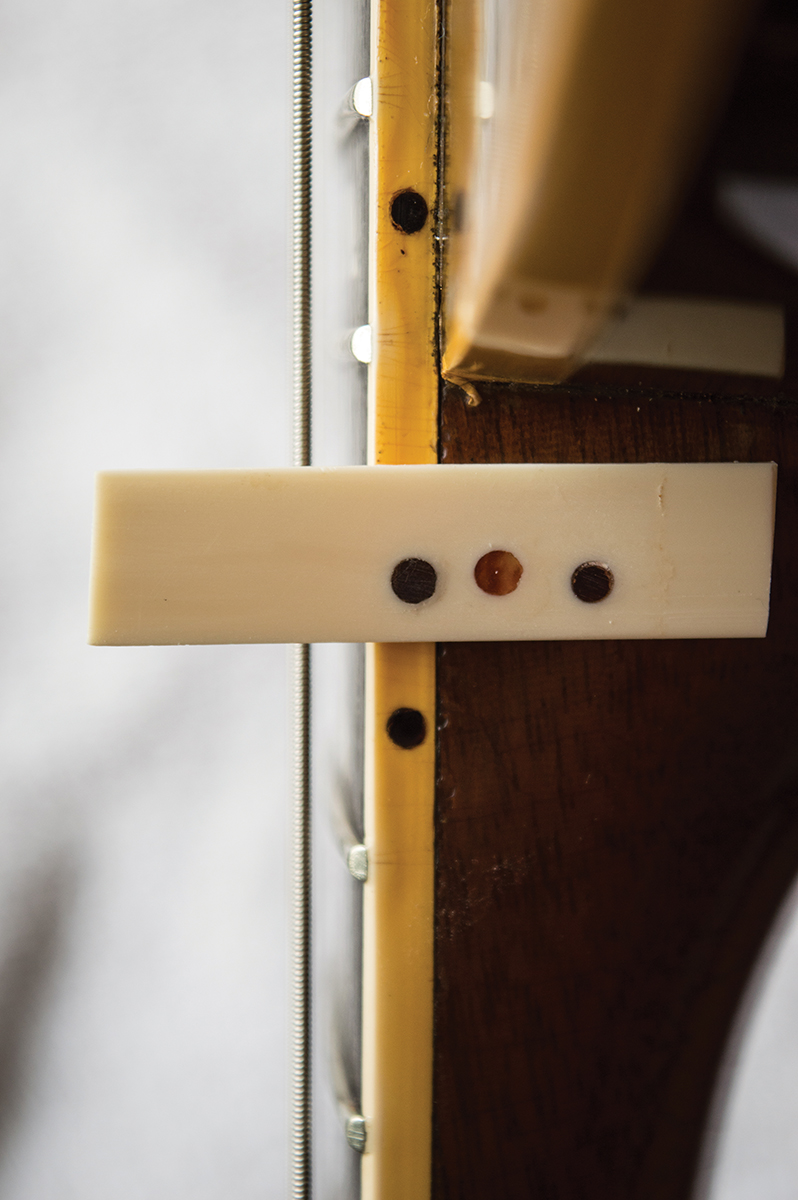
Allowing for the yellowed lacquer, our dots look pretty close to the originals
’Board stiff
Worryingly, sighting along the Greco’s neck reveals a slight backwards twist below the 2nd fret on the treble side. This isn’t something that’s easily fixed, so I decide to glue the board back on using a 40cm radius block from Crimson Guitars as a clamping caul. The block is dead straight and sufficiently thick enough to resist bending. My hope is that gluing the neck and board back together while clamped against a straight block will pull things back into line.
The process of re-gluing a fingerboard was covered in one of my Gretsch 6120 conversion Workshops. You can read about it for yourself on theguitarmagazine.com so I won’t repeat myself here. However, I will reiterate that index pins make ’board gluing relatively stress free and it’s advisable to leave everything clamped up overnight.
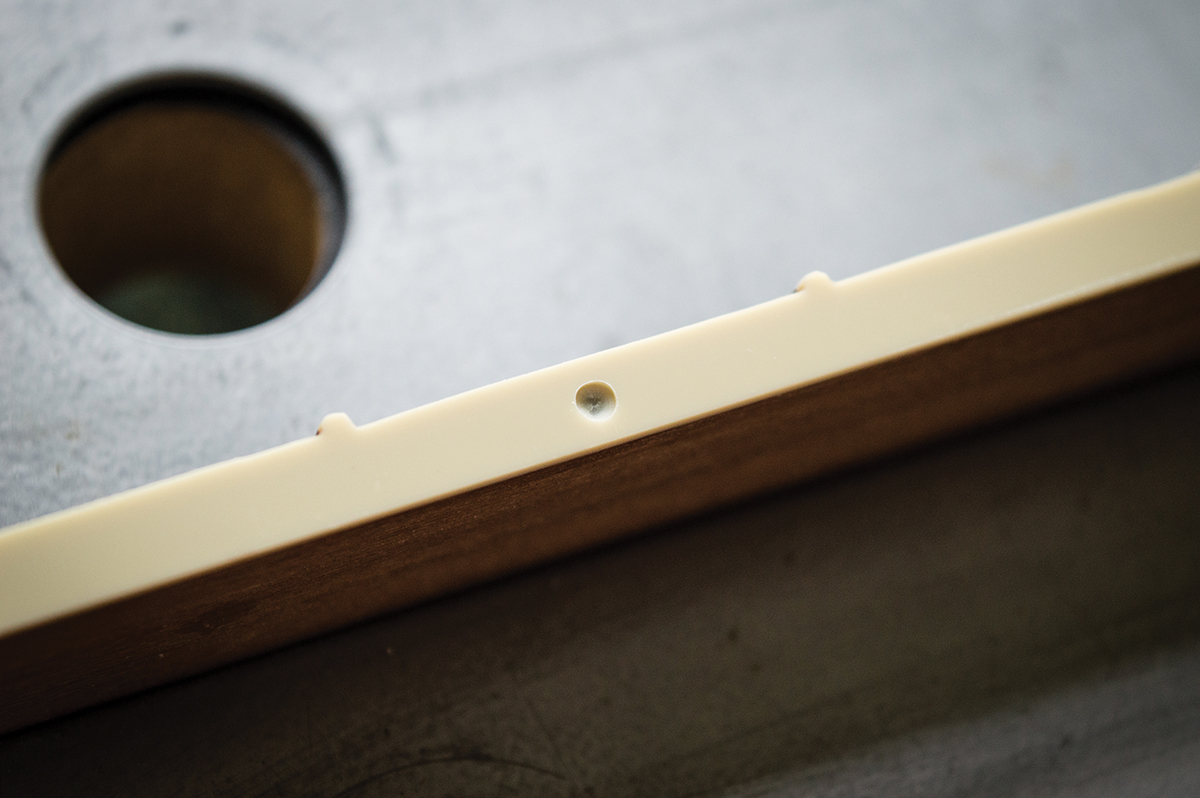
A 3mm bit is used to drill out holes in the binding
For this project, I use Titebond Original and I’m careful to wipe away all the squeeze out while it’s still fairly runny. With the clamps removed, I’m relieved to find that the twist has almost completely disappeared. I quickly sand off any binding overhangs so the neck feels smooth and I decide to string the guitar up.
First, I have to locate the bushing holes and knowing the approximate area, I lightly tap the top of the guitar’s body while listening carefully. The areas with air rather than solid maple beneath them make a different sound, and I confirm the locations by gently tapping a pin through the top. Using a pin is preferable to a test drilling because if you get this wrong, you’ll only have to fill a small and shallow pin hole.

After a drop of superglue in the hole, the dot is tapped in and within minutes it’s ready for levelling
With the bushing holes located I widen the pin holes with a 3mm drill bit then gently open them out using a small file. The bushings are tapped back in – remembering the ground wire on the treble side – with the studs screwed half way into the bushings. It’s preferable to tap the studs rather than risk denting the body by attempting to tap the bushings in with a mallet.
With the old nut shimmed on a couple of veneer strips and the guitar strung up, I’m pleased to find it sounds as good as before and plays pretty well. I decide to level, crown and polish the frets because I want the guitar playing properly before I begin re-shaping the neck.
We deliberately went for some colour variation with the dots and after levelling they look pretty good
Best in profile
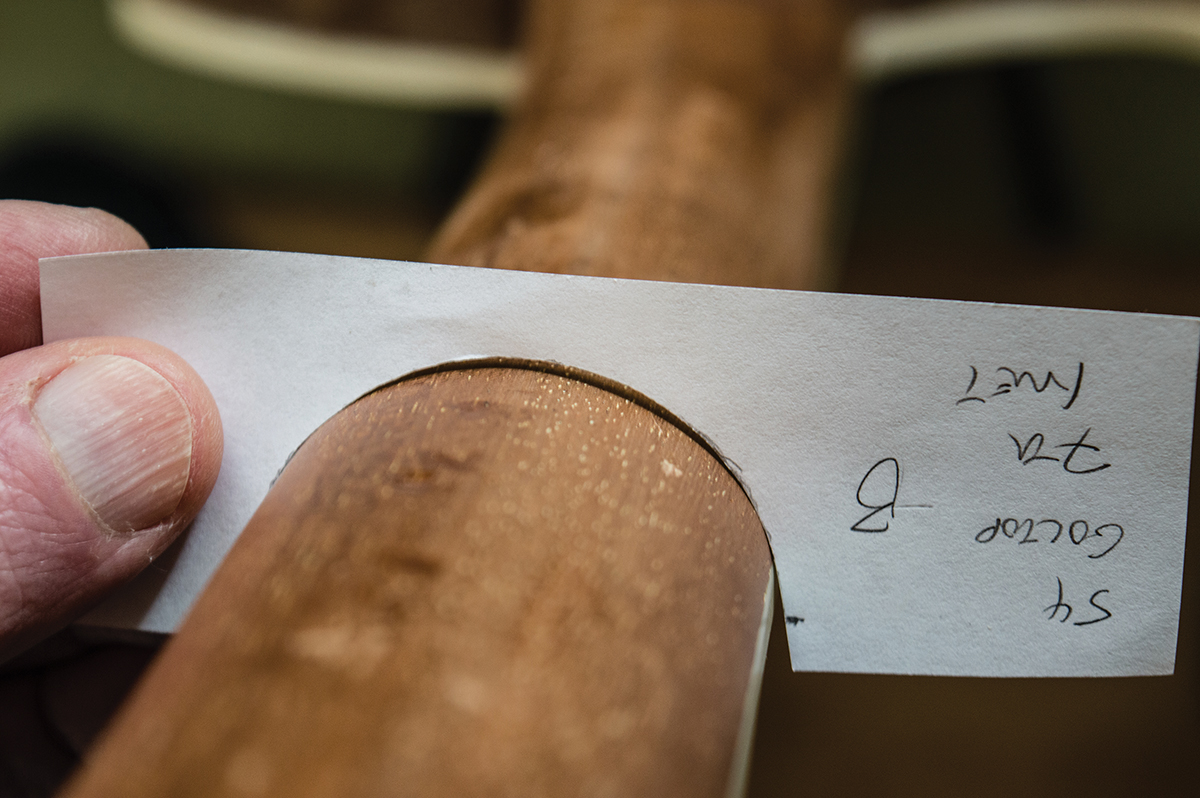
The increase in neck depth is immediately apparent, but the Greco still doesn’t feel much like a proper 1950s Les Paul. The ’54 Goldtop we measured has depth readings of 23.06mm, 23.97mm and 25.92mm at the 1st, 7th and 12th frets. The Greco now reads 22.48mm, 24.22mm and 27.05mm, so there’s certainly enough wood to work with.
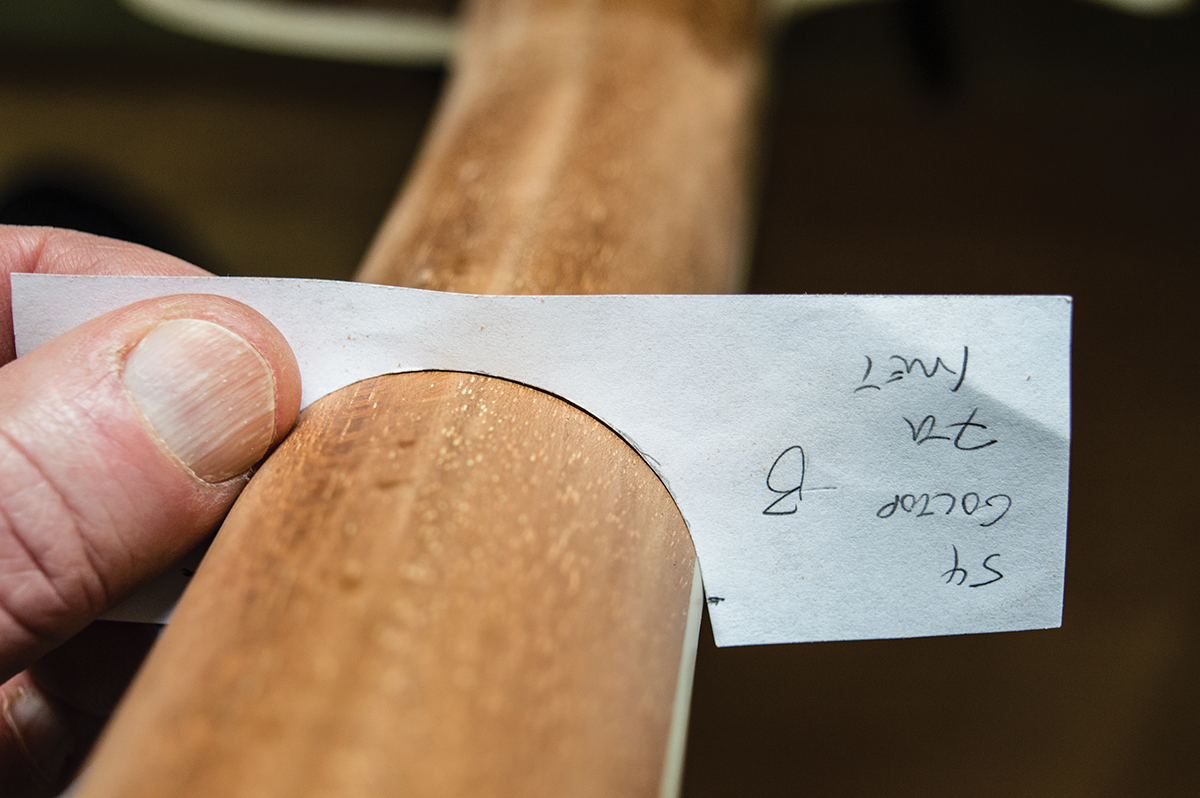
To approximate an authentically 1950s feel, I’ll have to re-profile the neck, and that’s where the neck templates I made from the ’54 will be used. Offering them up to the Greco neck, it can be seen that the Greco has too much shoulder. I decide to make pencil marks on the wood where the neck touches the template, then I file wood from those areas before checking again with the templates.

A 40cm radius block from Crimson Guitars makes a fine clamping caul and helps to correct a slight neck twist
Things begin with the templates sitting high on the neck. At first glance, you might think the neck has insufficient depth, but our measurements disprove that. By carefully removing wood from the spots that touch the templates, the templates gradually begin to drop lower onto the neck with more wood to template contact.
I work slowly, continually checking progress, and eventually the templates and neck shape begin to conform really well. The 7th fret template can be used further back along the neck and once I’m comfortable with the process, I begin to even things out between the 1st, 7th and 12th frets using a sanding block. It’s also fascinating to experience how the feel of the guitar changes while you are working.
The template demonstrates that there is too much shoulder and wood must be removed from the areas where the neck touches the template
Although very little material is removed, the effect is dramatic. As my TGM colleague Ed Oleszko recently observed, “There’s never anything in the way when you’re playing a 50s Gibson neck”. Their hybrid of a D and a very soft V conforms perfectly to the contours of your hand and, as I’m carving, I feel the neck – both literally and metaphorically – begin to vanish.
There is another observation worth making. It’s often said that vintage Gibson necks all felt different because they were hand-carved. However, in my experience two 50s Gibsons from the same year tend to be more remarkable for their similarities than their differences. Just before getting into the neck reshaping, I borrowed a different 1954 Goldtop to make a second set of templates for comparison.
As it turned out it wasn’t necessary, for the simple reason that the templates I made from the first ’54 fit the second one perfectly. It was more than a close fit – it was absolutely identical. Granted two guitars hardly constitute a representative sample, but I’m not entirely surprised. To achieve that level of consistency demonstrates the extraordinary skill of the craftsmen who carved Gibson necks during that era.

Pencil marks show the high spots and help us to target the right areas with our files and scrapers
Perfect Positioning
There’s another good reason for re-stringing the guitar at this point, besides the opportunity to gauge the feel of the neck as it is being re-carved, and the sheer fun of it! When visiting with B&G Guitars a while back, luthier Eliran Barashi told me, “We rout the pickup cavities after the neck is attached so we can get a true centre line for the strings to line up exactly with the polepieces.” That stuck in my mind because it’s surprising how many modern guitars turn up for review with misaligned pickups. I certainly didn’t want to make the same mistake having gone to so much trouble correcting the Greco’s misaligned bridge.
The altered profile is almost perfect and another fraction of a millimetre off the shoulders will finish the job
With insufficient body to string clearance to squeeze a P-90 cover into the neck position, I place the cover onto a piece of white card to trace around the outside, then I flip it upside down to mark the screw holes. With the card template cut out, I apply a little double-sided tape to the back, lessen its tack strength by sticking it onto my clothes and peeling it off a few times, and then place it in position on the body. Be careful with double sided tape on unfinished wood because it’s strong enough to tear wood fibres.
I measure precisely three inches from the bridge side edge of my P-90 template to establish the position for the front edge of the bridge pickup cover. This time there’s sufficient clearance for the cover itself. I slide it under the strings, align it with the strings and the edge line, and then mark around the cover and the card template. This establishes the exact positions for the new pickup cavities.
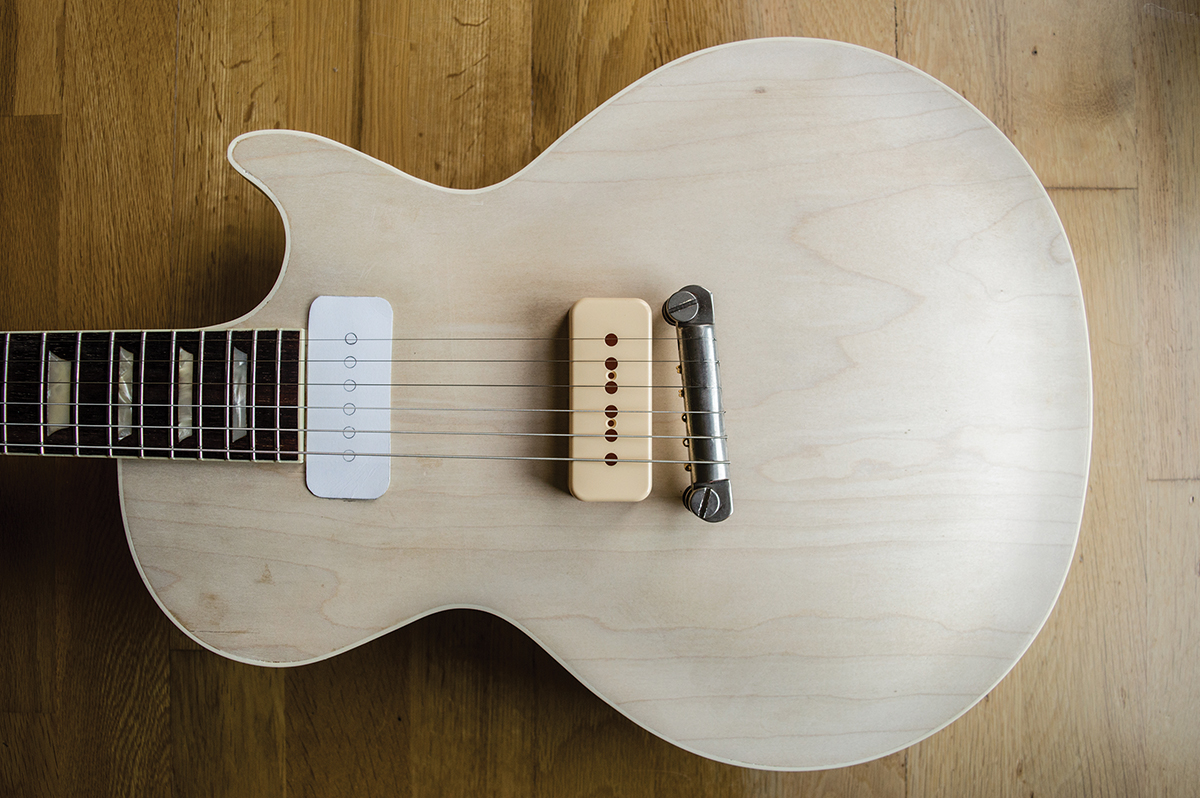
Establishing the correct pickup positions with the guitar strung up ensures the best alignment of strings and pole screws
Into The Hole
I’m hoping that routing the pickup holes will be the final scary part of this project, so with fingers firmly crossed I reach for the P-90 routing templates that Jim Lewis kindly made for me, along with the body cradle I made for routing the body in preparation for plugging.
The main difference this time is that the pickup routs must match the back angle of the neck. So, instead of having the body lie flat in its cradle, I decide to ramp it up at the neck end. With the cradle on a perfectly level surface, I place a length of 2x2cm wood under the body, oriented side-to-side to prevent the body from rocking, and slowly push it back until the fingerboard is level. You can place a spirit level along the fingerboard for this or even use a spirit level app on a smartphone.
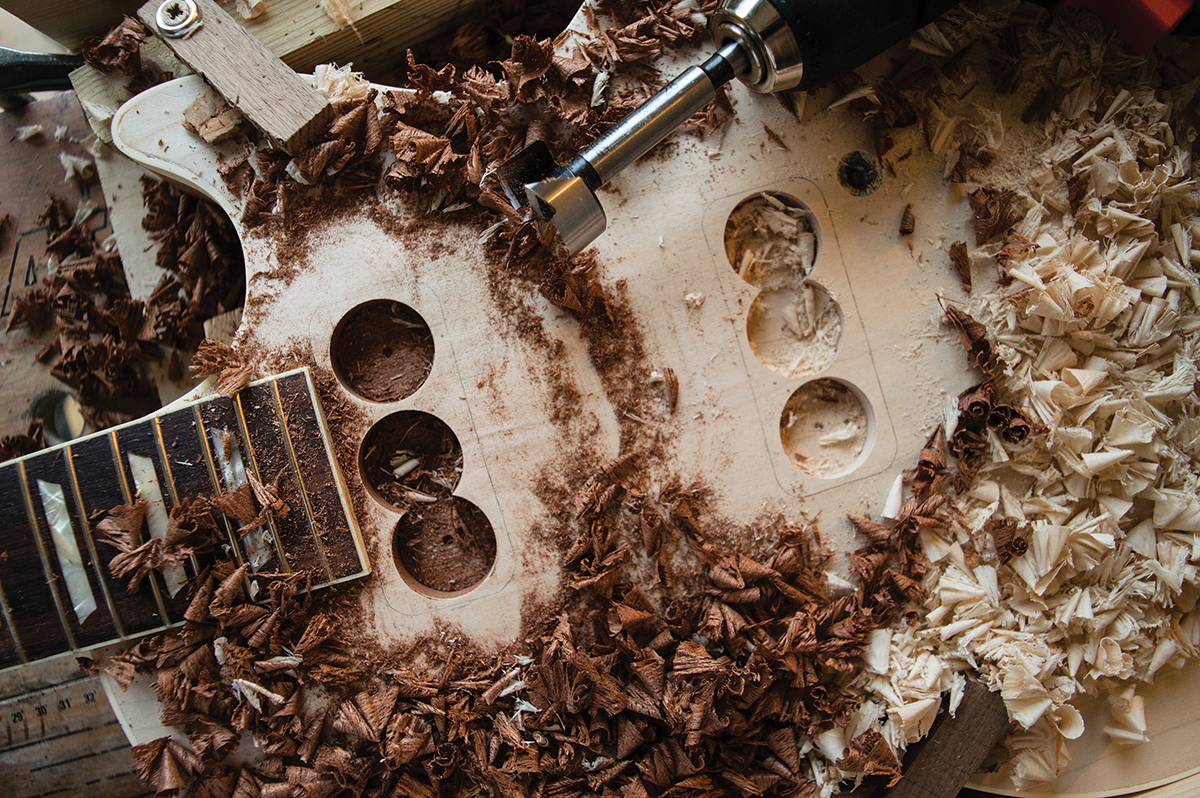
A 28mm forstner bit removes most of the wood from the pickup holes before we begin routing
Once the fingerboard is level, I clamp the body down using the same method detailed previously in this Workshop series and Jim’s small P-90 template is used to create a template on a longer piece of 12mm MDF that spans the body cradle. However, before routing, I use a 28mm diameter forstner bit and a drill to hog out most of the wood. This is quicker and easier than doing it with a router, and far less risky.
The forstner bit takes the P-90 cavities to just short of full depth, then I carefully line up the routing template over the outline I marked in the bridge position. After clamping down the template, I re-check its alignment and fit a bearing guided router bit into my router.

The routing template is in position and we are finally ready to rout holes for the P-90s
Depth is set so the first pass only cuts a few millimetres into the body. Trying to take out too much wood in one go, increases the likelihood of tearing chunks of the body. I take it gradually, dropping the router bit 3 or 4mm lower for each pass until the hole depth matches the readings I took from the ’54 Goldtop.
With the router bit butted up against the treble side of the hole, I mark the edge of the router base on the template and then measure half an inch towards the bass side and use double-sided tape to stick a wood baton across the template. This creates an end stop for router base.
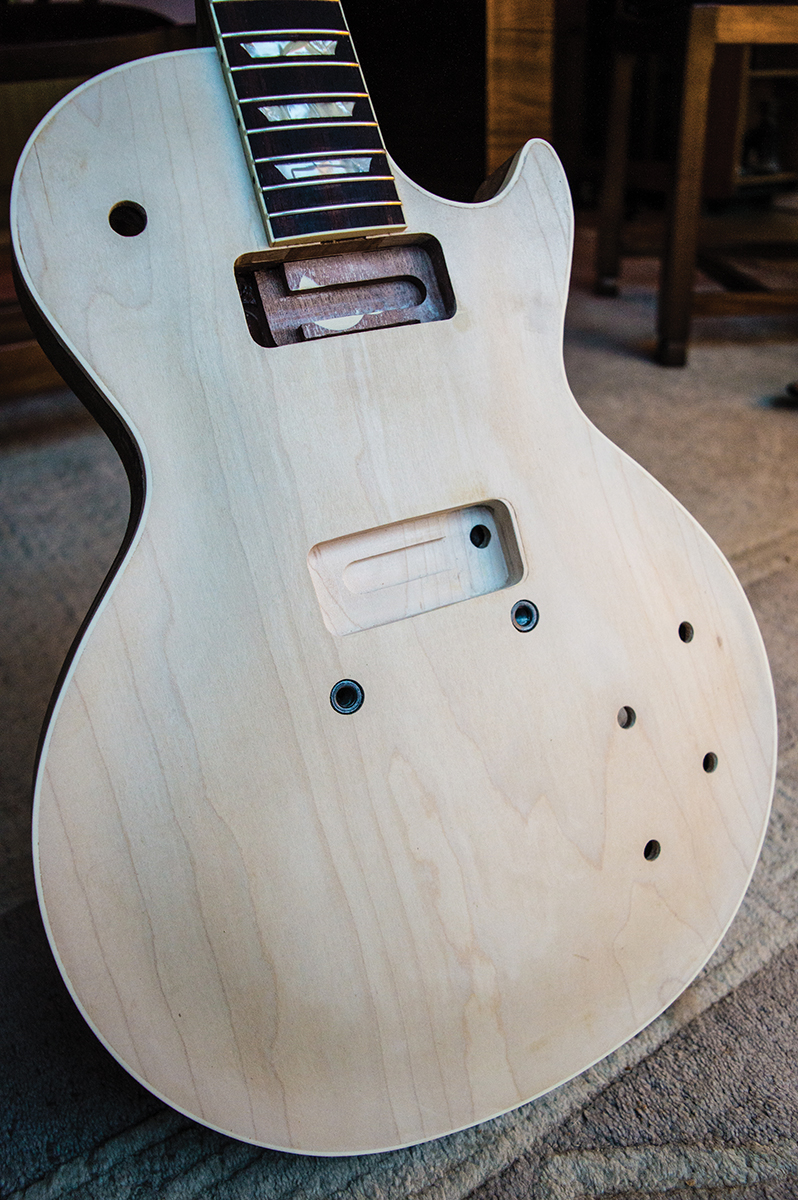
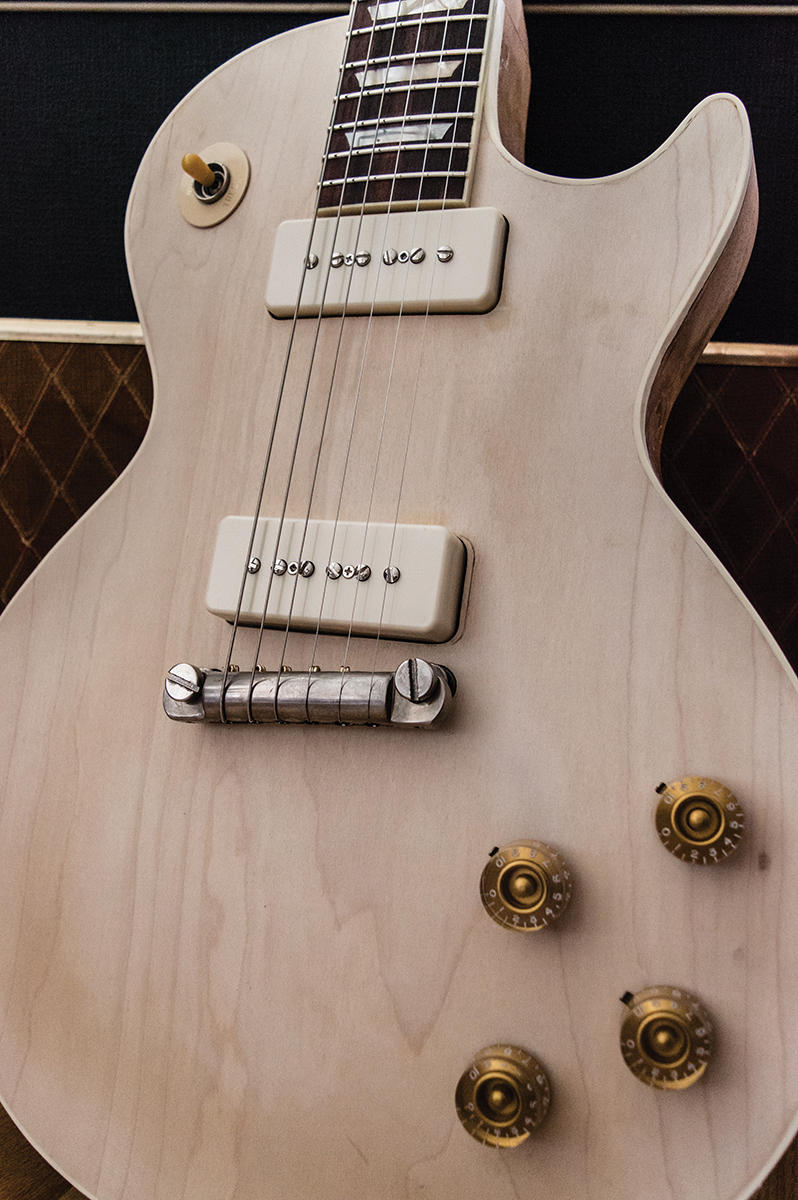
With the pickup routs done and the switch and control holes opened out, the guitar is ready for a trial assembly
The bit is lowered further and I rout the square-ish lower section on the treble side. I then remove the wood end stop, slide the router template towards the bridge until the router bit is lined up on the centre line of the cavity. The template is re-clamped and without altering bit depth, I rout the trough that provides clearance for the pole screws.
Besides some minor veneer chip out on the treble side that I have to patch up, all goes fairly well. I employ a little guesswork to locate the wire channel under the corner of the pickup cavity with a 3mm drill bit and I use an 8mm to widen the hole.
The process is repeated for the neck pickup cavity and after opening out the switch and control holes I’m ready to install the pickups and test that the wiring can still be routed through the body. Fortunately, everything works, and in the next instalment the body will be painted. I’ll also go shopping for parts, and engage in a bit of relicing.