Music Composition for Beginners 5: Breaking out of CAGED (Part 1)
With our ‘PIRII’ system, you’ll be able to unlock all the basic major and minor chords along the fretboard in a snap.
CAGED is one of the most fundamental guitar theory and technique systems. It lays the groundwork for identifying and playing chords in any key, based on five basic chord shapes. But it isn’t exactly foolproof.
With awkward C, D and G shapes, it can be tough to figure out where to position your fingers should you want to play, say, a G major an octave up from a regular Open G. That’s where our PIRII system comes in.
After this lesson, you’ll be able to:
- Identify and play CAGED chord shapes anywhere along the neck, without a capo
- Use a mnemonic device to remember exact finger positions
- Broaden your arsenal of chord voicings
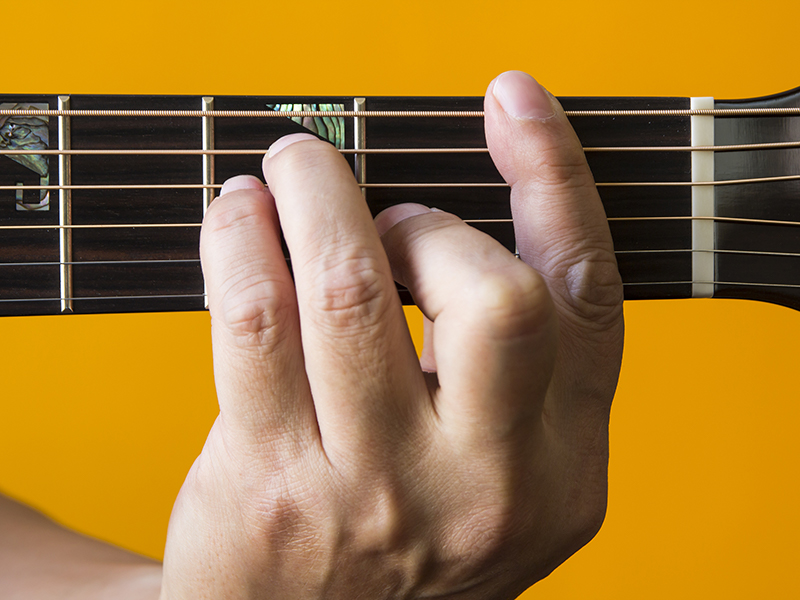
Knowledge of CAGED is essential, so check out our previous lesson on the system before starting this one. Oh, and because some of these chord shapes require a good stretch of your digits, it helps to go through a few finger exercises, too.
What is PIRII?
Simply put, PIRII is a shortcut for learning the CAGED system. It helps you to quickly identify alternate chord shapes along the neck, which opens up a wide palette of voicings beyond those of your basic open chords.
First, take a look at this diagram:
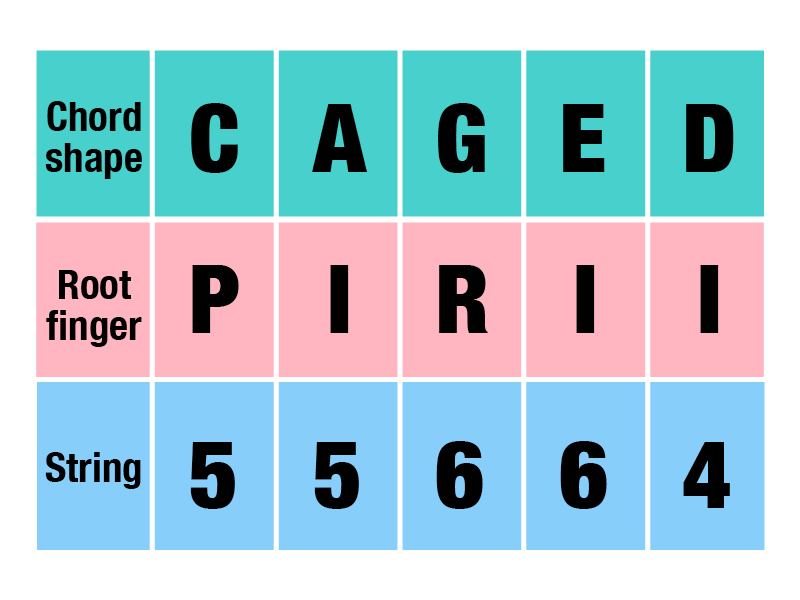
“CAGED” is an acronym for the five open chord shapes: C, A, G, E and D. And “PIRII” stands for “Pinky, Index, Ring, Index, Index”, which refer to the finger that’s meant to hold the root note of your desired chord. Added to that are the digits “5,” “6” and “4”. These refer to strings: “6” is your low E string and “5” is your A string.
So how do they all come together?
Easy. When you’re using CAGED to form new chords, first choose an open chord shape. In that shape’s column, the respective fingers and strings correspond to the location of the root note of your desired chord.
For example, you want to play an E major chord in the C position. A glance at the “C” column brings up “Pinky” and “5”. That means you need to use your pinky to hold down the E root note on the fifth string. Which is on the seventh fret. With that ‘PIRII’ finger in place, it’s much easier to position your ring and middle fingers into the familiar Open C shape.
Now, you’re left with a ‘free’ index finger. Since a basic C major has open strings (G and E), you’ll need to use that index finger to barre the fret where those open strings—or the guitar nut – should be in this new position. So fret zero in an Open C becomes the fourth fret in this case. Barre that fret, and you have a C-shaped E major.
Using PIRII not only yields you a new E major chord shape to fool around with. As you’re higher up the neck, the chord sounds brighter – all the better to play arpeggios with – and you can now slide from a C major to an E major since your fingers are holding down the same shape.
You do, however, have to familiarise yourself with a different way of playing your chords. As your index finger becomes a capo substitute, you have to practice playing the Open C major, Open G major and Open D major with your index finger ‘free’. Those are the toughest shapes to master without having that key finger to anchor you.
Major chords with PIRII
We mentioned that with PIRII, you can slide from one chord to another. Here, we take a closer look at that and show you how it works for all the CAGED positions, starting with the C.
And to make things more recognizable, we’ve started each clip with the ‘normal’ way of playing chords before shifting to the ‘CAGED’ way and sliding up to the second chord. We’ve also added a chord diagram on the bottom-right corner of each clip; the white dot indicates the position of the ‘PIRII finger’ and, hence, the root note of the chord.
C shape: Open C major to F major
Start with a C major chord in the classic open position. Take a look at the PIRII diagram, and it shows you “Pinky” and “5”: So your little finger holds down the F root note on the A string, which is on the eighth fret, while your index finger barres the fifth fret to replace the guitar nut. Your other fingers are in the standard Open C position, just many frets higher.
Compare this F major to a regular Open F major, and you’ll hear that the former sounds more sparkling and delicate – even though they’re both the same chord.
A shape: Open A major to D major
With the E and A shapes, PIRII doesn’t deviate from the regular CAGED system. Begin with a typical A major chord. To get to a D major, the PIRII chart tells us “Index” and “5”, so slide your index finger up to the root note on the A string. It’s on the fifth fret. Barre that fifth fret with your index finger, and position your ring, middle and little fingers on the seventh frets. Looks like an A major albeit higher up, doesn’t it?
G shape: Open G major to C major
Here’s how you can transition from a G major to a C major with a slide. But first, you need to get accustomed to playing an Open G major with your ring finger on the root note.
Once that becomes comfortable, all you have to do is slide your entire hand up the fretboard until that ring finger lands on the eighth fret, or the C. Then use your index finger to barre the fifth fret. It’s an awkward shape for your fingers, but it’s well worth committing it to (muscle) memory.
E shape: E major to A major
Here’s another simple one. Start with an E major played with your pinky, ring and middle fingers. To move to the A major, you’re looking to land your pinky on the right note on the low E string, which is on the fifth fret. Your ring and middle fingers assume their regular positions, and your index finger barres the fifth fret.
D shape: D major to G major
Yikes, more awkward fingers! Using your pinky, middle and ring fingers in the Open D position is weird at first, but take the time to learn it. Few chord shapes sound as good as this when used to accompany another guitarist or to play arpeggio runs.
Start with your everyday D major with those last three fingers. According to the PIRII chart, the D shape is pegged to the index finger and the D string. Which means to play a G major in this shape, your first finger shifts up to the G note on the D string, or the fifth fret. Hold that note, then coax your other fingers to line up in the D shape in relation to that finger.
Minor chords with PIRII
Now that we have the major chords covered, it’s time to move on to their minor cousins. And because minor chords don’t exist in Open C and G shapes, you only need to deal with the A, E and D shapes, or “xAxED”. All other rules of PIRII still apply.
A minor shape: A minor to D minor
Just like the A major chord, get used to playing with your last three fingers, which makes shifting to the next chord much more seamless.
Begin with your regular A minor chord. To find a D minor in that shape, the PIRII chart instructs your index finger to find the root note on the fifth string. That’s also on the fifth fret. Your last three fingers then form the rest of the Open A minor shape. You can either leave the low and high E strings open, or change up your index finger so it barres the entire fifth fret. We’d like to think the latter is preferable, but hey – you do you.
E minor shape: E minor to A minor
Again with this minor shape, you should get accustomed to playing an Open E minor with your middle and ring fingers.
Once you have that locked down and you want to move to an A minor in the same position, you need to find the A note on the low E string – it’s on fret five – with your index finger before your other fingers catch up. Similarly, you can either leave the B and high E strings open, or barre the entire fifth fret.
D minor shape: D minor to G minor
This one requires very flexible fingers – enough to span across a four-fret range. Because if an Open D minor already involves stretching across three frets, a G minor in the same shape requires an additional finger on a lower fret. We’ll leave you to figure this one out yourself. It’s worth the stretch.
In Part 2 of this lesson, we’ll apply this PIRII system to two popular chord progressions: the I-IV-V and the i-vi.