Related Tags
DIY Workshop: Greco to Les Paul Goldtop conversion (Part Two)
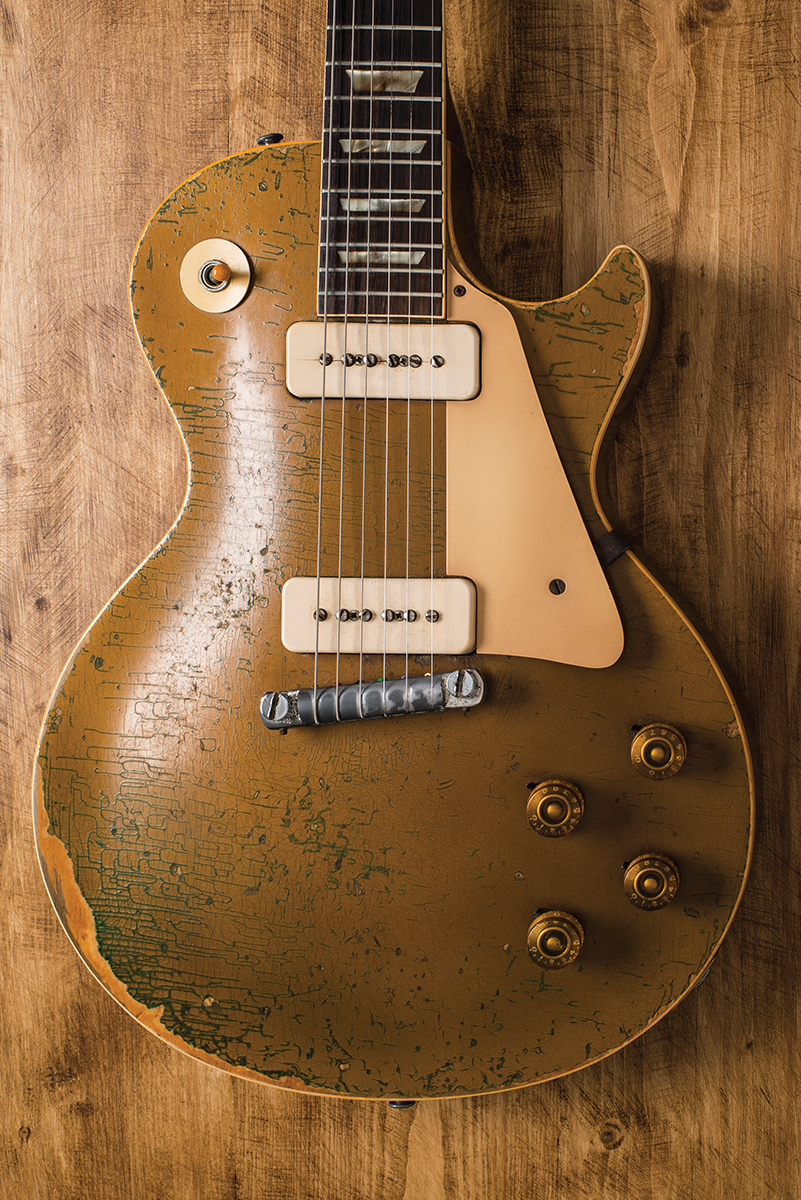
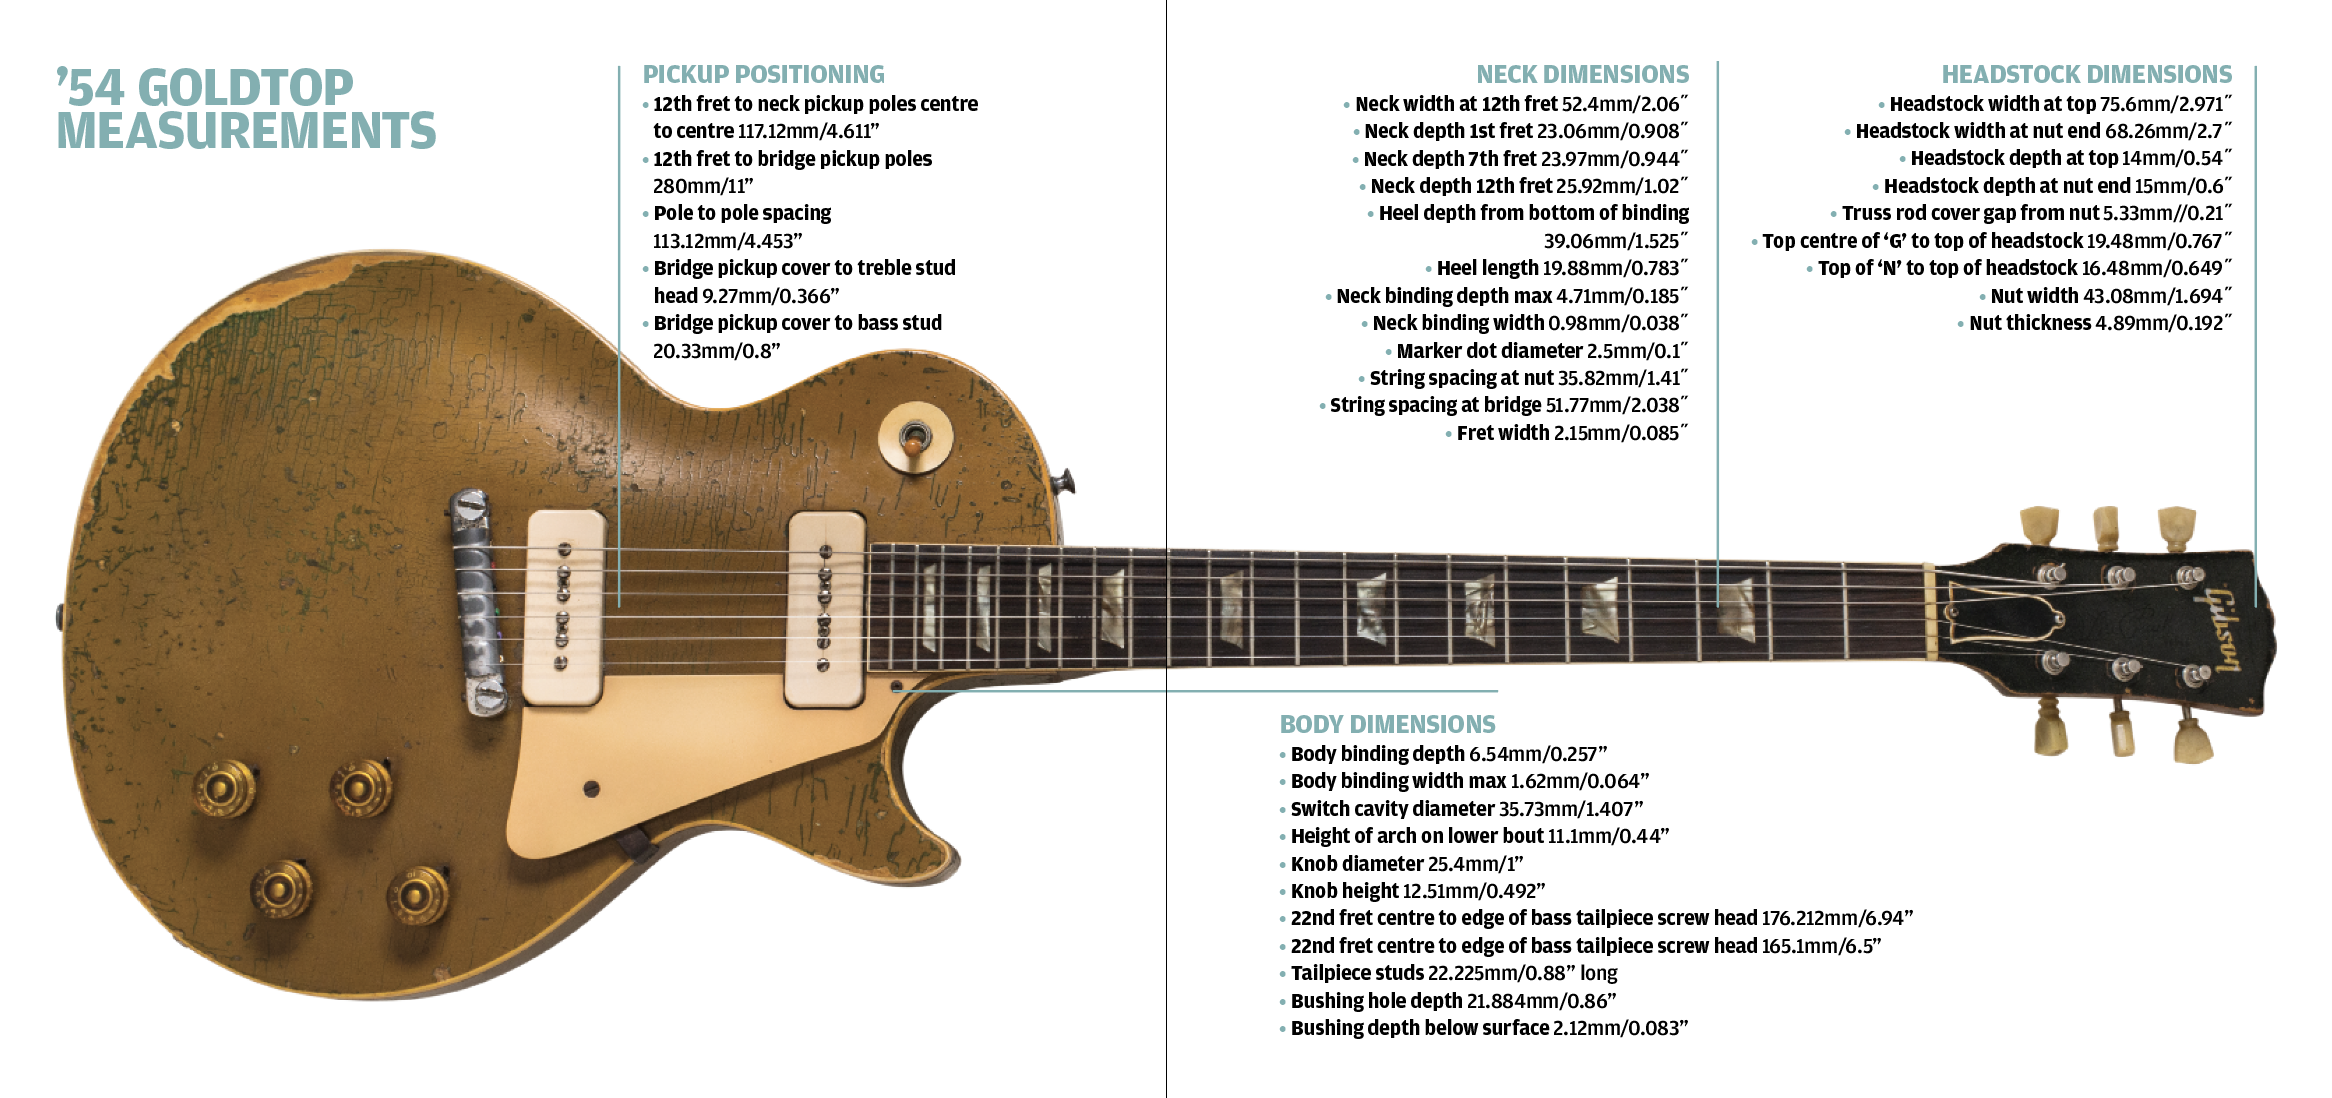
When you’re converting an old Greco guitar into a retro LP-style Goldtop, what better reference point to have than the real thing? We sit down with an original ’54 and get our ruler out…
When you’re embarking on a project that pays tribute to a classic, having access to the real thing is a dream come true. With that in mind, I’m extremely fortunate that Vintage Guitar Boutique talked the owner of this 1954 Goldtop into letting me borrow it once again.
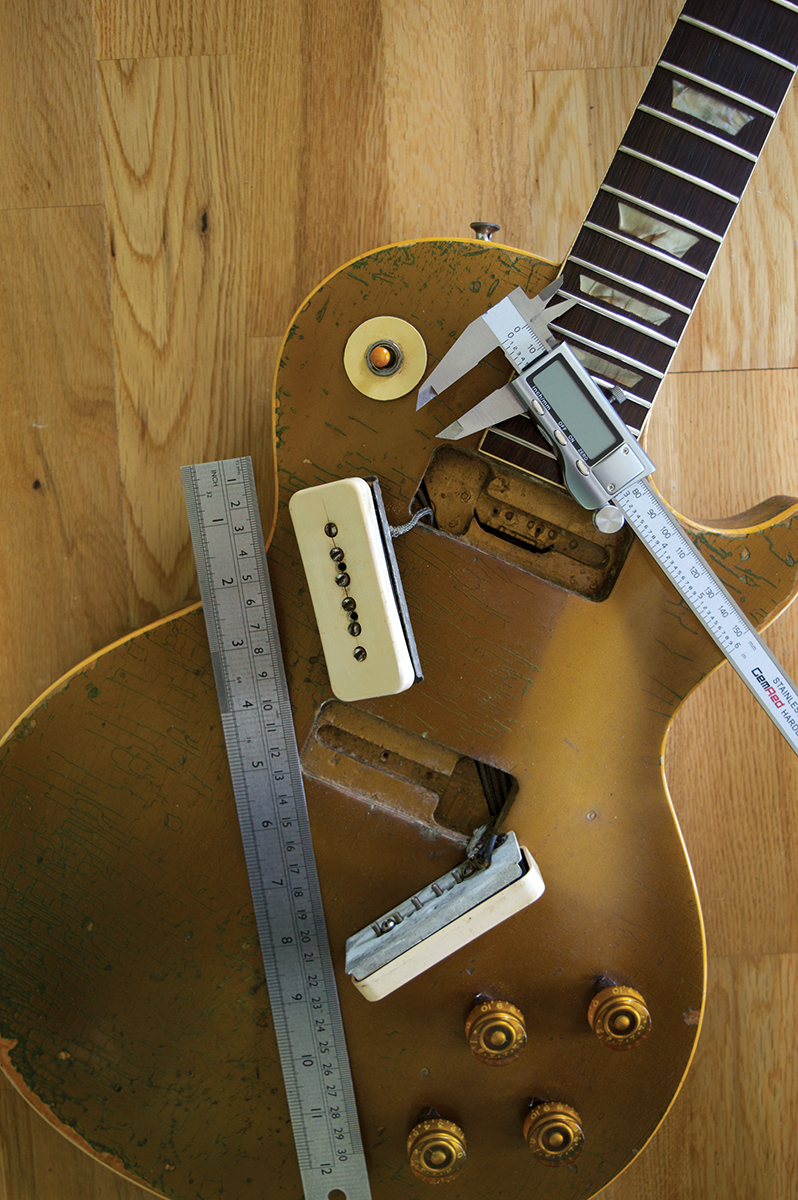
Armed with digital callipers, a micrometer, a precision steel ruler and a profile gauge, the idea is to ‘blueprint’ this guitar to try and make our homage as close as possible to the real thing. We’ll also be taking some detail shots to help with the finishing and ageing further down the line.
Getting the measure
Rather that explain a fairly straightforward but time consuming process in detail, I’ve put all the measurements into tables with both imperial and metric figures, which you can find below. Bear in mind that mid-1950s Gibsons were not made by CNC routing machines, so the figures apply to this Goldtop, but other Les Pauls from this era may vary to some degree.
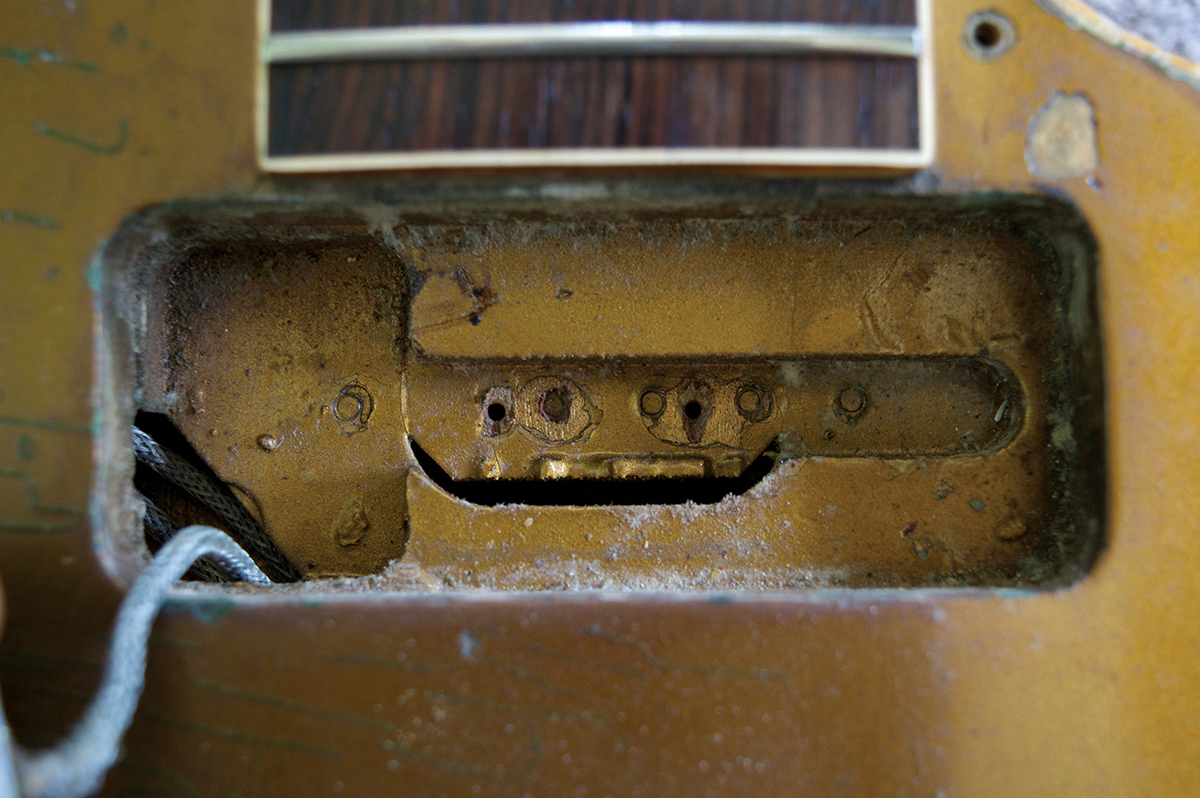
In the neck pickup rout you can make out the end of the neck tenon and see the wire channel in the bottom right corner
I’ve also provided diagrams for the pickup routs because it’s the easiest way to present the information. In other areas, I created templates for reference. Simply remove the pickguard, place it upside down on a piece of A4 paper then draw around the edge and mark the position of the screws using a pencil. All measurements below 150mm are taken with digital callipers and I used a steel ruler for those above.
In-depth profile
In these circumstances, it would have been handy if I could have borrowed one of Gibson’s Historic Division guys, along with their very impressive profile reading laser device to map out the neck contours of the ’54, but without that, I’m just going to have to do it myself. The process is a bit more involved than taking straight point-to-point measurements, however, because the object is to record the shape and size, and subsequently create templates to guide the neck shaping.
The digital callipers give me accurate measurements of the neck depth and width at the 1st, 7th and 12th frets. For depth I take the measurements from just behind the frets because removing the frets is obviously out of the question. To capture the neck profile at the 1st, 7th and 12th frets I use a profile gauge.
This is a gadget you can find at any decent tool suppliers, such as Axminster, Screwfix and even Wilko. My gauge came from Wilko and cost me £1.99. The gauges with fine metal needles will give you a more accurate reading than the ones with thicker plastic parts, however you should protect the neck you’re reading from being scratched by using masking tape.
Reading a neck profile is fairly straightforward, but it has to be transferred onto paper or card to create carving templates. I begin by drawing a long straight line across the centre of a sheet of paper then drawing three shorter lines at right angles across the centre line.
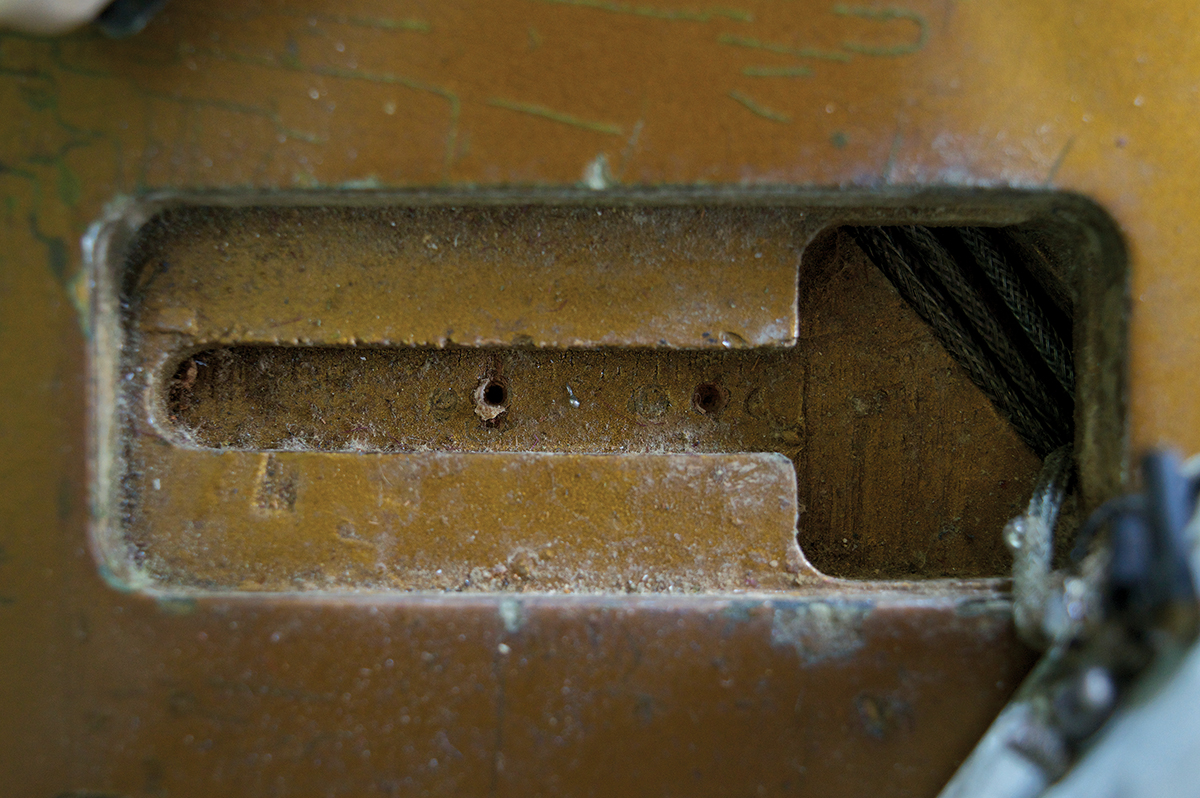
The wire channel re-emerges in the top corner of the bridge pickup rout
Taking my width measurements, I mark the points so that the bisecting lines are at the exact centre and the centre line represents the fingerboard edges. Lining up a 12-inch radius gauge with the width marks, I mark out the position of the fingerboard at each fret position. This gives me a position for the apex of the fingerboard at the centre point, and I use the digital callipers to mark the neck depth points on the centre line.
When using the profile gauge, I take a reading then place a sheet of paper along the very edge of a desk, then trace the profile reading onto the paper using a sharp pencil. The initial tracing will be a stepped line, but if the profile gauge’s teeth are fairly fine, it’s easy to turn it into a smooth curve.
When using a profile gauge like this, things always get a bit sketchy as things straighten out towards the fingerboard edges. In addition, the gauge also doesn’t give you a clear indication of the depth. So when you cut out the shape with sharp scissors, continue past the edge points of the profile reading.
Next, take the cut out template and place it over the lines you marked out on the A4 sheet. Line up the apex of the curve with the depth point you have marked on the bisecting line and the sides of the template with your fingerboard edge marks, and then trace the profile onto the A4 sheet of paper.
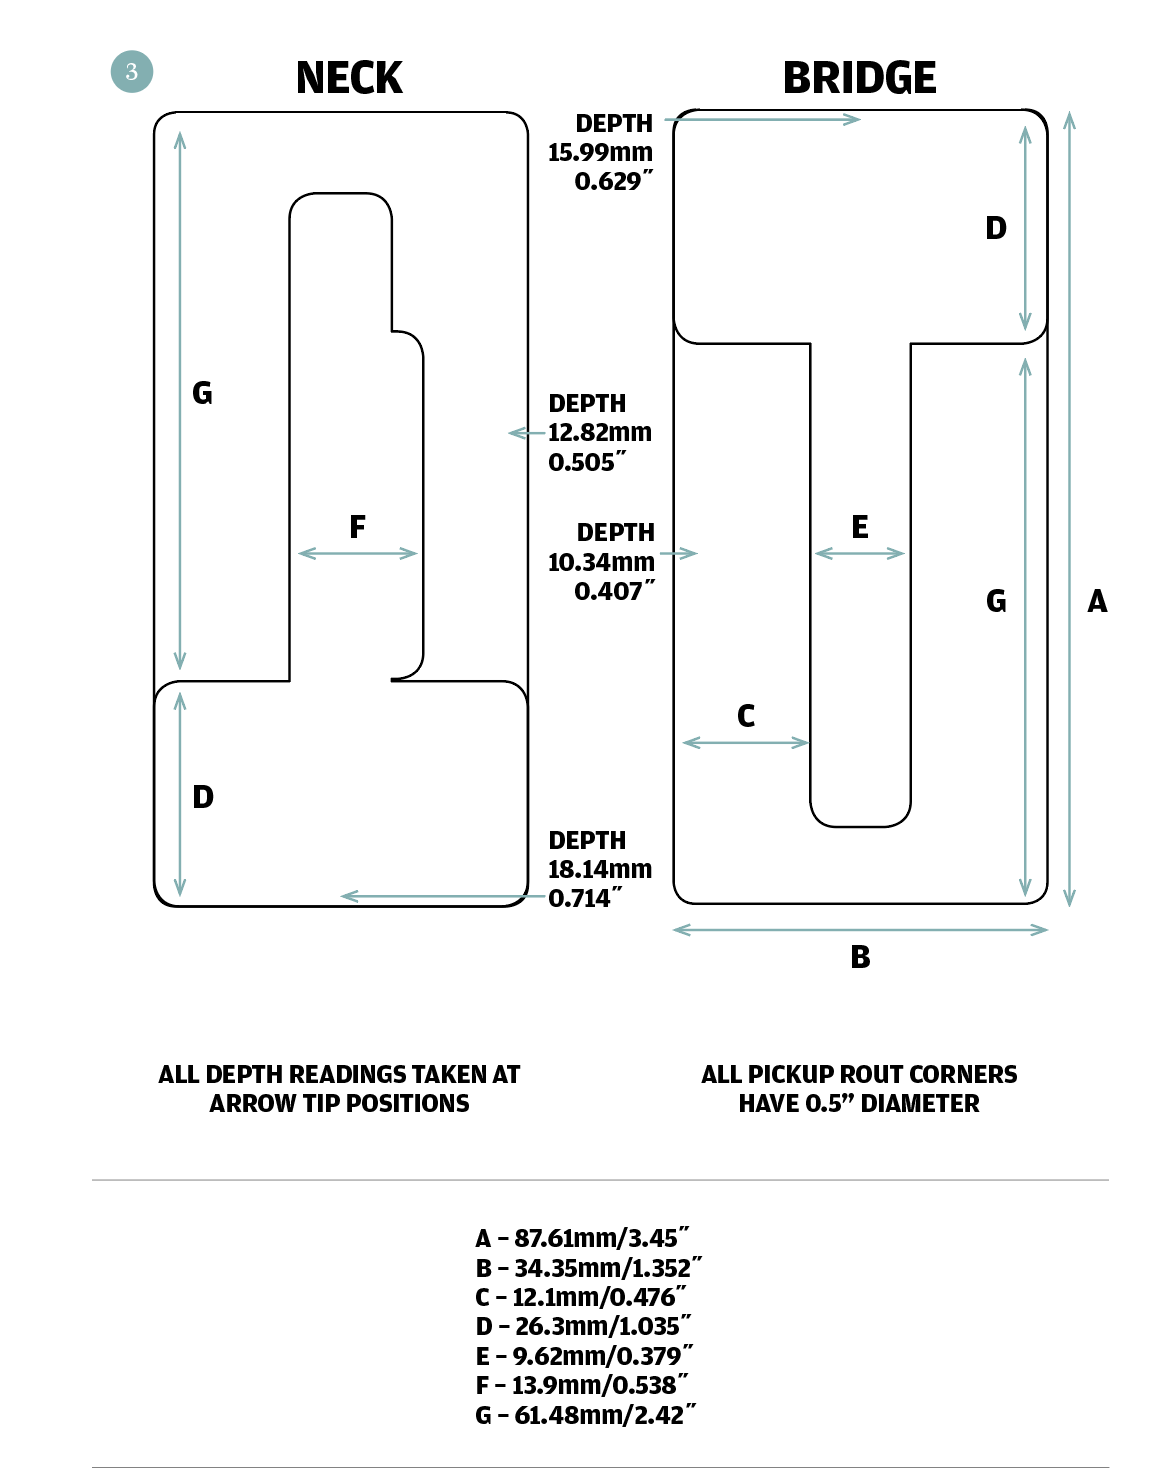
This diagram shows the dimensions of the cavities of both pickup routs on the ’54
Granted, this is nowhere near as accurate as Gibson’s hi-tech laser device, but if you use this method to create carving templates and check them against the original neck, you might be pleasantly surprised by how accurate they are. What’s more, when you can see the profile marked out on paper, it reveals a great deal about the way Gibson’s luthiers carved necks.
The shape of this ’54 neck is somewhere between a D and a V, and there isn’t even a hint of a shoulder anywhere along the length. The curve begins straight away at the edges of the board and progresses quickly. In my opinion it’s the reason why vintage Gibson necks can be over an inch deep, yet still feel supremely comfortable. The oft-used terms ‘clubby’ and ‘baseball bat’ are simply inappropriate.
I’m planning to apply templates made using this procedure to finesse the Greco’s neck. At present it feels too shallow and the profile is somewhere between a D and a U, so I hope there will be enough wood to work with. I guess I’ll find out!
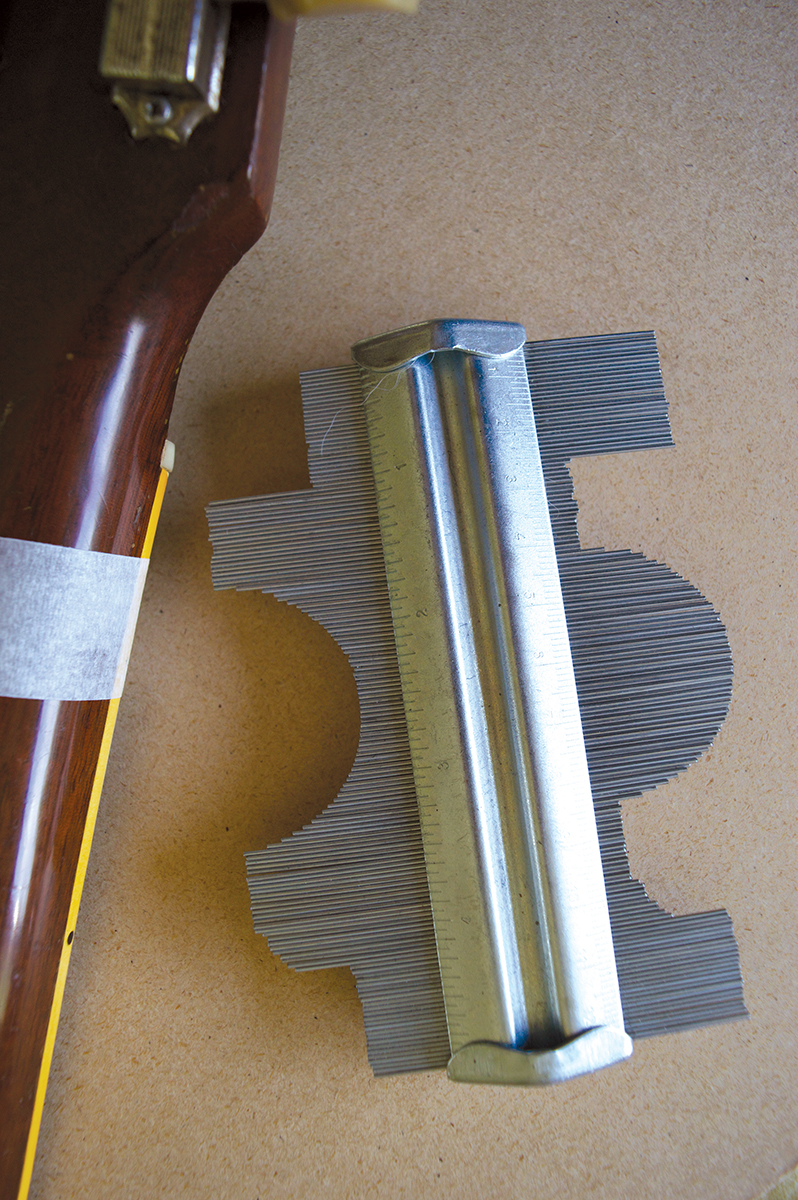
This profile gauge came from Wilco and the masking tape is used to protect the neck finish when taking readings
Wrap music
The next things on the agenda are the bridge studs and bushings. Much is made of the length of the bushings and the type of metal they’re made from. According to the late Steve Rowan of Pigtail Music, vintage Gibson bushings were variously 0.5, 0.88, 1, and 1.25 inches in length and made from steel. Apparently many of the Gibson Historics have 0.75-inch brass bushings, but for wrapover tailpieces one-inch bushings are preferable because it helps to prevent bridges from leaning due to string pull.
This is one area where it may be advisable to deviate from vintage, because even with 0.88-inch bushings, the bridge studs on the Goldtop have begun to lean forwards and the wrapover is jacked back on its adjustment screws to compensate.
Common sense would suggest that longer is better when it comes to bushings because the deeper they’re set into the body, the more resistant they should be to string pull. Having already extracted the Greco’s bushings, I use a magnet to confirm they’re steel and I was pleased to find they are also one inch long. With that in mind, I’ve decided to re-use them if possible, but I’ll need to get some relic’d studs and a decision has to be made about the tailpiece.
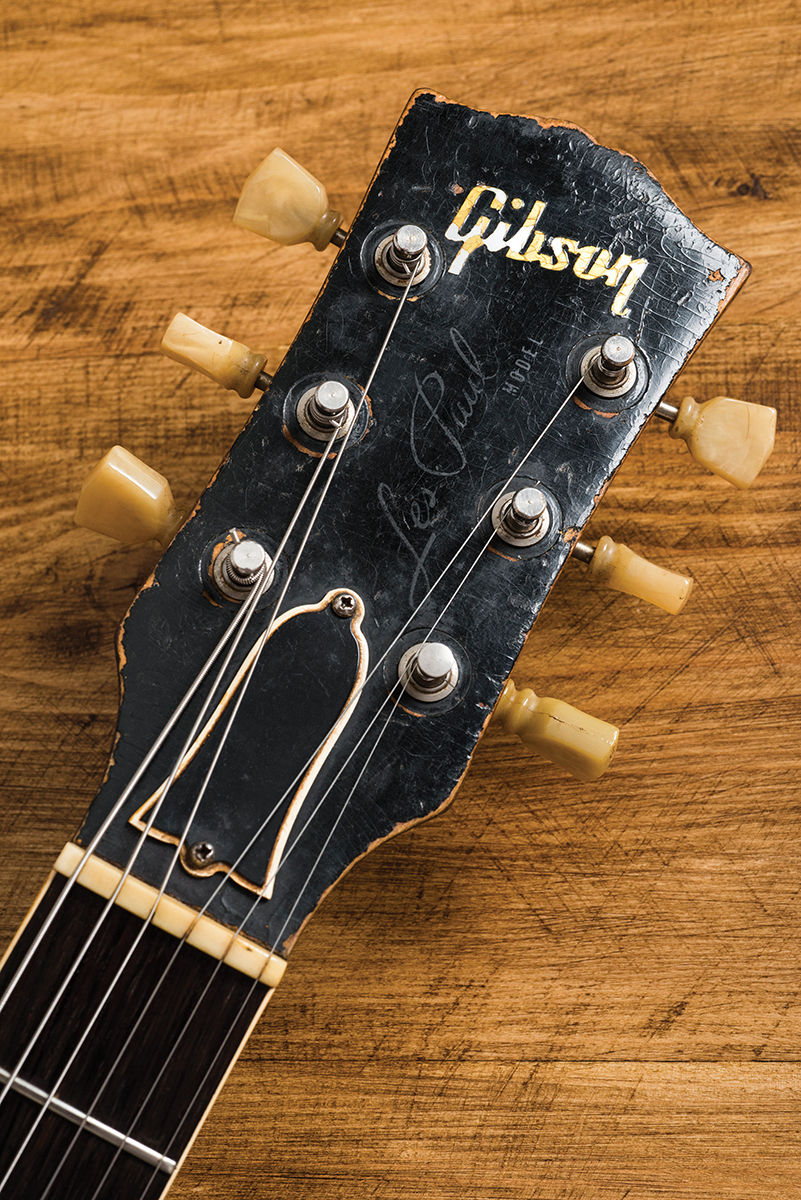
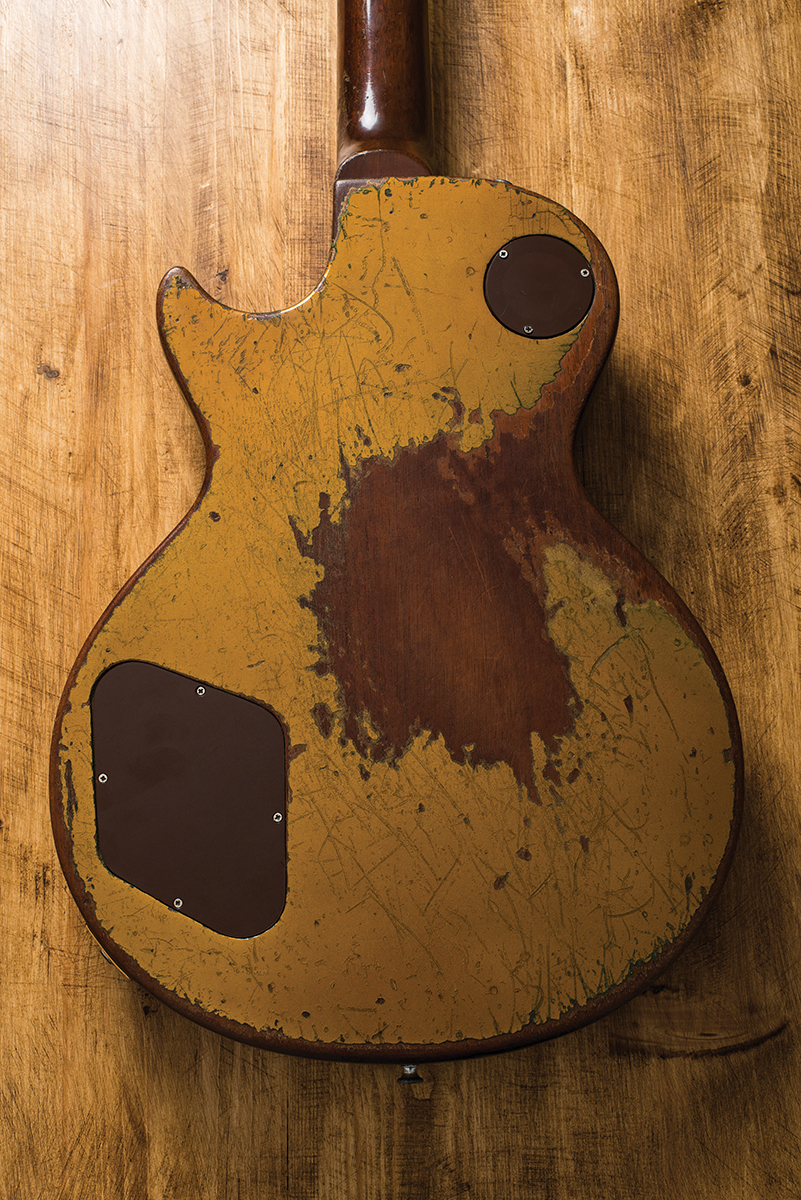
These reference photos of the 1954 Goldtop’s wear patterns will come in handy when it’s time to age our Greco
It goes without saying that I wouldn’t consider anything other than a proper 1950s spec lightweight aluminium tailpiece for this guitar. After all, the object here is to try and achieve something that’s as close as possible to the real thing sonically as well as aesthetically and physically. In my view a lightweight aluminium tailpiece is one of the best bang for buck upgrades you can make to Les Paul and ES-style guitars if you’re chasing vintage tone.
This Greco has long been fitted with a very nice relic’d Faber aluminium tailpiece and I’d certainly like to continue using it if possible. The complication, however, is that wrapover tailpieces are drilled and tapped at the back of the ‘ears’ to accommodate grub screws. These screws allow each end of the bridge to be moved further away from the neck and thereby provide some rudimentary intonation adjustment.
Faber sells aluminium wrapover bridges with adjustment screws, but my tailpiece was the type designed for use with tune-o-matic bridges. One solution is to drill and tap the ears to accommodate grub screws – in other words, to convert a regular tailpiece for use as a wrapover bridge.
You can buy metal tapping kits quite easily, or find a local metal worker to do the job for you. The Allen grub screw in the bridge of the ’54 is 0.132 inches in diameter and about 0.3 inches long – anything close to that should suffice.
On a scale of…
I’ve learned the hard way that it’s better to make guitar building mistakes before spraying the finish, so I prefer to perform a dry run as early as possible to check alignments and flag up any potential issues. In this case I decided to locate the correct position for the wrapover bridge.
This flags up a potential issue regarding vintage Gibson scale length. Although it was nominally 24.75 inches, in actuality the scale length of mid-to-late 1950s Gibsons was very slightly shorter. The way to assess scale length is to measure the distance from the nut to the centre of the 12th fret and then double it. For a 24.5-inch scale length you should see 12.38 inches, but this Goldtop actually measures 12.28 inches, which equates to a scale length of 24.56 inches. So the vintage Gibson scale length is actually 0.19 inches shorter than it is widely assumed to be.
Gibson used ‘the rule of 18’ because it was the traditional method of determining fret intervals. By successively dividing the scale length – minus the offset to the previous fret – by 18, you can determine all the fret positions. For the greatest tuning accuracy the figure should actually be 17.817, but remember those guys didn’t have pocket calculators, let alone computers or smart phones, and dividing by 18 would have been a lot easier.
These days, most guitar manufacturers divide by 17.817, and that’s certainly what the people at the Fujigen Gakki factory did when building this Greco. Consequently the scale length is bang on 24.75 inches. But does it make much of difference when the guitar is in your hands? Well, when we attended the launch of the B&G Little Sister Crossroads back in May, The North American Guitar had arranged for Robbie McIntosh to demo it.
During soundcheck he played the more affordable, ‘rule of 17.817’ Crossroads for a while, and then he swapped over to a Tel Aviv-made model, which used the rule of 18. Within seconds he was asking if the scale length was different – so there you are!
Regardless of whether mere mortals would notice any difference in tone or feel, it certainly makes a difference when determining the correct bridge placement. You can see from my measurements where the Goldtop’s bridge posts are located in relation to the 22nd fret. If I were to apply the same measurement to the Greco, the bridge would end up too far forward and I would almost certainly have difficulty setting the intonation.
Fortunately, I remembered to measure the nut to saddle distances for the two E strings before I dismantled the Greco. They were 627mm (24.685 inches) and 634.5mm (24.89 inches) for the high and low E respectively. I carefully positioned the bridge on the Greco body to ensure the centre line of the bridge was exactly the same distance away from the nut at each end. I then brought it forward by 3mm to allow for some intonation adjustment range and marked it on the body.
My original intention had been to finish up this workshop with the bridge installed and the guitar strung up, however I decided against it. The existing PAF routs are 7mm wider than P-90 routs and by my calculations the treble side bushing would end up only 5mm or so away from the bridge rout. The bushings must fit very tightly into their holes and will have to be pressed or tapped in.
With so little wood around the bushing, the risk of splitting the body is too great. Instead, I’m going to plug the PAF routs before installing the bridge, but that can wait for now!