Related Tags
DIY Workshop: Greco to Les Paul Goldtop conversion (Part Seven)
With the gold lacquer sprayed, it’s time for top coats and polishing up – but first we need to take care of the binding and start relicing some parts.
Last time around in our Greco conversion, we finished spraying gold, but the lacquer still needed to be removed all around the body’s top edge to reveal the binding before the final top coats could be sprayed.
While getting ready to do this job, I find myself watching an online video in which famed Gibson relic-meister Tom Murphy demonstrates how to get clean lines, and binding that’s square and even in depth all the way around the top edge. It’s highly impressive stuff from a genuinely skilled craftsman, and I’m all set to make a binding scraping tool when the loan of a real ’54 Goldtop gives me pause for thought.
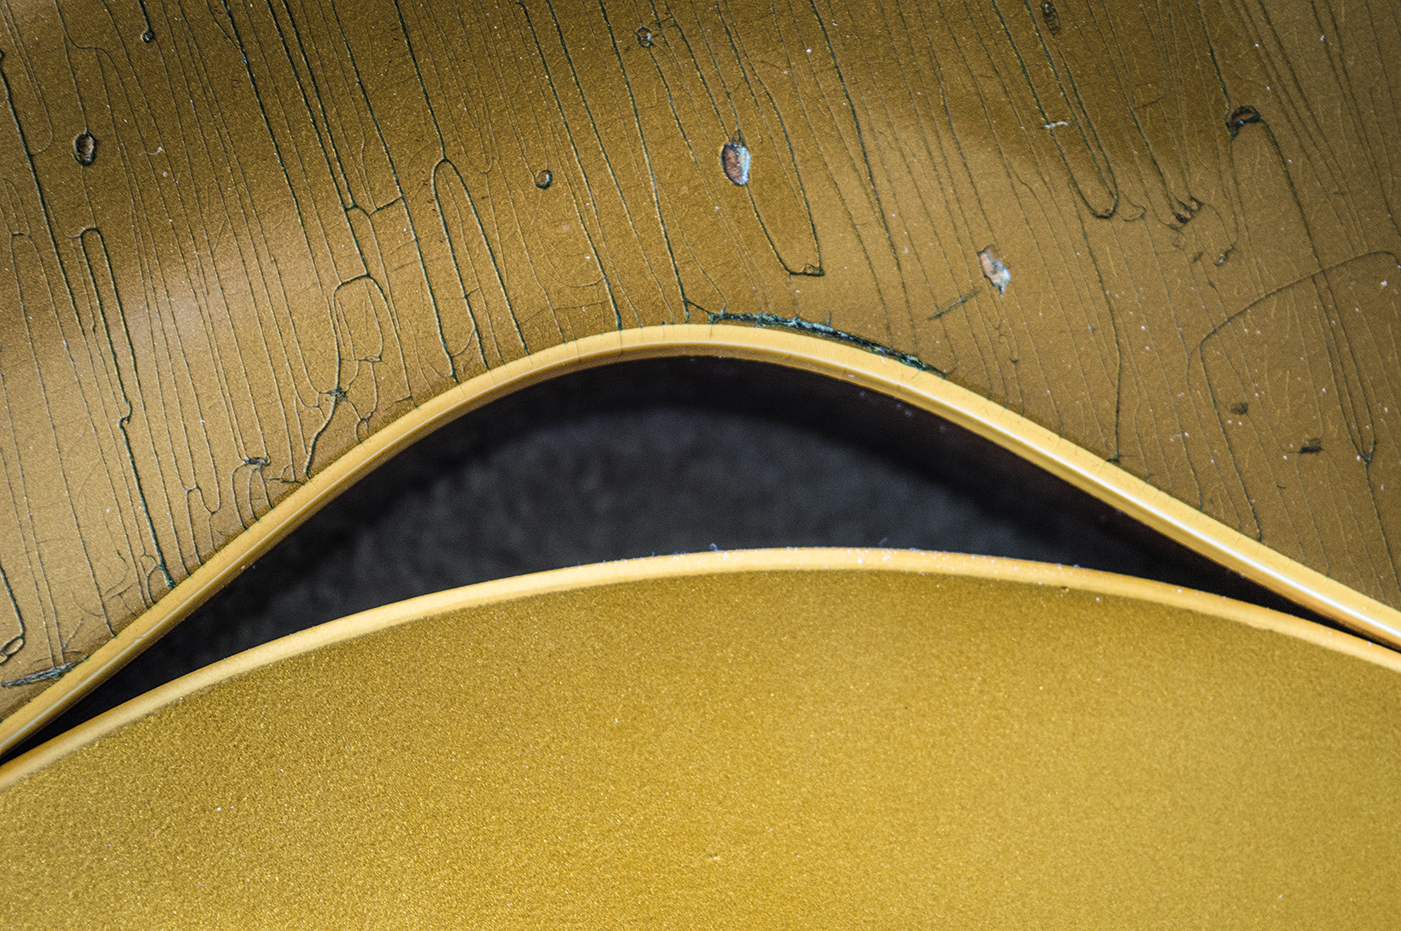
It’s immediately apparent that Gibson didn’t have someone with Murphy’s skills on the production line the day this ’54 had its binding scraped. The depth of the binding around the top edge varies between approximately 1.5mm and 3mm and it’s not square with the sides at all.
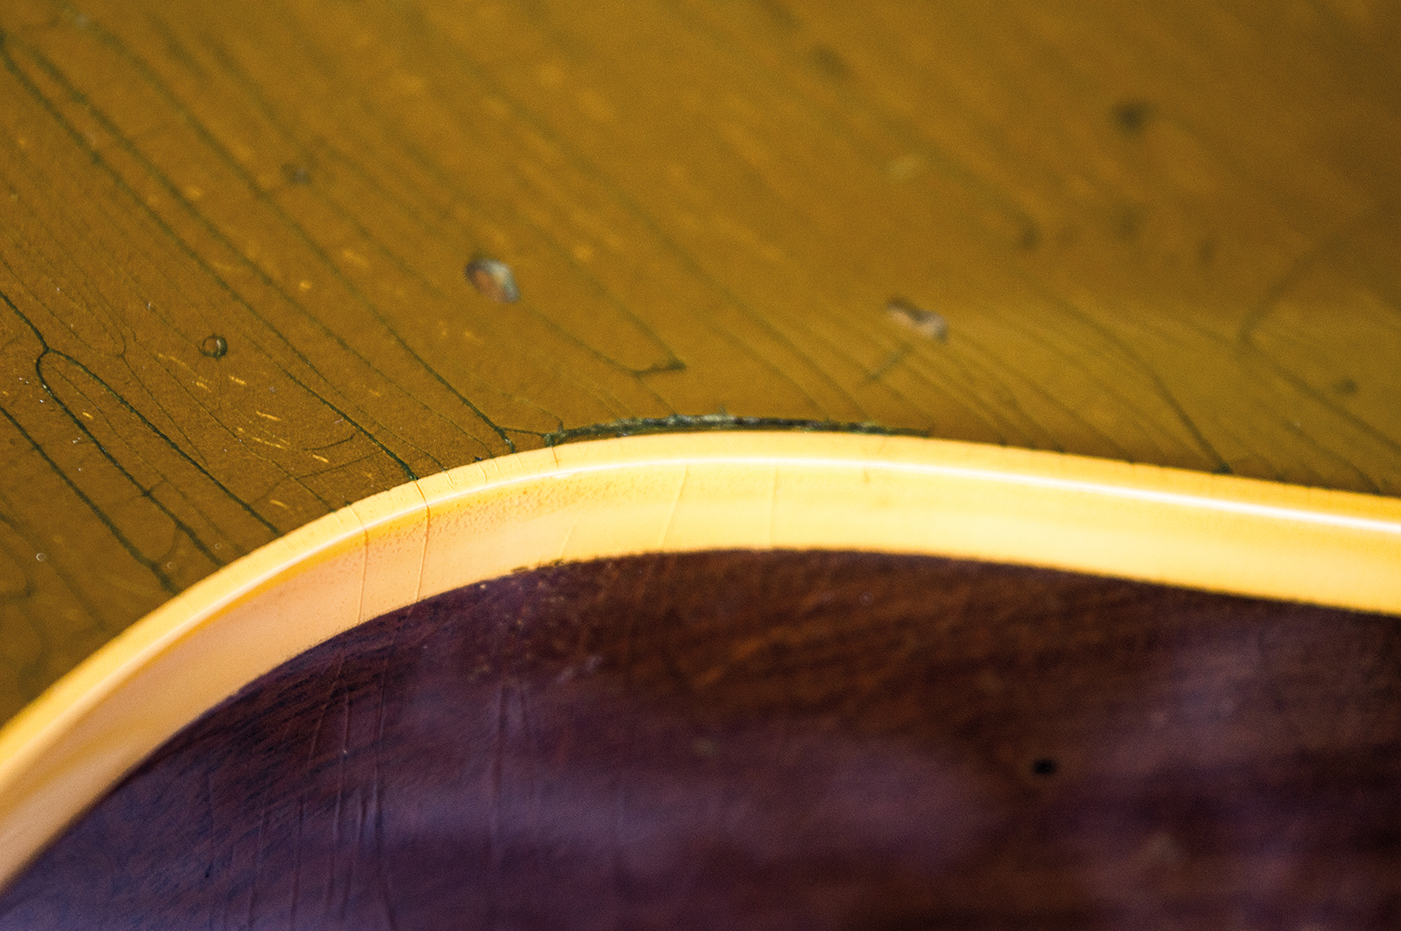
The edge of the gold lacquer actually looks quite soft – more like a transition than a scribed line – and the binding is angled. This suggests that they did the job with a sharp blade held at an angle rather than a special tool, and this angle isn’t consistent, being far more acute in the waist and cutaway areas.
Unfortunately, I don’t have a Burst on hand to determine whether Gibson became more precise with binding as the 50s went on, but my ES-330 suggests they were still using the angled blade approach in 1962. I tentatively give it a try using a utility knife blade and straight away it looks pretty good.

A decision is made to attempt to recreate the vintage look rather than try to master an unfamiliar tool in an attempt to achieve something technically accomplished but more modern in appearance.
Although my efforts haven’t turned out as well as I would have liked, I’m not too concerned because I can work any imperfect areas it into the relic’ing. Greco’s binding thickness is also slightly less than Gibson’s and I have learned that it’s best to remove binding tape and scrape binding while the lacquer is slightly soft in order to get clean lines and prevent chipping.
Get your coat
Look at any vintage Gibson and the binding will most likely appear yellow or even slightly orange – except in the areas where the lacquer has completely worn away to reveal the off-white plastic. The binding’s hue is the result of the clear lacquer coats that Gibson sprayed over the colour coats darkening with age.
I discover that it’s easy to replicate the appearance of the yellow or orange binding using Manchester Guitar Tech’s light tint and tinted clear respectively. They will also soften and darken the look of the gold coats, but beware, because too much tinted lacquer will give the gold a slightly ginger appearance, which doesn’t look right at all.
Eventually, I compromise by spraying just enough light tint clear to ‘age’ the binding, while maintaining a gold look on top. Light tint clear is sprayed over the rest of the guitar too and I follow up with several coats of clear gloss to build sufficient depth.
The guitar is set aside for a couple of months to allow the lacquer to cure and I follow my usual procedure to bring the finish up to a high gloss. Working my way through ever finer grades of wet and dry paper and micromesh, I buff it out with Farecla G3 and Meguiar’s Scratch X. If it wasn��’t for the various dents that I didn’t bother to steam out, it would be a fairly passable finish. But that has never been the intention and I’ll get onto the body relic’ing in the final instalment. Meanwhile, I need to think about some aged parts.
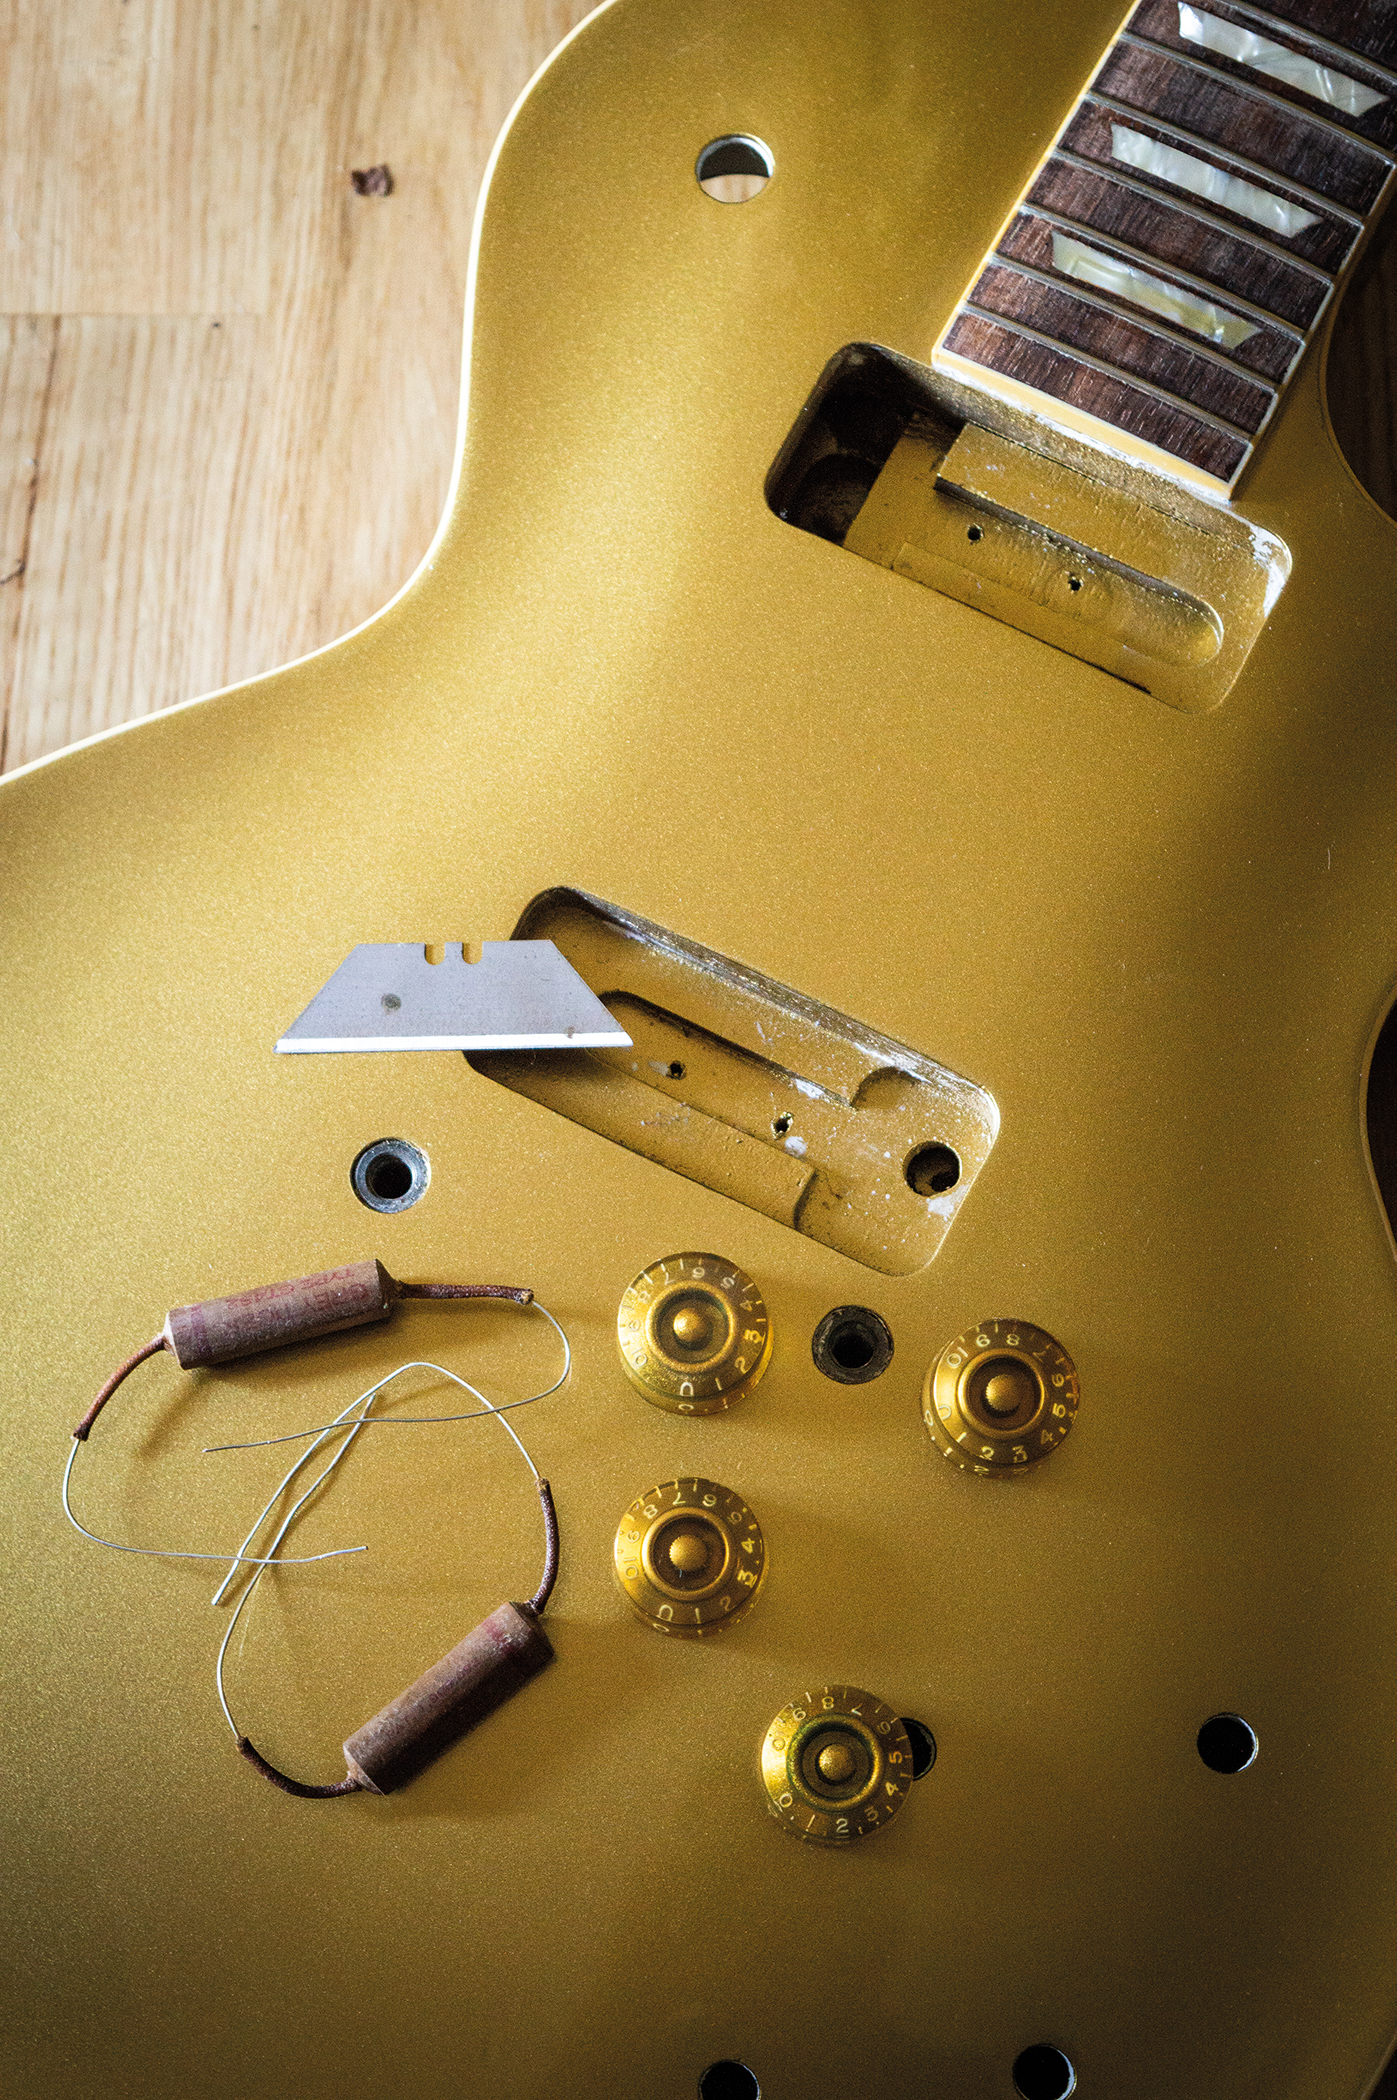
Knob twiddling
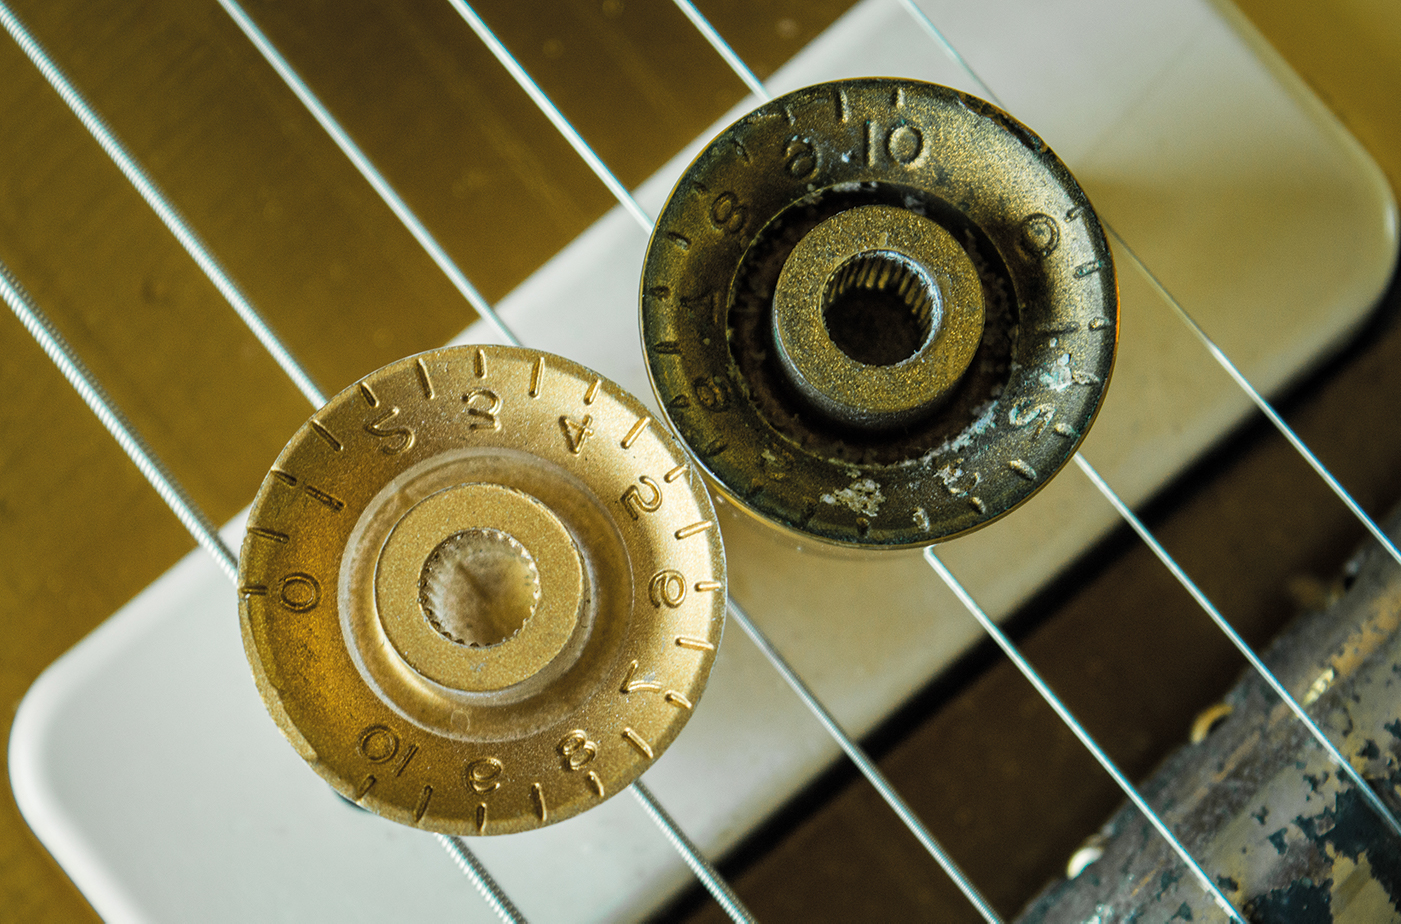
Mid-50s-style speed knobs are readily available online, and a set of four doesn’t cost much, however you do need to know what you’re buying before you start. The cheapest ones are made in Asia, and will do a good job, however they’re intended for 6mm pot shafts and not the 6.35mm shafts of CTS pots. As a result, you should consider the shaft width when buying, and also look for those with the numbers and markings moulded into the skirt if you plan to relic them.

Unless you buy a relic set, none of the newly manufactured speed knobs will look vintage. The 50s ones appear to have been hand-painted inside with the same lacquer used for the Goldtops and the coverage was a lot better. With the repros, they struggle to get enough paint deep inside the knob and the tone of the lacquer looks a bit too smooth and orange.

With this in mind, I decide that there’s only one thing for it – I’m going to make my own relic knobs. First, I wipe the centre sections of the pot with acetone to remove the factory paint, and then sand it off the skirt. The reason for sanding is that I don’t want the acetone to dissolve the white markings. This is why you need the moulded markings because transfer markings will wipe off along with the gold. Clear speed pots are available, but they always have black markings. If you can find some with white markings it will save you some work.
Next, I scuff up the external surfaces with 4,000-grit micromesh and cover the outside with masking tape. Double sided tape holds the pots to a paint stick and I spray the exposed undersides with Goldtop lacquer. After a couple of reasonably light passes, I spray a heavier coat and use a paintbrush to work the lacquer into the deeper recesses, but I’m not looking for perfect coverage.
Once the lacquer has dried, I paint the underside with Humbrol metallic green enamel, which you can find in hardware and model shops. Since the lacquer coats are still a bit patchy, the green coats show through when the pot is viewed from the outside. If you want very green looking knobs, or specific green areas, simply wipe away some of the gold lacquer using a cotton bud dipped in acetone before painting the green enamel.
The Goldtop lacquer doesn’t stick to the green, so I do a final coat with Humbrol gold enamel. When that has dried, I mount each knob on a split shaft potentiometer. Medium brown and amber ColorTone stain is mixed into a 50/50 solution of water and acetone. This is applied to the outside of each knob with a cotton bud and allowed to dry thoroughly before the process is repeated twice more.
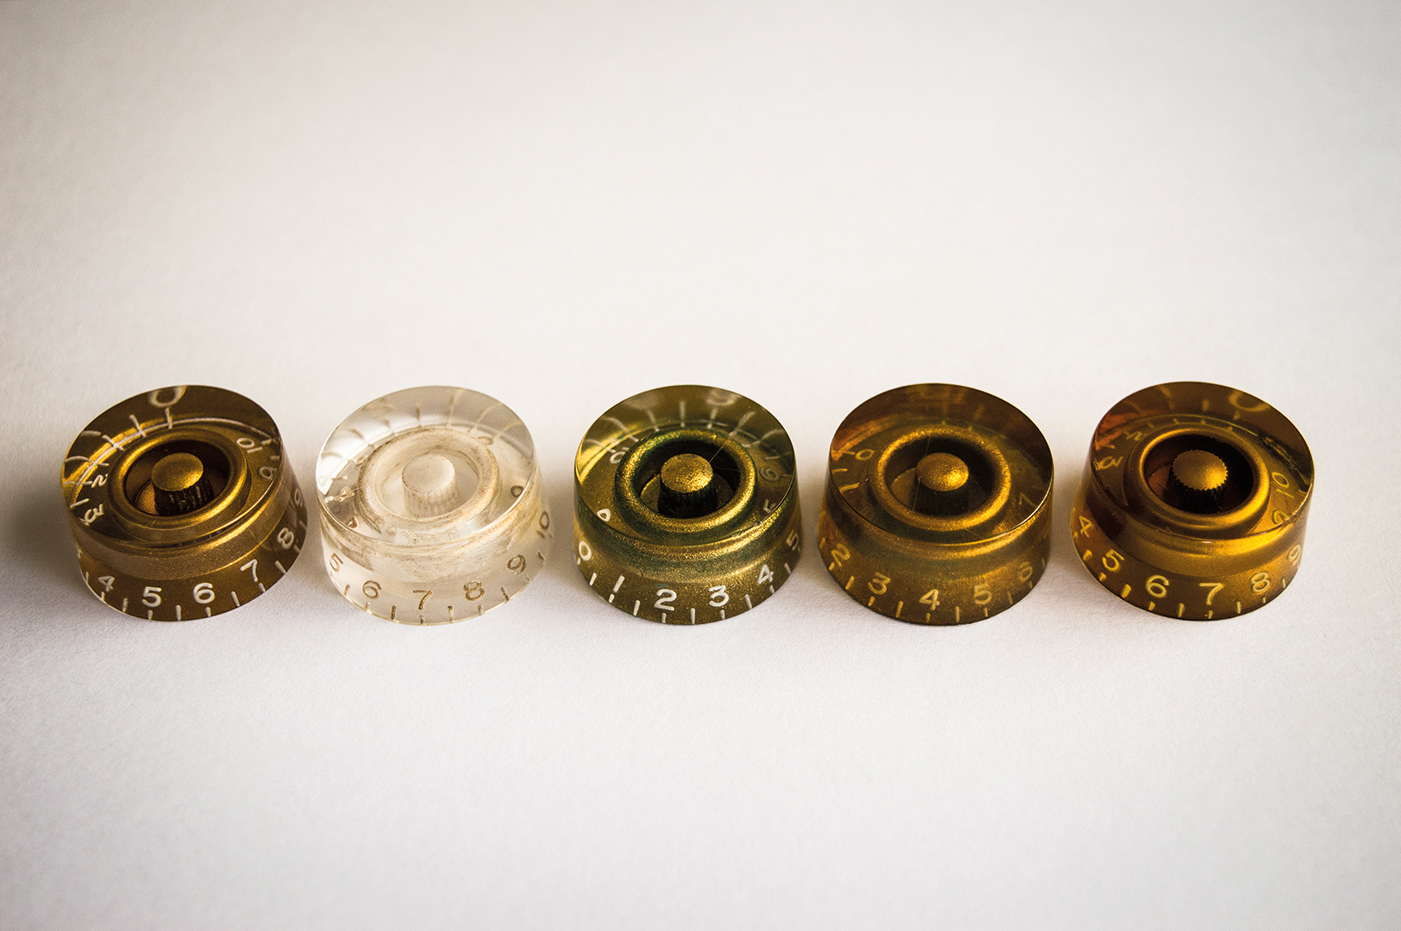
All the repro knobs are completely transparent when viewed from the side, but the originals look slightly amber. Acetone enables the ColorTone stains to penetrate the plastic and you’re left with a more amber look. Of course you can buy relic speed knobs, but I’m happy with the way that these turned out and it saved me some money.
Easy tigers
I’ve made repro caps in the past – for the tweed Pro restoration back in our June 2018 issue – and this time I’m going to make Grey Tiger repros for the sheer fun of it. Using graphics software I recreate the case markings, trying to match the typeface, letter spacing and layout as closely as possible to a real Grey Tiger. It’s not perfect, but it’s not far off. I find a sheet of thin card in my local art shop that’s close in colour to the original capacitor. It’s then cut to A4 size and I print off enough copies to make several capacitors.
Vintage Grey Tigers measure 35 x 9mm, so wrapping the cut-out cardboard strips around a 9mm dowel and fixing them with wood glue, the tubes end up close enough. Of course I could stuff these with some nice modern capacitors and seal them up with wax like I did for the tweed Fender Pro. But in addition to making Grey Tiger repro casings, this time I’m going to try rolling my own tone capacitors.
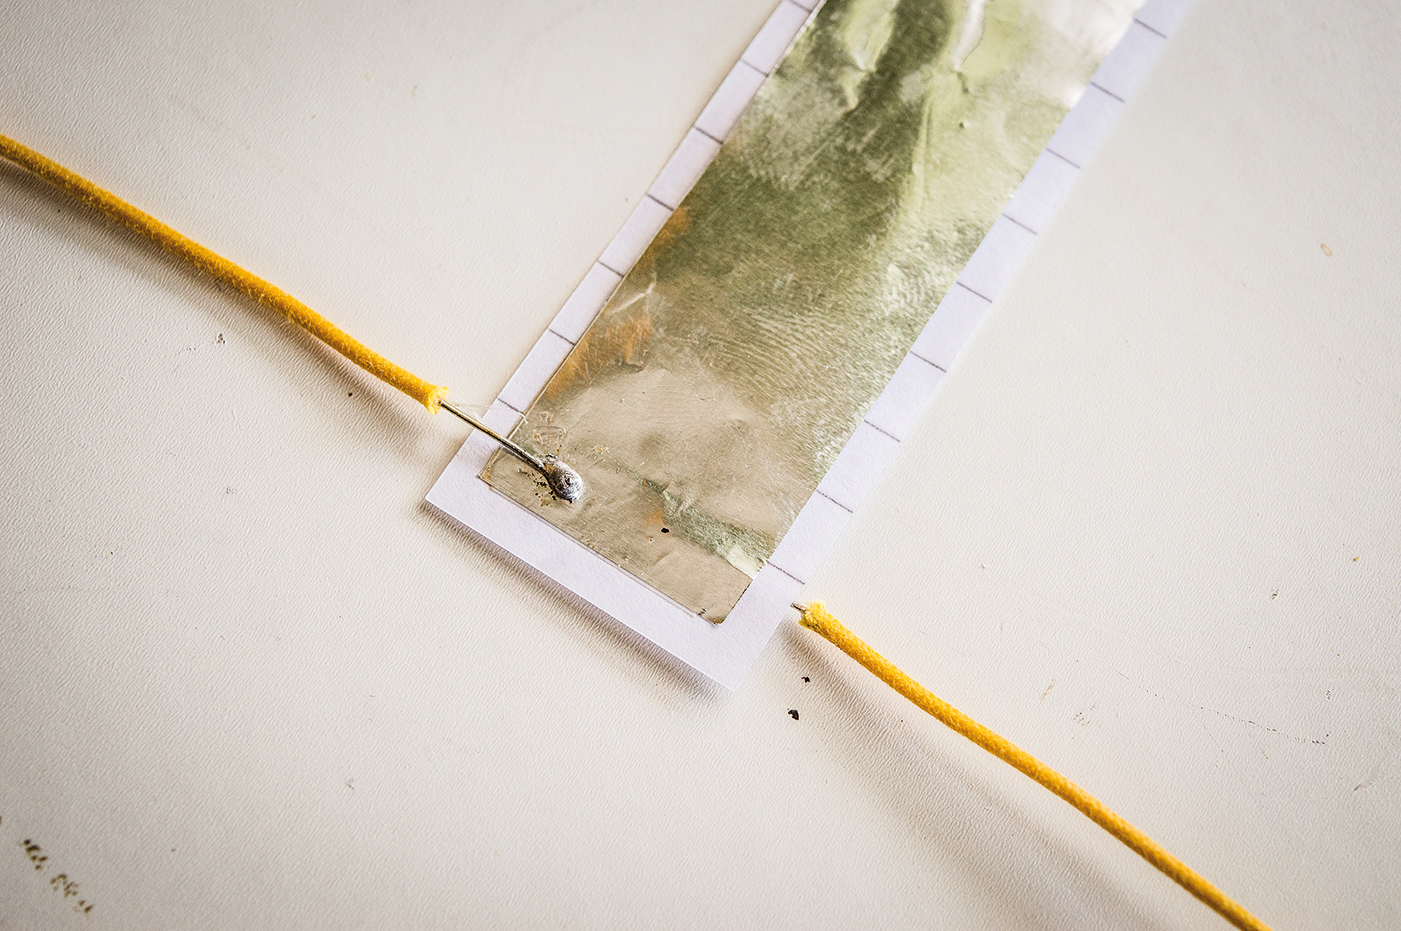
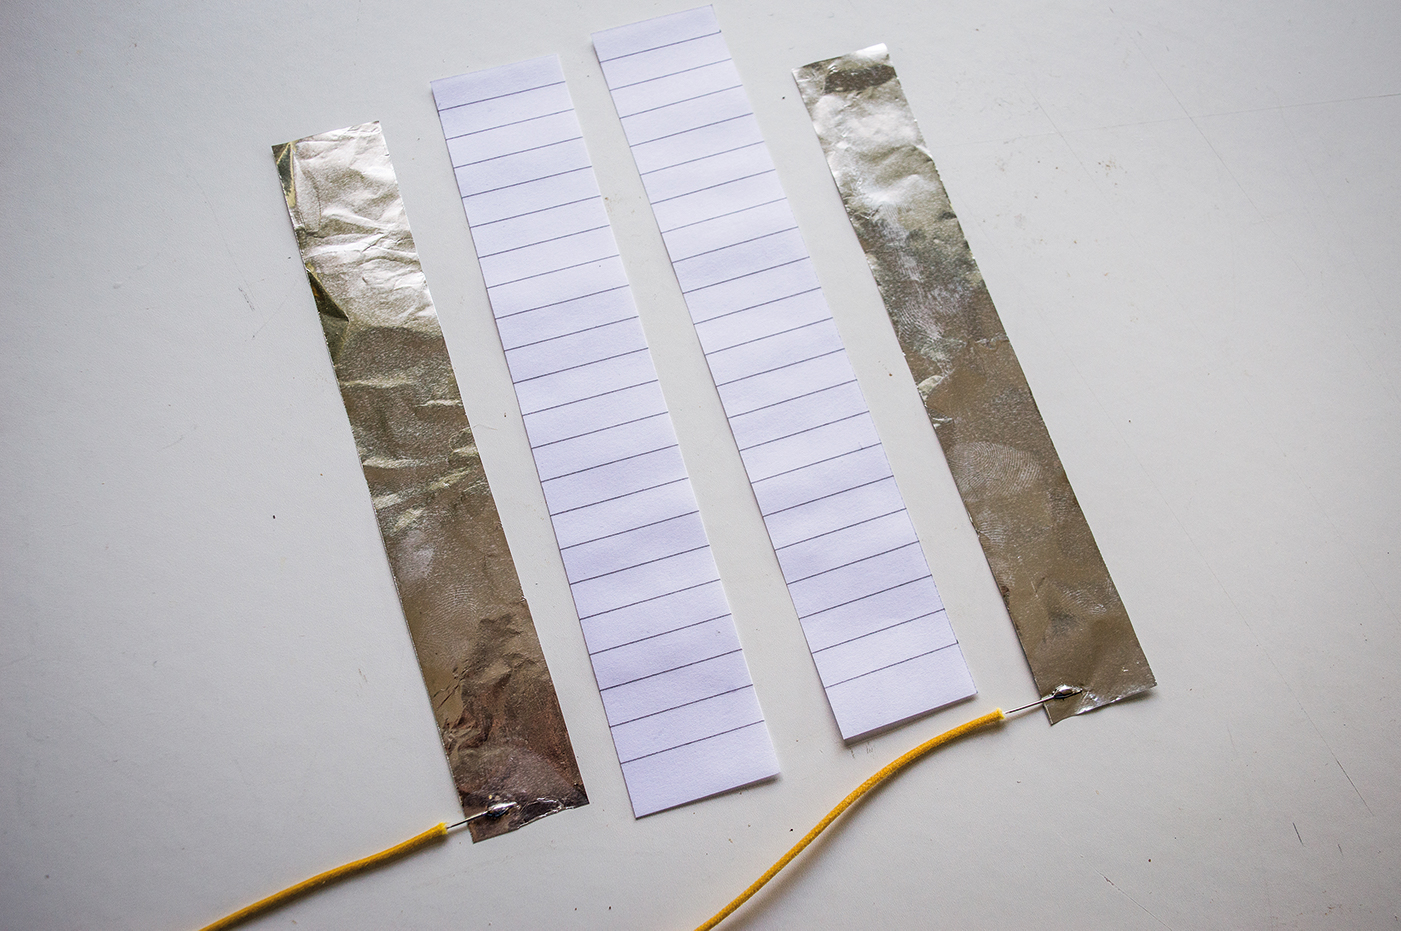
The originals were paper/foil types, so it’s no surprise those are the main ingredients for my DIY versions. I cut two strips of kitchen foil one-inch wide and two strips of greaseproof paper 32mm wide. A leadout wire is soldered to each strip of foil, and the trick for doing this is to dab some drops of cooking oil onto the foil and use a very hot soldering iron. First get some solder to stick to the foil, which may take longer than you’re used to, and then solder the wire onto the foil. It’s actually the trickiest part.
With one strip of printer paper laid out on the worktop, I place a tiny piece of double-sided sticky tape across the one end and lay one strip of foil over the top, leaving 3mm of paper visible along each edge. It’s flipped over and the second strip of foil goes on the other side, followed by the second strip of paper. Each time I use a piece of double sided tape to hold the foil and paper. I’m making an axial capacitor, so I make sure that the leadout wires are going in opposite directions and mark the outside foil wire.
Taping the one end helps to get started, but the fiddly bit is keeping everything aligned as you roll up the capacitor. I try to make it as tight as possible and when it’s completely rolled, I use masking tape to hold everything in place.
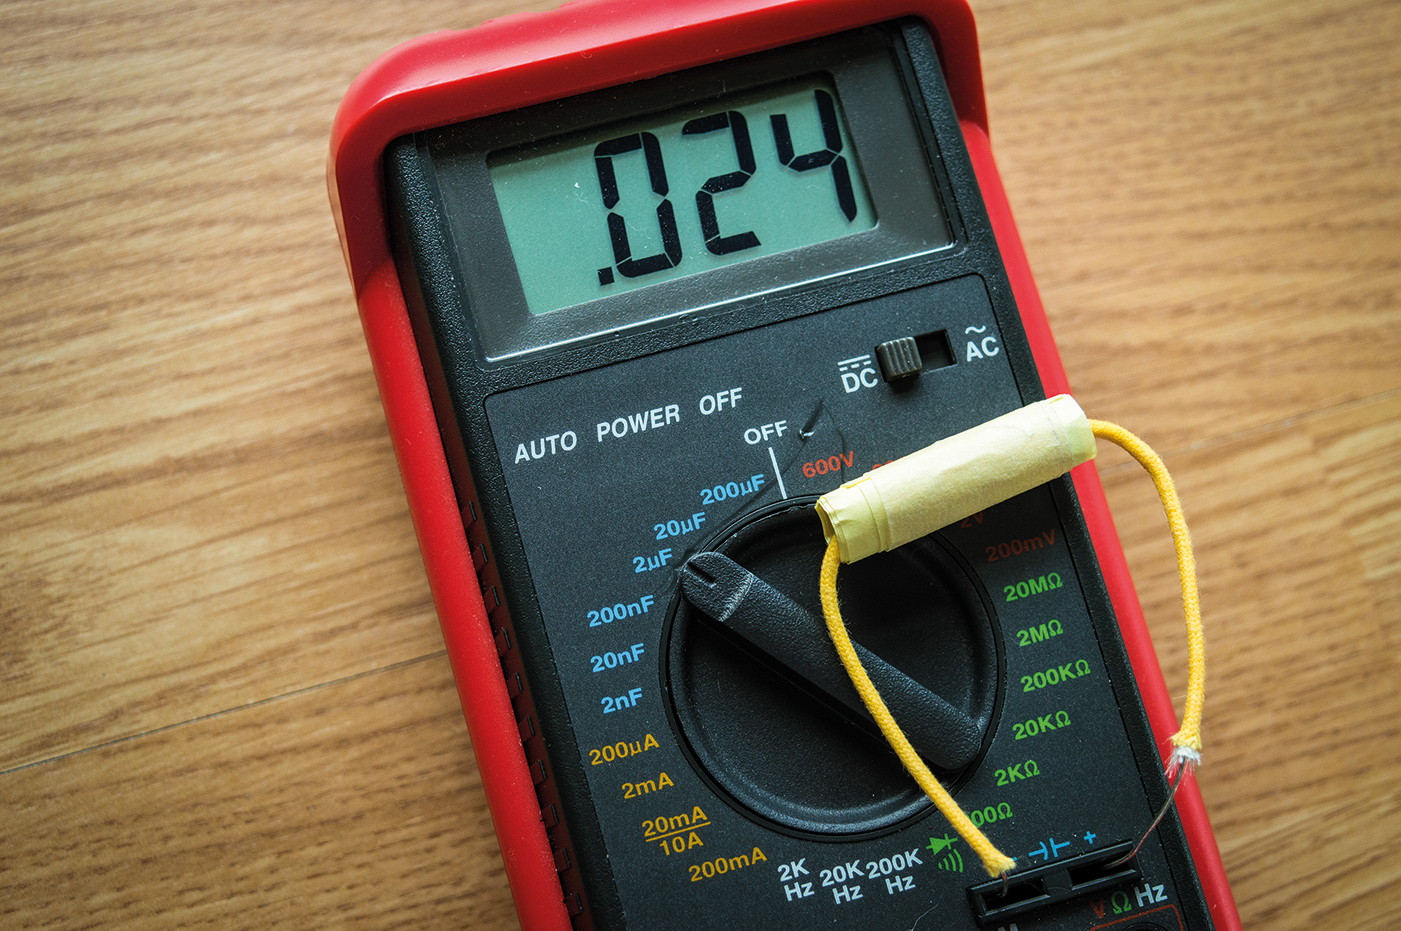
With my multimeter I test for continuity, just to be sure the foil pieces aren’t shorting out. Then I switch to capacitance mode and get a reading of 0.033uF. I’m shooting for 0.022uF so I carefully unpick the masking tape, unroll a few centimetres, then chop it off and stick it back down.
After a few attempts I’m thrilled to get a reading of 0.024uF. The DIY cap is hastily installed in a Les Paul and it works very nicely indeed. Treble roll off is gradual and even when the tone control is set to zero, there is still plenty of clarity. The only problem is that the diameter is too wide for the tube casing…
So, I need to try again using thinner paper. The paper acts as an insulator between the foil strips and it’s called a dielectric. Capacitance is determined by several factors, including the surface area of the foil and the thickness of the dielectric material. With a thinner grade of paper, fewer turns should be required for the same amount of capacitance and that means a smaller diameter, too.

Printer paper measures 0.08mm, cigarette papers are 0.01mm and the paper from a notepad is about 0.04mm. Since cigarette papers aren’t long enough, I go with the notepad paper and manage to roll a couple more caps that are close enough. Back in the day they used unbleached electrical ‘kraft’ paper.
Each capacitor is wax potted with molten wax that I have heated in a bain-marie – much like pickups – and inserted into a tube. I fill the tubes with molten wax using a syringe because it’s the easiest and least messy way of getting it in there. When it cools, the caps solidify and are held in place. Lastly, I dip the caps in the molten wax to coat the outsides before sliding cloth coverings, that have been stained amber and sprayed with medium brown lacquer, over the leadout wires.
After a dusting of newspaper ash, they look pretty good. I can’t claim they’d pass for the real thing but they have the right vibe. Of course Luxe make wonderful quality replicas, but they cost about £30 each and I’d estimate mine cost about 10p! If you want to make your own tubes for hand-rolled caps, or simply disguise modern ones, it’s fairly straightforward to do something similar – give it a go!