Related Tags
DIY Workshop: Fender Tweed Pro Restoration
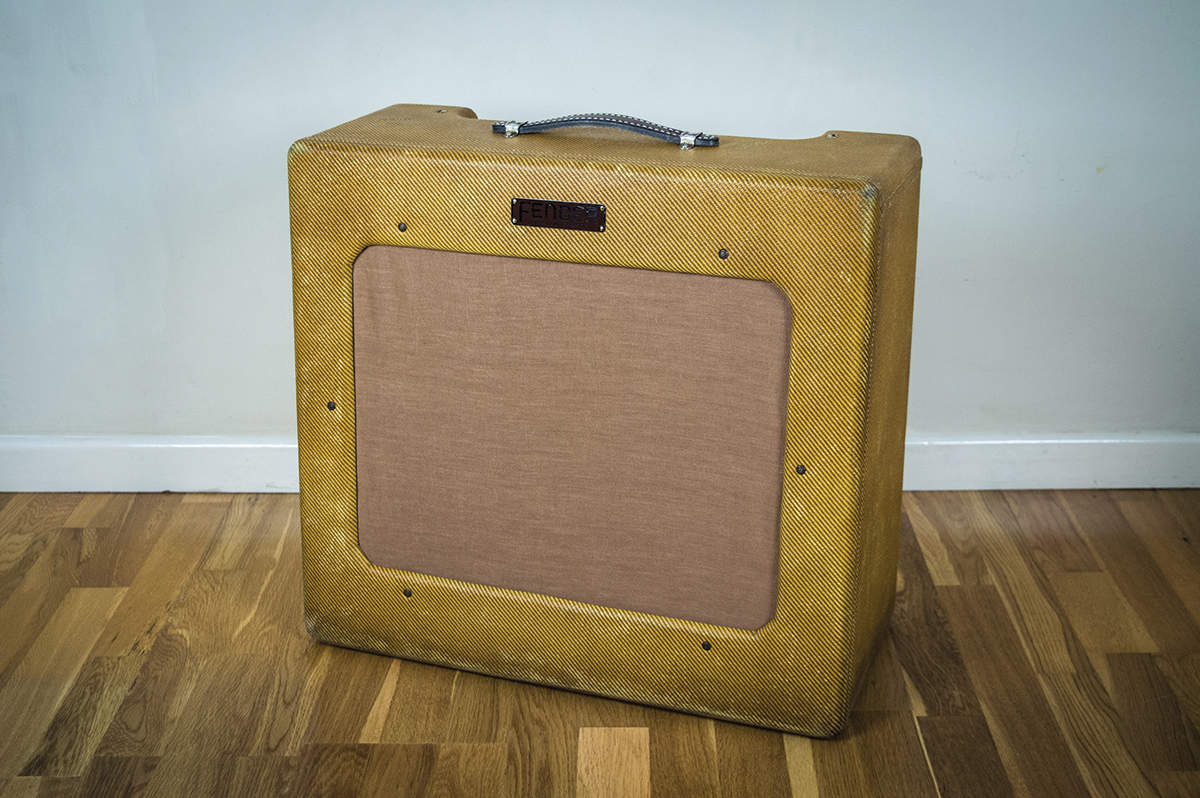
It was listed as a mystery 50s Fender amp, but what turned out to be a 1951 Pro needed a lot of TLC.
A friend of mine had been looking to buy a Fender TV Deluxe for a while, but one day when browsing on Reverb he came across a curious advert for a ‘1950s Fender Amp’. Not knowing what he had found, he sent me the link to see if I thought it was legit. At first glance it looked like badly re-covered Deluxe, but then I noticed that it had six baffle bolts rather than four. The speaker looked bigger than usual, too, and the penny dropped. This wasn’t a TV Deluxe at all, but rather the bigger, louder and rarer TV Pro.
Although it looked to be in pretty dire condition, and the seller was noncommittal about whether it worked, I felt it was worth a punt. The price was very low for a tweed Pro and the seller was okay about shipping it internationally.
Sometimes buying vintage guitars and amps is like buying houses – you have to be able to see the potential behind the dodgy décor and unkempt garden. And despite the drab grey tolex and a changed handle, this Pro was remarkably original, the control panel was in excellent condition and both of the original transformers were still with the amp.
So, with no turning back now, the brief is a simple one – after restoring the electronics and re-tweeding, I want it to end up looking as close as possible to an unrestored amp. Let’s get to it…

With its drab grey tolex, the Pro looks pretty rough on arrival but it’s mostly original and in great shape
Power supply
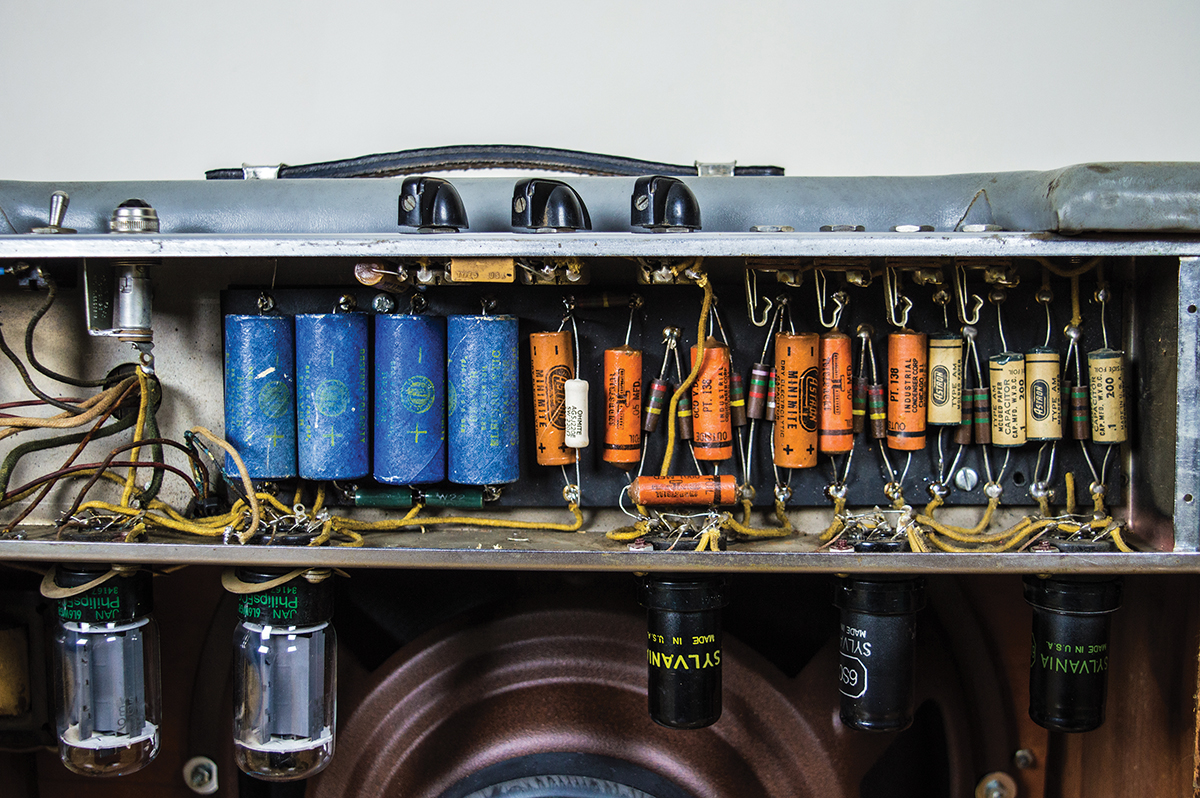
The Pro arrived with a full set of Cornel Dubilier 20uF 450-volt filter capacitors. All four are blistered and it makes no sense to leave them installed. Originality isn’t a factor because these are clearly replacements. The giveaways are poor lead dress and the way they are soldered onto the chopped leadout wires of the original caps.
Since this project is a complete restoration rather than a running repair, I decide to de-solder the original cap wires once the replacement filter caps are removed. I also remove both of the power supply’s 10K resistors, because they appear heat damaged and now is the best time to do it. One measures 12K and the other 20K, and both appear to be disintegrating after a long and hard life.

Power supply resistors have a tough life and we recommend changing them for high wattage wire wound
For the power supply, the amp needs four 20uF filter capacitors and two 10K resistors. I go with Sprague 500-volt caps and Welwyn 7-watt wire wound resistors. Although not vintage-spec carbon composite types, as the Welwyn’s power rating is more than adequate and they look good – which is more than can be said for the Spragues.
To keep things looking vintage, I decide to slice the cardboard tubes covering the Cornel Dubilier caps lengthways to remove the old caps, then I re-use the tubes to wrap up the Spragues. Happily, it’s an almost perfect fit, so I re-seal the cardboard tubes with tape and install the new resistors and filter caps, with the join lines on the underside.
Astron Minimite filter caps would have been fitted at the factory, but the blue tubes of the Cornel Dubiliers suit the vintage vibe. We could pay around $20 each for the original items, but they’d be unusable anyway, and $80 plus import duties and tax is a lot of money to spend on cardboard tubes for a player’s grade tweed Pro.
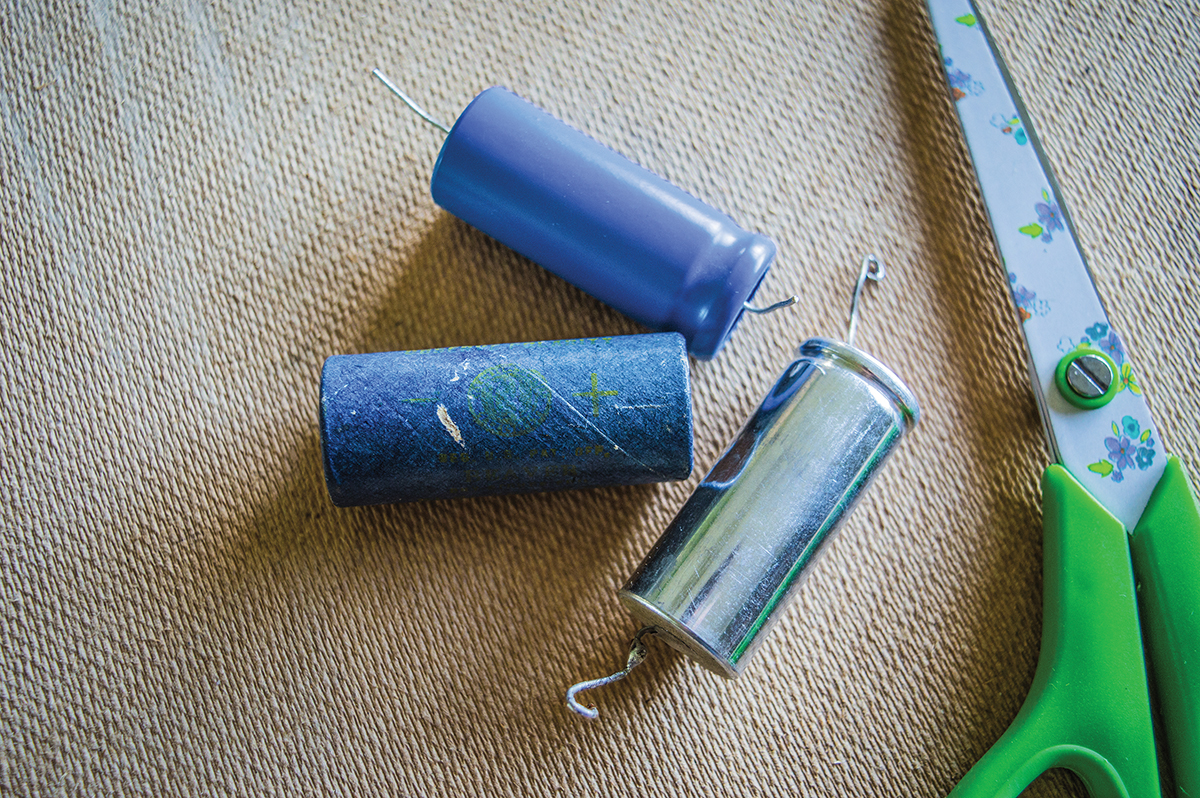
The cardboard outer tube has been removed from the silver capacitor to be fitted over the blue Sprague Atom
Unstuffing caps
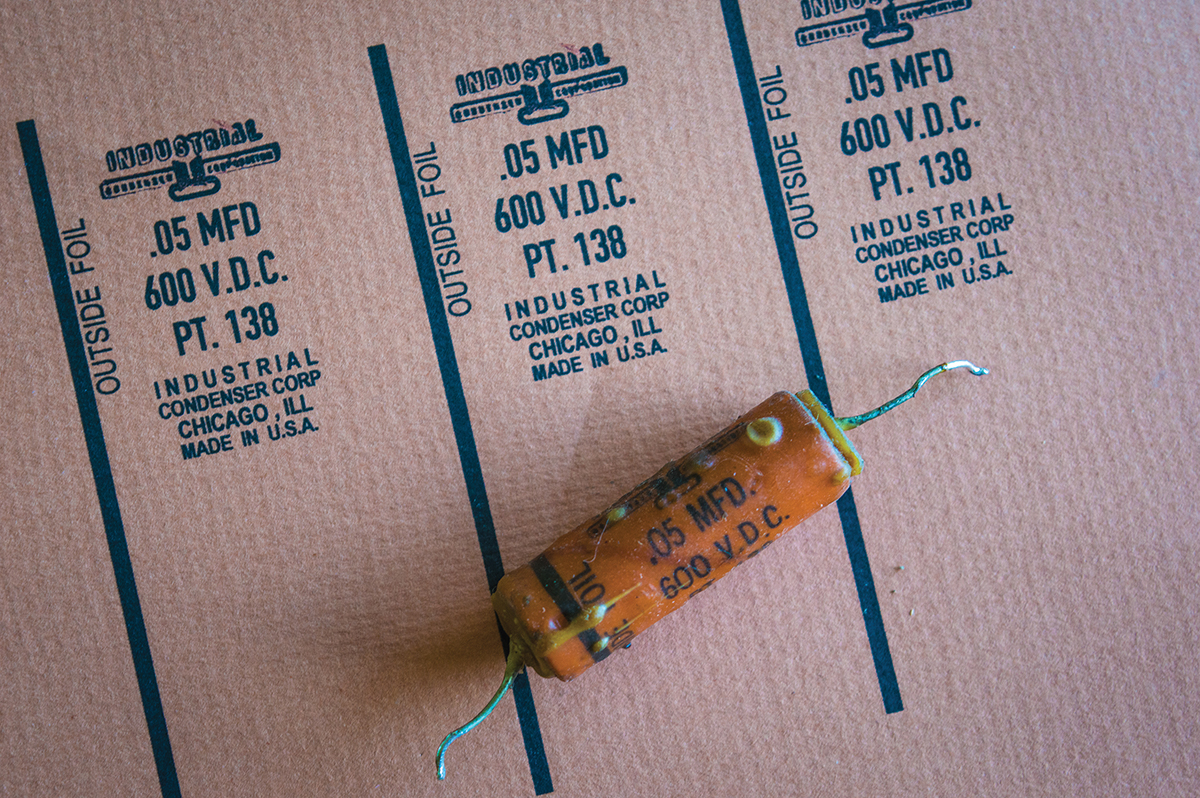
Besides the caps in the power supply, there are two 25uF electrolytics, eight signal caps, a 0.005uF on the tone pot and a 0.0001uF across the plates of the 6SC7 phase inverter. Most are Industrial Condenser Corporation (ICC) paper/foil types that are typically seen in early 50s tweed amps, however a Sprague Black Beauty replaces one and all four caps linking the inputs to the valve grids are paper/foil Astrons. More on those later.
The 25uF caps are re-tubed just like the filter caps, but the ICC ones cannot simply be pulled out of their tubes to maintain the vintage appearance. They’re actually sealed with wax, and maybe a little resin adhesive, so they will need to go into the oven.
It’s not as crazy as it sounds because wax melts at a fairly low temperature. I place the caps onto several layers of kitchen paper on an oven tray, and put them into a pre-heated oven set to around 100°C. When all the wax and resin has run out and pooled around the ends of the tubes, they’re done!
Your next job is to pull out the two leadout wires, then put a flat head screwdriver into one end of the tube and push out the foil and paper wrap. This should come out easily but if it doesn’t, you’ll need to bake the caps for a bit longer. The outside of the tubes should also be wiped down while they’re hot. If all goes well, you’ll be left with clean and empty capacitor tubes.
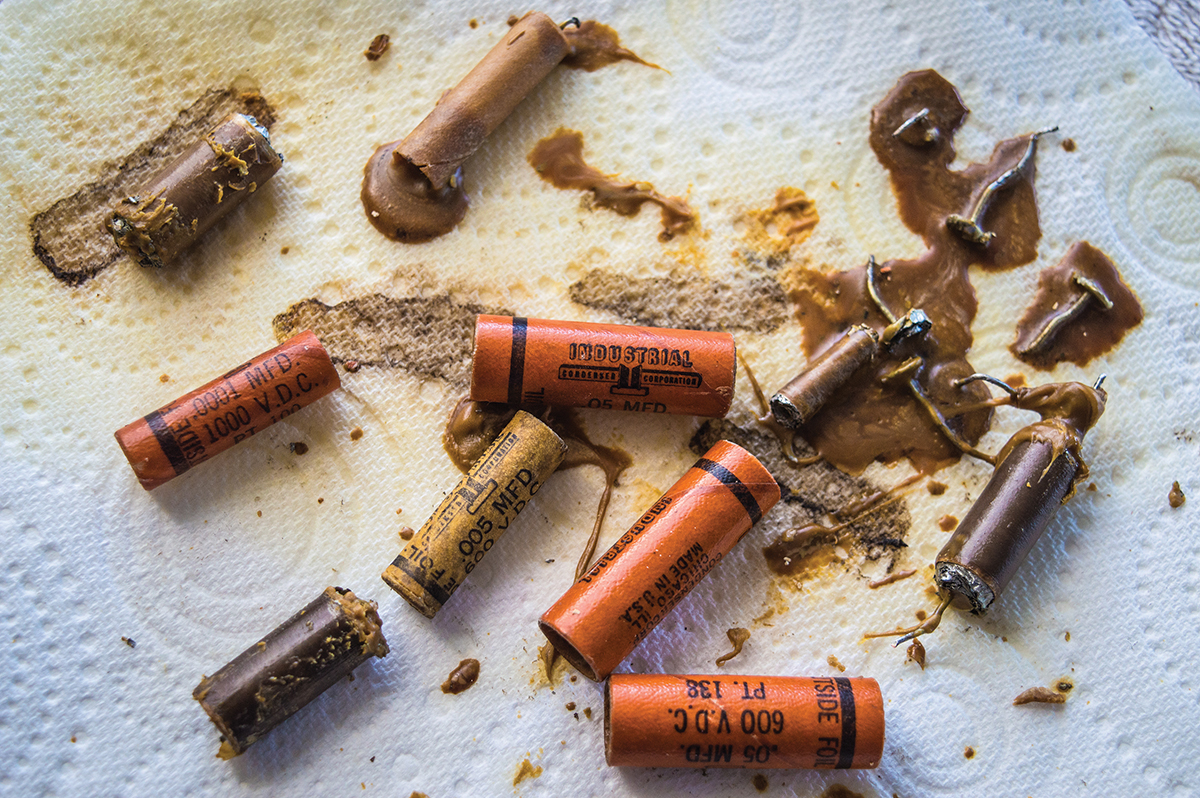
After oven baking the cardboard tubes have been cleaned out, wiped down and are ready to be re-used
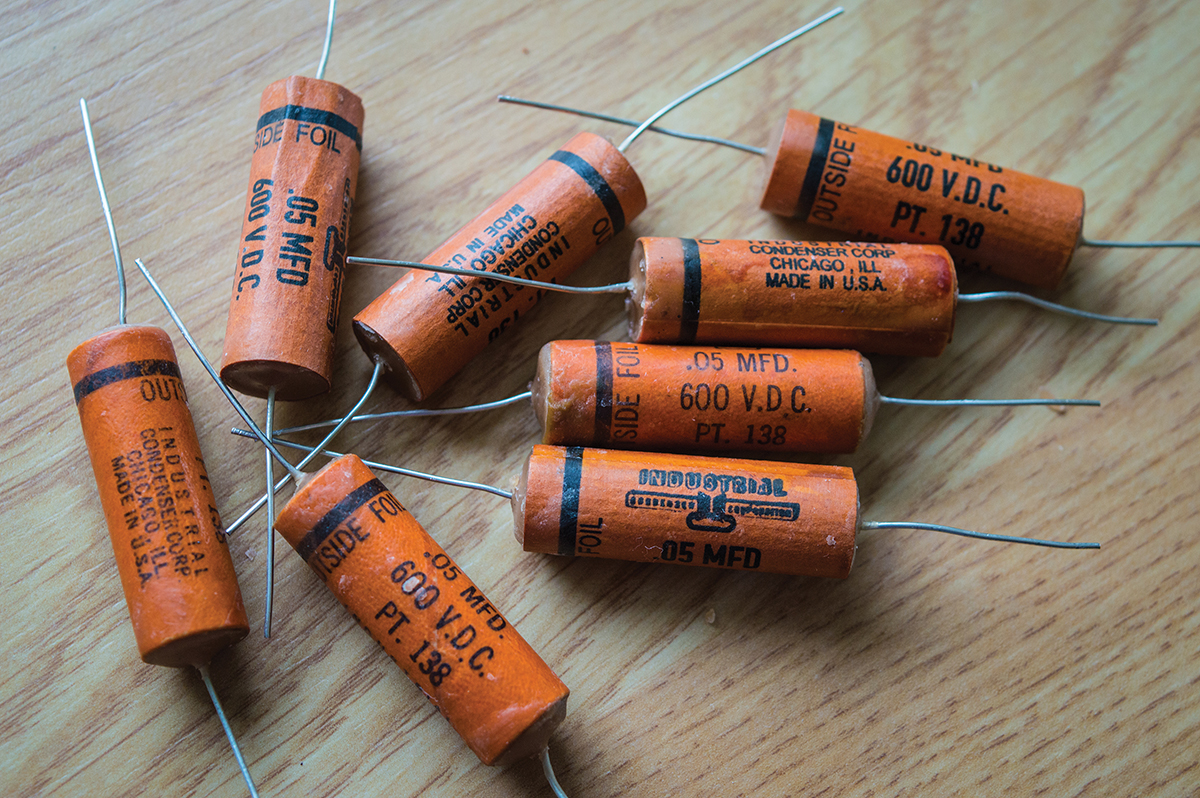
Re-stuffing tubes
The internal diameter of these tubes is just over 10mm, which means that many of the popular signal caps you’d consider won’t fit inside. Fortunately, there are no such difficulties with affordable and great sounding Mallory 150s. With the outer foil ends marked, I wrap them with some tape and ease them into the old tubes – which also have outer foil makings.
Beeswax is heated in a bain-marie until it’s runny, then sucked up into a plastic syringe to get it into the ends of the tubes. I fill one end, hang the caps up for the wax to set, then they’re flipped over to fill the other end. With both ends sealed, I dip each capacitor momentarily into the liquid wax to coat the tubes and re-hang them to cool down.
This method of capacitor stuffing is seldom seen in guitar amp restorations, but it’s commonplace among vintage radio restorers. Since 60-year-old signal paper/foil capacitors are rarely of any practical use, it seems a shame merely to discard them and put modern caps in their place. The re-stuffed caps should continue working for decades and I think they look fantastic in historic amps. However, what can you do if some of the vintage caps are missing? Well…
To replace the missing tubes, new ones need to be made
Roll your own
Most of the markings on the original cardboard tubes are just text, and the logo is easy to find online and download. Using a graphics program, I match the original font and scale as closely as I can to create labels and print them onto thick orange paper from my local art shop. The labels are cut to size and wrapped around a piece of 10mm dowel with some Titebond wood glue applied. The glue grabs the cardboard quickly and the tubes are slid off the dowel so they don’t stick to the wood. The vintage tube dimensions are 1.5 x 0.5 inches.
To match the colour more closely, I spray the tubes with some amber nitrocellulose from Manchester Guitar Tech and set them aside to dry. Once they’re ready, I stuff the repro tubes with Mallory capacitors and wax them as I did with the originals. They’re not perfect, but they’re pretty close.

A mix of original tubes, our freshly rolled repros and some repros after spraying with amber lacquer
Astron adventures
The circuit diagram specifies 0.05uF 600 volts, but the Astrons linking the input sockets to the valve grids are 0.1uF 200 volts moulded paper caps. Although they’re unfamiliar to me, I’m convinced they were factory fitted. It’s clear to see the solder joints are undisturbed and the leadout wires are gently curved, which conforms with the wiring style throughout this Pro. What’s more, these caps are identical to the ones used in the very earliest Fender ‘slab’ basses.
The swollen appearance made it clear that all the ICC signal caps had to be replaced, but the Astrons are housed in thermoplastic casings and so there’s no swelling. Since they’re unfamiliar to me, I decide to run them past my Heathkit capacitor tester at full operating voltage. All four turn out to be in perfect health and since they’ll never be exposed to high voltages in the position they occupy in the circuit, there’s no reason to swap them out.
With Mallory 150s sealed inside with wax, the repros look pretty similar to the originals
Coil complications
We have previously described the process of powering up newly built and long dormant vintage amplifiers, but the short of it is that I use a lightbulb current limiter and power the amp up in stages, adding one valve at a time. I also install a modern grounded mains cable if the amp doesn’t already have one.
Results are mixed. Nothing scary happens, all the internal voltages are about right and the fully loaded Pro isn’t drawing excessive current. Unfortunately, the amp sounds whisper quiet and unpleasantly distorted. Under normal circumstances I would plug the amp into an external speaker to verify that the output transformer is okay, but the field coil speaker complicates things.
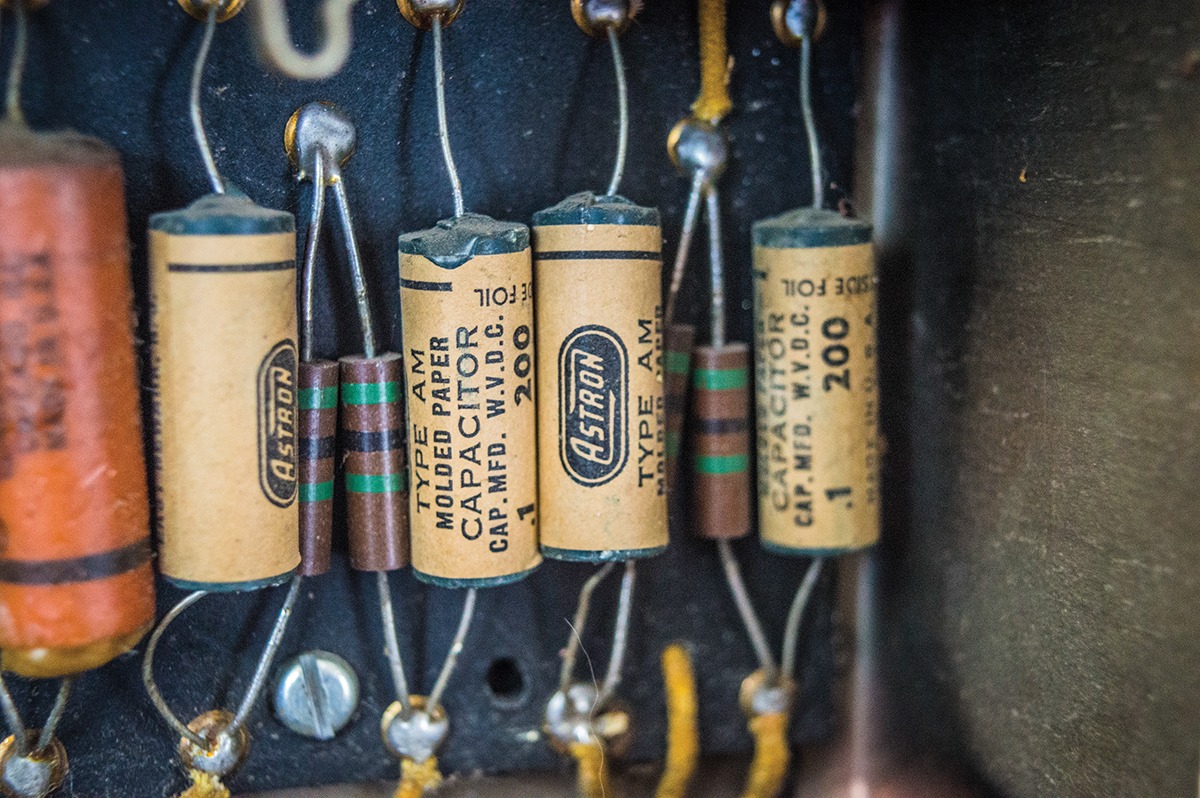
These original Astron capacitors coupling the input jacks to the valve grids all test good, so they’re left in place
The output transformer is mounted on the speaker frame rather than the amp chassis, which is typical for Fenders of this era. However, there are far more wires connecting the amp to the speaker than usual because Field Coil speakers have to be powered.
Yep, this design actually predates the era of practically sized permanent magnets.
It’s just about possible to see that the wires would have been colour coded when new, but 67 years of dust has turned them all more or less the same colour. I therefore have to trace the wires and refer to the circuit diagram to determine the function of each. I’m also curious about the field coil wiring shown on the circuit diagram because it differs from the field coil wiring that’s usually depicted.
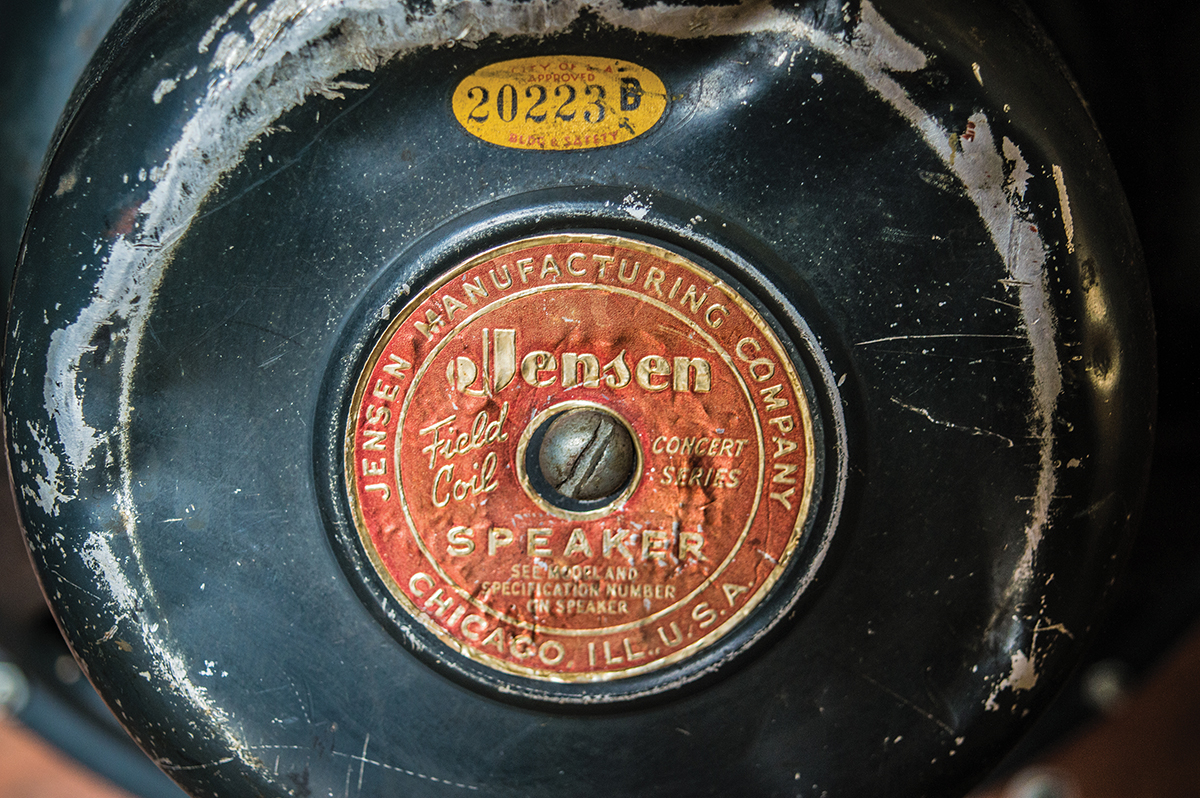
The bell cover of this Jensen F15N field coil speaker has been altered to fit under the extended late 1951 top panel
As always, Rift’s Chris Fantana enlightens me and I learn that field coils can be connected in two different ways. Most are wired into the power supply, where they can energise the magnet and act as a choke. Typically, the field coil resistance will measure in the low 100 ohms.
The Jensen F15N we have here takes a feed from the power supply and terminates to ground. Typical resistance for this type of field coil is higher at between 5K to 8K, and I measure 6.8K. Another thing Chris points out is that the field coil acts as a drain resistor when the amp is shut off, which is actually a useful safety feature.
![]()
The output transformer is mounted onto the speaker basket and the wires are for power as well as audio
To test the output transformer, it’s perfectly safe to leave the field coil connected. I de-solder the two wires leading from the secondary of the output transformer to the terminals on the speaker frame and then connect them to an external 12-inch speaker.
With the new speaker hooked up my heart sinks as, once again, I hear almost no noise coming through the external speaker. Nevertheless, I risk a power chord and experience a bit of a Back To The Future moment as the Pro tries its best to blast me across the room.
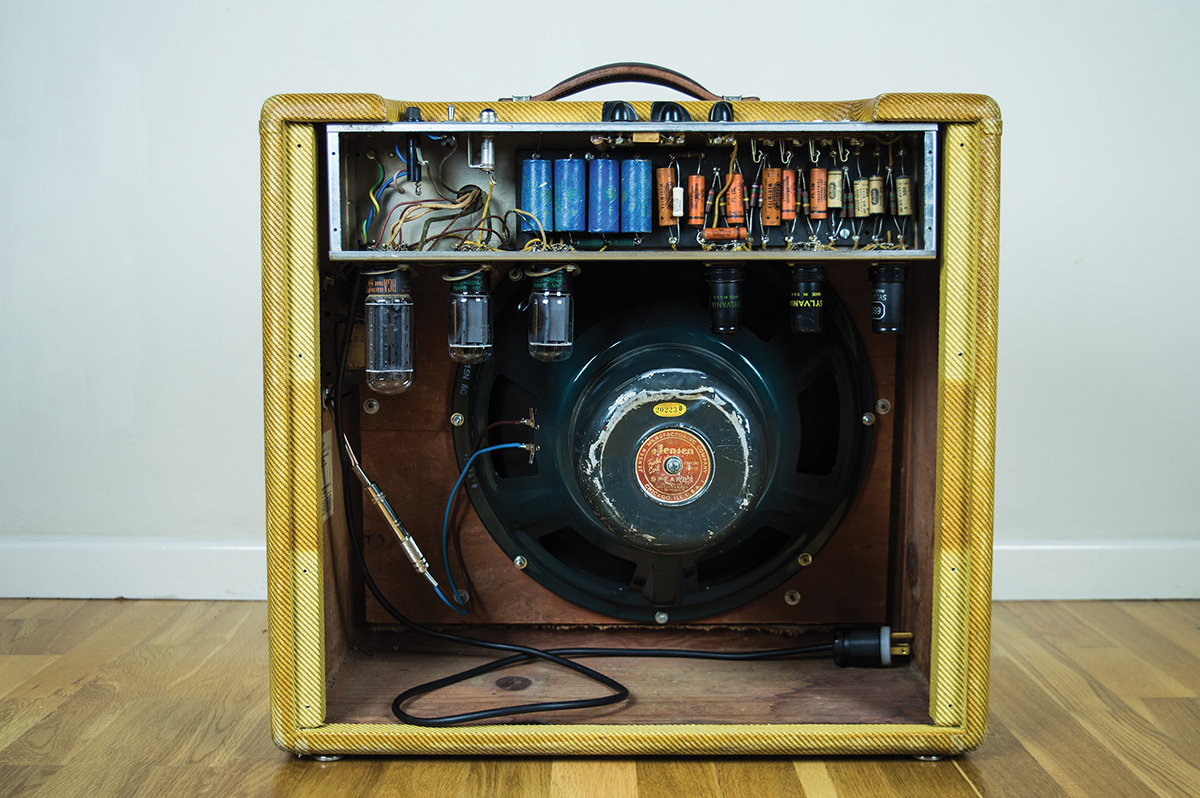
With the exception of the white cathode bias resistor, the restored circuit board looks much as it did when new
To my absolute delight, this amp sounds pretty outrageous from the get go. The noise floor is remarkably low, but there’s nothing underpowered with the output signal, that’s for sure.
Checking the bias, I find it’s running on the cool side, so I drop the bias resistor to 220 ohms. All the other voltages are right where they should be and I can already tell that this Fender Pro is loud, bright and has a fantastic overdrive tone – but a decision still has to be made about the speaker.
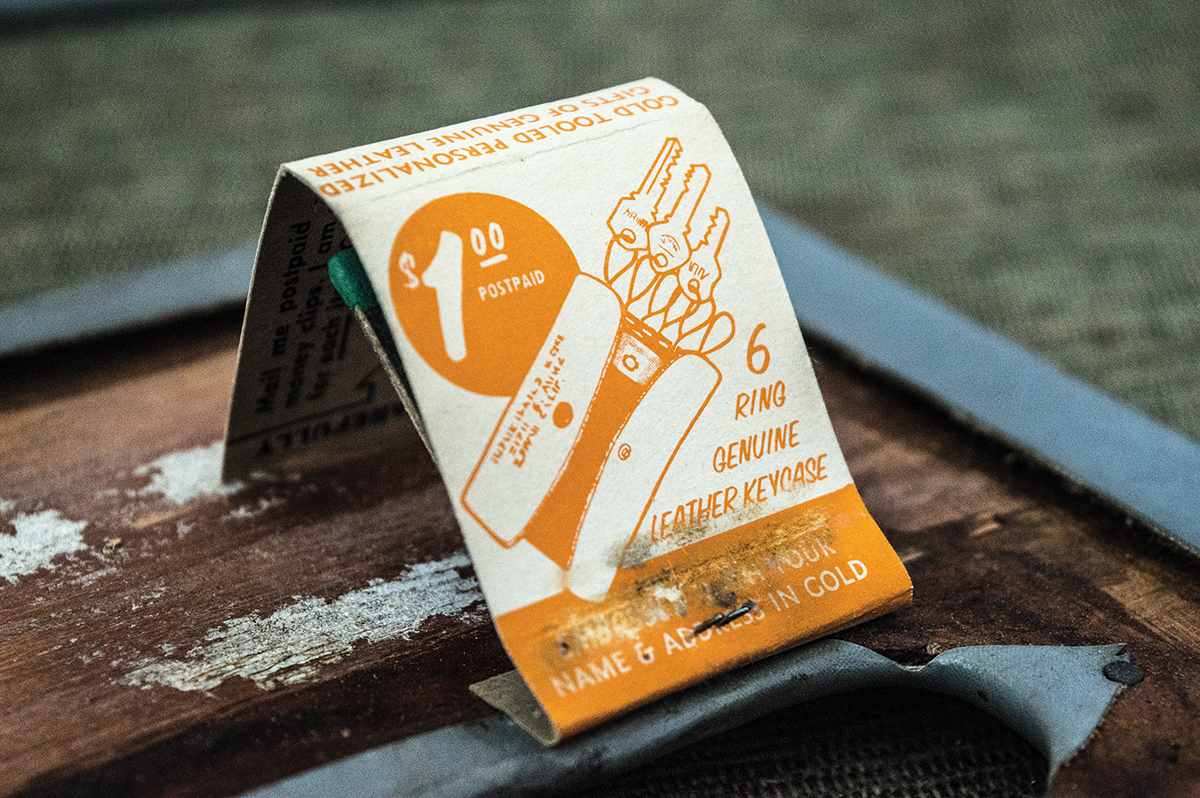
An old grocery store invoice and a full pack of matches are found under the tolex
Speaker solutions
With a non-functioning Jensen, 15-inch choices are limited compared to 12-inch speakers. Vintage P15 Jensens are available, but they all seem to be in the US and once postage, taxes and import duties have been added, it’s an expensive and risky option. The same goes for vintage JBL D130s and Altecs, because you can never be sure if they’re working properly, or if they’ve had a dodgy re-cone.
Of course, there are modern Jensens, but experience suggests they’re not always the best option when authentic vintage tone is the goal. The ever-helpful guys on The Gretsch Discussion Pages recommend the Weber 15A150 and Cali as well as the Eminence Legend 151, but again they can be expensive to import.
Apparently the original F15N can be re-coned, but I can’t find anybody in the UK who is prepared to do it. The search is on for a vintage Jensen P15, but in the meantime, a reissue Jensen P15 does the job and with the original bell cover fitted over the magnet, it looks the part.
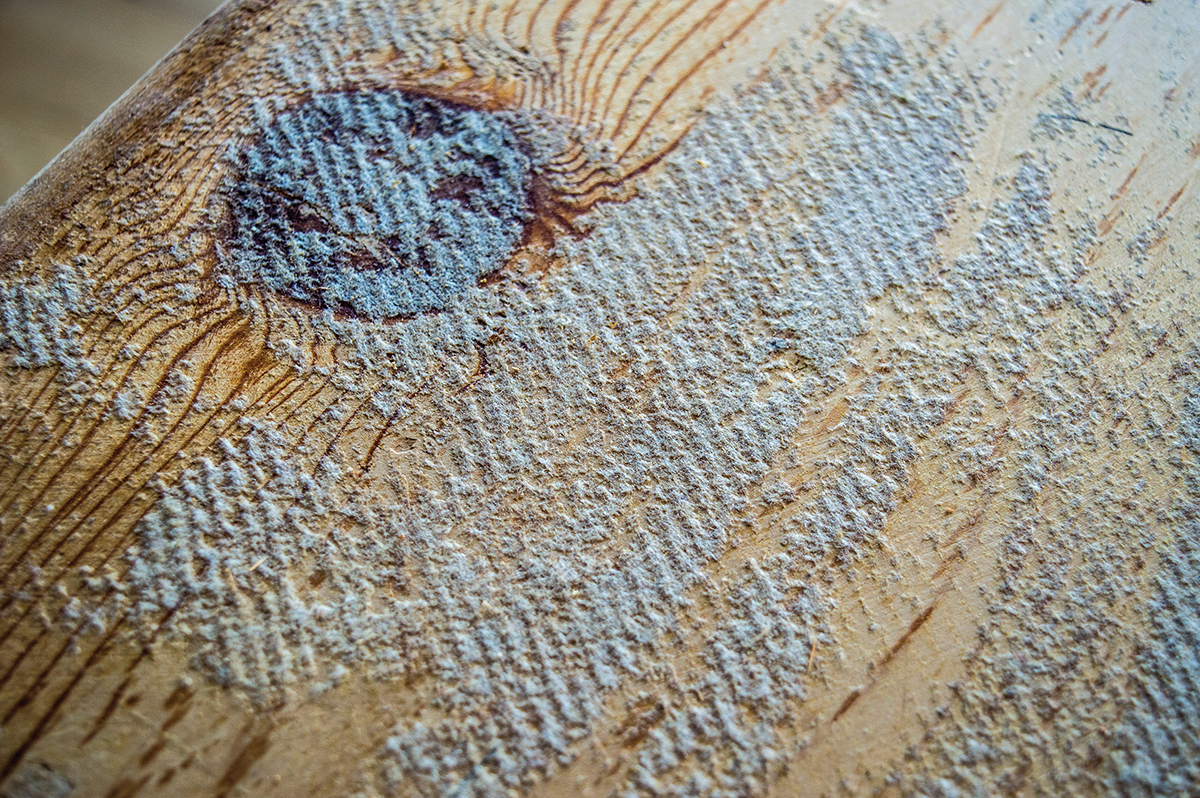
Residue on the cabinet shows that the Pro was originally covered with low-contrast tweed
Tweed needs
Stripping the tolex off turns out to be pretty easy because relatively little of it was glued to the cabinet in the first place. The exception being the tolex covering the front panel that is stuck on firmly. The overlaps show that this was the first piece to have been stuck on, and whoever did it went heavy on the glue.
Whatever they used was clearly good stuff, but it seems like they ran out pretty quickly and switched to contact adhesive instead. When that started running low, they ceased spreading the glue over the panels, and applied it only around the edges. By the time the back panels were being done, they’d resorted to hammering tacks.
The plywood front panel is in a sorry state and the surface will need to be restored before re-tweeding
Besides a load of sticky glue residue and some damage to the front panel’s outer layer, the cabinet turns out to be in decent shape with solid joints and no cracks. Traces of the original tweed can be found everywhere, but best of all is the discovery of a box of matches and fragments of an old invoice trapped under the tolex. It reads ‘Parks Cash Grocery, 222 South Sixth Street, Klamath Falls, Oregon’, so it seems reasonable to conclude that this Pro was in the vicinity when the tolex was applied.
A blade is used to scrape off he contact adhesive and I use an orbital sander to remove the remaining tweed glue from all the panels besides the front. Due to the damage on the front panel, which I suspect was inflicted when the tweed was first removed, I clean it up with a sanding block.
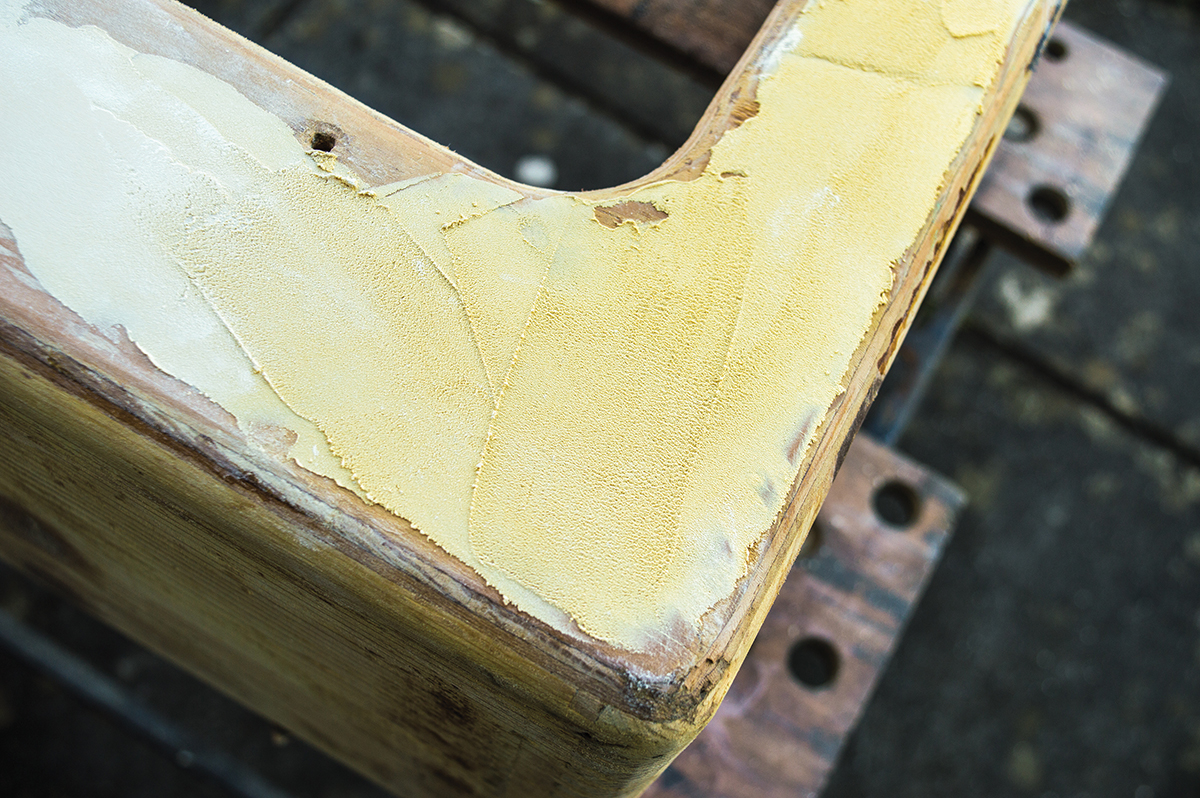
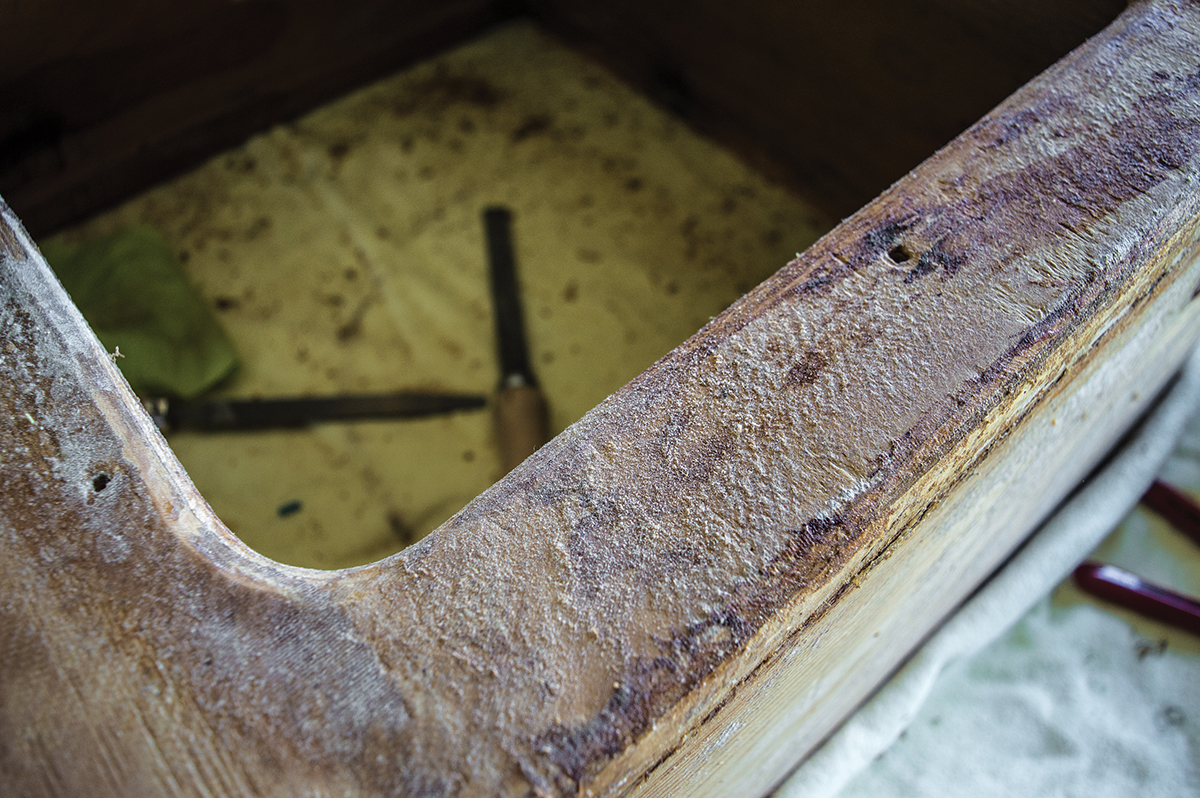
Two-pack filler is applied over most of the front panel before it is sanded flat
The front surface is very uneven so I apply two-pack wood filler all over the panel. Once it has hardened, I flat it back with a sanding block, mark any remaining low spots with a pencil, apply some more filler in targeted areas and sand again.
Eventually I’m left with a fairly flat surface and I repeat the filling and sanding process wherever I find any dents in the wood. After a thorough brush down and going over with a vacuum cleaner followed by tack cloth, the cabinet is ready for its re-tweeding.
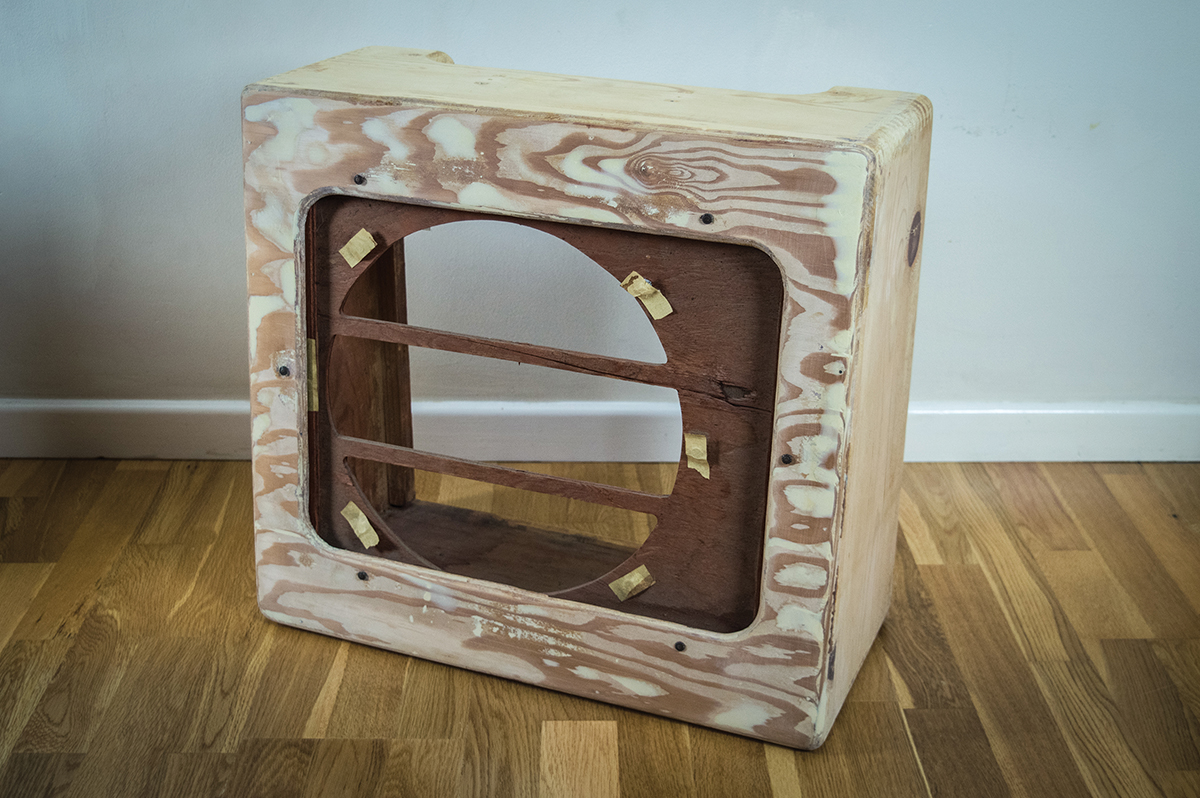
At last the cabinet is ready for re-tweeding and the filled areas show up as a light beige against the darker wood
Cover versions
My original intention was to do the re-tweed myself, but thinking it through, I decide against it. Given the opportunity to re-spray a ’51 Telecaster, I wouldn’t hesitate because I’ve sprayed, relic’d and restored so many guitars. However, I have never applied tolex or tweed to a cabinet, and every instinct tells me that a 1951 Fender Pro is an inappropriate place to start.
Instead I hand the cabinet over to Chris from Rift – a man who knows a thing or two about tweed in every respect. No doubt I will try my hand covering a cabinet at some point, and if I do, you’re almost certain to read all about it in TGM. When you do your own guitar and amp work, there’s no shame in accepting your limitations and letting people who are more experienced and skilled handle the make or break aspects of a project.
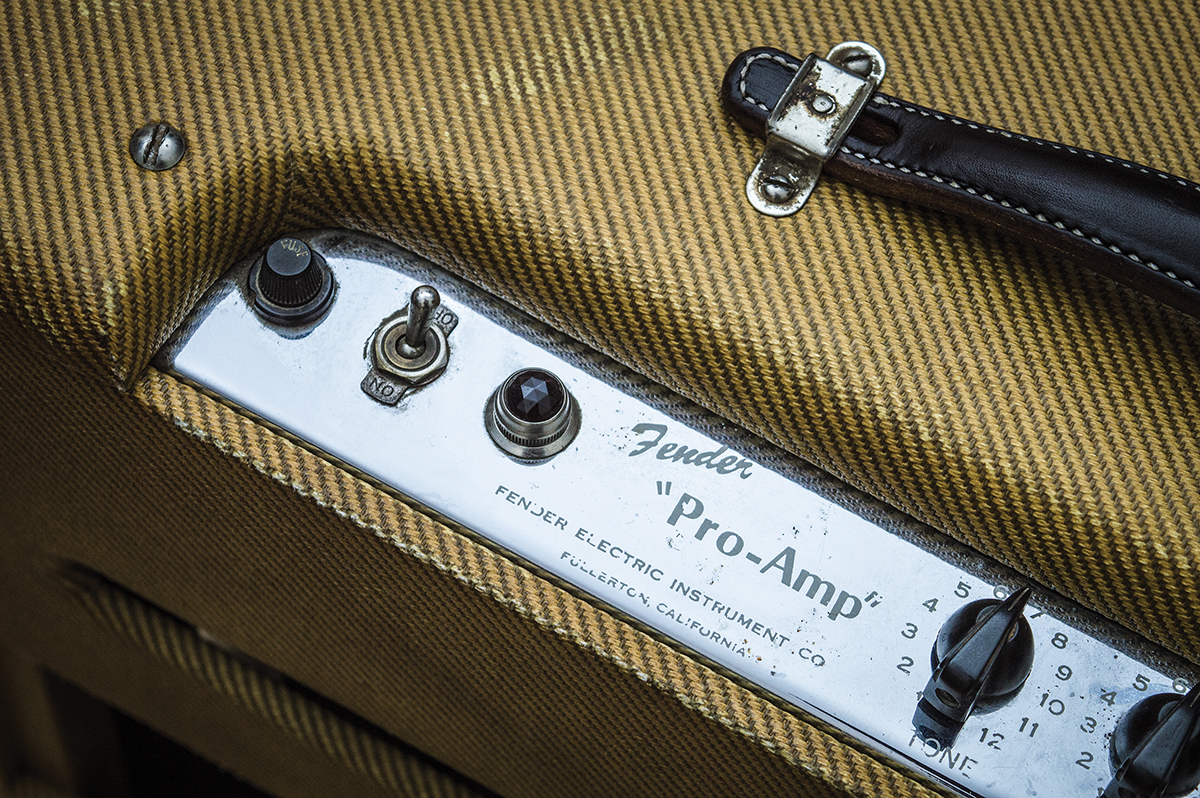
The control panel’s chrome plating and silk screening is in fine condition considering its age
It turns out handing it over to a professional was a wise move, because the cabinet looks fantastic when it returns. Fender amps from the very early 1950s would have had low-contrast tweed but the original tweed is no longer available. Instead this one is done with olive stripe tweed rather than the dark brown stripe. Fender amps of this vintage tend to be either very pale in colour, or a dark brownish orange. Since this isn’t low-contrast tweed, I decide to go for the latter.
After two coats of clear wax-free shellac, a proper rub down with a Scotch pad, a few coats of tinted clear nitro and some misted coats of tobacco brown, the colour looks about right. I follow that up with another Scotch pad treatment to knock back the glossiness and inflict some considered damage with a wood rasp. Before long, the TV Pro has acquired a certain ‘patina’ and I decide to stop and let Father Time take care of the rest.
The original magnet cover is fitted onto a repro Jensen P15N, but those speaker wires will need to be changed
Getting back together
The original Fender badge was missing, but the owner found a repro online. These badges are getting much harder to find and this one came from Italy. The original badge pins had penetrated all the way through the front panel, so I tap sewing pins through the holes from back to front.
The repro badge has a pin hole at each corner, which allows the badge to be placed over the pins. Confident that the badge is correctly positioned, I gently tap the badge fixing pins in from the front. Afterwards, the handle holes are located and the handle is reinstated. The owner manages to find some brown linen that is a pretty close match to original Fender speaker cloth and I staple it onto the baffle. The baffle is slipped over the six bolts and once all the baffle nuts are tightened, I re-install the speaker.
The output transformer was originally mounted on the actual speaker basket, but that’s no longer possible. Instead, I mount it onto the cabinet’s side wall using a couple of wood screws. With the chassis mounted, the valves back in their sockets and the back panels screwed on, the restoration is complete.
The handle fixings are original and, alongside some considered artificial ageing, a quality repro handle completes the look
Pro pricing
It may be interesting to consider the overall cost of the project. The amp itself cost £1,325 including shipping and import duties. The electronics needed a couple of hours of work to get the amp running safely and sounding good, plus a further £120 or so for the modern Jensen.
By that point the amp was perfectly usable, but with the re-tweed, relicing and reassembly factored in, the total cost has ended up closer to £2,000. The going prices for TV Pros in good original condition tend to be above £3,000 and well restored examples can be found for anywhere between £2,300 and £3,000.
The Pro is now worth more than the owner has spent on it and in all likelihood, it will increase in value. For reference, the narrow panel Fender Custom Pro reissue was priced at £2,299 when we reviewed it last year, and good luck finding a boutique repro for less than that.
Sonically, this Pro is something special. It’s like the grown up version of my ’51 5A3 Deluxe, with a similar overdrive characteristic, a wider frequency range, plus a more detailed and revealing quality. Even so, I can’t help wondering what it will sound like when that vintage Jensen eventually shows up…